

In this blog, you’ll learn to set up your own custom, serverless logging system using Google Apps Script and Google Docs. You’ll use a Google Apps Script to handle the HTTP requests and other business logic and store the logs in Google Docs.
Contents
Creating a Google Doc
First of all, create a new Google Doc in which you’ll store your logs. Get its ID that you’ll be using in your Google Apps Script project code.
Writing Code
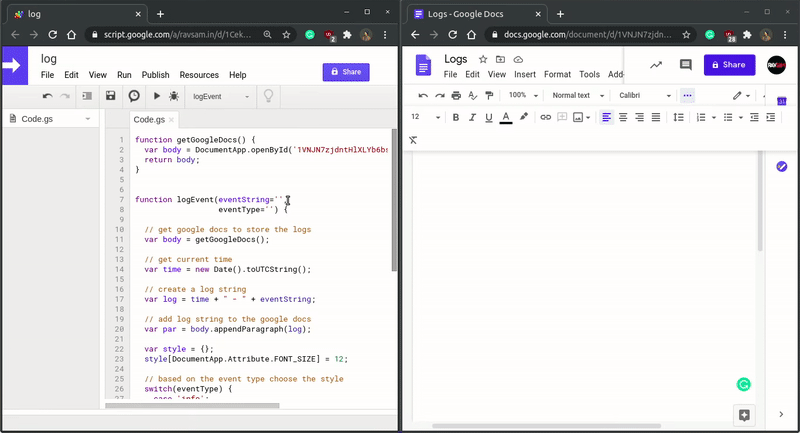
First, create a new Google Apps Script Project. Once you have created a new project, create a Main.gs file and add the following code to it:
function logEvent(eventString, eventType='info') {

  // get google docs to store the logs
  const body = DocumentApp.openById('google-docs-id').getBody()

  // get current time
  const time = new Date().toUTCString()

  // create a log string
  const log = time + ' - ' + eventString

  // add log string to the google docs
  body.appendParagraph(log)
}
In the above code, you have created a logEvent(eventString, eventType='info') function which takes in two parameters eventString, and eventType. In this function, you get the body of a Google Doc in which you want to store your logs. After that, you create a new string that contains the current time and the event string and append this log to the body of your Google Doc. At this point, you can try to run your function manually to see if anything happens at all.
It would be great if you can color code your logs to identify the type of event just by looking at them. Modify the logEvent function as in the following code:
function logEvent(eventString, eventType='info') {

  // get google docs to store the logs
  const body = DocumentApp.openById('google-docs-id').getBody()

  // get current time
  const time = new Date().toUTCString()

  // create a log string
  const log = time + ' - ' + eventString

  // add log string to the google docs
  const par = body.appendParagraph(log)

  // create a style object and add font size property
  let style = {}
  style[DocumentApp.Attribute.FONT_SIZE] = 12

  // based on the event type and font color property
  switch(eventType) {
    case 'info':
      style[DocumentApp.Attribute.FOREGROUND_COLOR] = '#0000ff'
      break
    case 'success':
      style[DocumentApp.Attribute.FOREGROUND_COLOR] = '#06ad00'
      break
    case 'warning':
      style[DocumentApp.Attribute.FOREGROUND_COLOR] = '#e67e00'
      break
    case 'error':
      style[DocumentApp.Attribute.FOREGROUND_COLOR] = '#ff0000'
      break
    default:
      style[DocumentApp.Attribute.FOREGROUND_COLOR] = '#000000'
      break
  }

  // apply the custom style the log string
  par.setAttributes(style)
}
In the above code, based on the value of eventType, you apply the styling to your log string. By default, each new event is associated with the info type.
Handling HTTP Requests
You are done with the core code of your script. The last step is to handle HTTP requests which you can make from any type of app like React Web App or a Flutter App.
Add the following code to the Main.js file:
// handles the get request to the server
function doPost(e) {
  try {
    // get query parameters
    const eventString = e.parameter['event_name']
    const eventType = e.parameter['event_type']

    // log the event
    logEvent(eventString, eventType)

    // return json success result
    return ContentService
          .createTextOutput(JSON.stringify({'result': 'success'}))
          .setMimeType(ContentService.MimeType.JSON)
    }
  }
  catch (e) {
    // return json failure result
    return ContentService
          .createTextOutput(JSON.stringify({'result': 'failure'}))
          .setMimeType(ContentService.MimeType.JSON)
    }
  }
}
The above code handles the POST request made to the Google Apps Script. Based on the script execution, a JSON response is sent back to the requesting app.
Once this is done, you can deploy the script as a Web App and use the Web App URL in your requesting app.
Results
Let’s see how well this custom serverless logging system works.
Awesome! Those color codings make the logs user-friendly. This kind of custom logging system can help you to debug your apps in production mode as well. You can also configure email or slack notification functionality for a particular kind of event so that your team gets notified of any irregularities in your apps.

