<?xml version="1.0" encoding="utf-8"?><feed xmlns="http://www.w3.org/2005/Atom" ><generator uri="https://jekyllrb.com/" version="4.3.4">Jekyll</generator><link href="https://www.ravsam.in/blog/feed.xml" rel="self" type="application/atom+xml" /><link href="https://www.ravsam.in/" rel="alternate" type="text/html" /><updated>2025-08-28T15:14:57+00:00</updated><id>https://www.ravsam.in/blog/feed.xml</id><title type="html">Best Web, Mobile Apps Development in India by RavSam Web Solutions | Blogs</title><subtitle>RavSam Web Solutions is an expert in Web Design, Web Development, Mobile Apps Development, Software Development, and Automation services.</subtitle><author><name>RavSam Web Solutions</name></author><entry><title type="html">How to Implement AI in Your Small Business - A Complete 2025 Guide</title><link href="https://www.ravsam.in/blog/how-to-implement-ai-in-your-small-business-a-complete-2025-guide/" rel="alternate" type="text/html" title="How to Implement AI in Your Small Business - A Complete 2025 Guide" /><published>2025-08-28T08:30:00+00:00</published><updated>2025-08-28T14:51:23+00:00</updated><id>https://www.ravsam.in/blog/how-to-implement-ai-in-your-small-business-a-complete-2025-guide</id><content type="html" xml:base="https://www.ravsam.in/blog/how-to-implement-ai-in-your-small-business-a-complete-2025-guide/"><![CDATA[<p>Artificial intelligence isn’t just for tech giants anymore. In 2025, small businesses across every industry are leveraging AI to streamline operations, enhance customer experiences, and boost profitability. If you’re wondering how to implement AI in your small business, this comprehensive guide will walk you through every step of the process.</p>

<h2 id="why-small-business-ai-implementation-matters-in-2025">Why Small Business AI Implementation Matters in 2025</h2>

<p>The AI revolution has reached a tipping point. According to recent studies, 73% of small businesses that have implemented AI report increased efficiency, while 67% see improved customer satisfaction within the first six months. More importantly, businesses using AI solutions show an average 15% increase in revenue growth compared to their non-AI counterparts.</p>

<p><strong>The competitive advantage is clear:</strong> Early AI adopters in the small business space are capturing market share while their competitors struggle with manual processes and outdated systems.</p>

<h2 id="step-1-identify-ai-opportunities-in-your-business">Step 1: Identify AI Opportunities in Your Business</h2>

<p>Before diving into artificial intelligence consulting or purchasing AI tools, you need to identify where AI can make the biggest impact in your operations.</p>

<h3 id="common-ai-implementation-areas-for-small-businesses">Common AI Implementation Areas for Small Businesses:</h3>

<p><strong>Customer Service &amp; Support</strong></p>

<ul>
  <li>Chatbots for 24/7 customer inquiries</li>
  <li>Automated ticket routing and prioritization</li>
  <li>Sentiment analysis for customer feedback</li>
</ul>

<p><strong>Sales &amp; Marketing</strong></p>

<ul>
  <li>Lead scoring and qualification</li>
  <li>Personalized email marketing campaigns</li>
  <li>Predictive analytics for customer behavior</li>
</ul>

<p><strong>Operations &amp; Inventory</strong></p>

<ul>
  <li>Demand forecasting and inventory optimization</li>
  <li>Automated scheduling and resource allocation</li>
  <li>Quality control through computer vision</li>
</ul>

<p><strong>Financial Management</strong></p>

<ul>
  <li>Automated bookkeeping and expense categorization</li>
  <li>Fraud detection and risk assessment</li>
  <li>Cash flow prediction and budgeting</li>
</ul>

<h3 id="action-item-conduct-an-ai-readiness-assessment">Action Item: Conduct an AI Readiness Assessment</h3>

<p>Create a simple spreadsheet listing your current business processes. For each process, ask:</p>

<ol>
  <li>Is this task repetitive and rule-based?</li>
  <li>Do we have sufficient data to train an AI system?</li>
  <li>Would automation here save significant time or money?</li>
  <li>Could AI improve accuracy or customer experience?</li>
</ol>

<p>Processes scoring high on these criteria are prime candidates for AI implementation.</p>

<h2 id="step-2-choose-the-right-ai-solutions-for-your-budget">Step 2: Choose the Right AI Solutions for Your Budget</h2>

<p>Not all AI solutions require massive investments. In 2025, small business AI options range from affordable SaaS tools to custom implementations.</p>

<h3 id="budget-friendly-ai-tools-50-500month">Budget-Friendly AI Tools ($50-500/month):</h3>

<p><strong>Customer Relationship Management</strong></p>

<ul>
  <li>HubSpot’s AI-powered lead scoring</li>
  <li>Salesforce Einstein for small teams</li>
  <li>Pipedrive’s sales automation features</li>
</ul>

<p><strong>Marketing Automation</strong></p>

<ul>
  <li>Mailchimp’s predictive analytics</li>
  <li>Hootsuite’s AI content scheduling</li>
  <li>Canva’s AI design assistant</li>
</ul>

<p><strong>Business Operations</strong></p>

<ul>
  <li>QuickBooks’ AI bookkeeping features</li>
  <li>Calendly’s smart scheduling</li>
  <li>Zapier’s workflow automation</li>
</ul>

<h3 id="mid-range-solutions-500-2000month">Mid-Range Solutions ($500-2,000/month):</h3>

<ul>
  <li>Custom chatbot development</li>
  <li>Advanced analytics dashboards</li>
  <li>Inventory management AI systems</li>
  <li>Employee scheduling optimization</li>
</ul>

<h3 id="enterprise-level-implementations-2000month">Enterprise-Level Implementations ($2,000+/month):</h3>

<ul>
  <li>Custom machine learning models</li>
  <li>Computer vision quality control systems</li>
  <li>Predictive maintenance solutions</li>
  <li>Advanced customer analytics platforms</li>
</ul>

<h2 id="step-3-calculate-your-ai-implementation-roi">Step 3: Calculate Your AI Implementation ROI</h2>

<p>Smart small business owners measure twice and cut once. Before investing in AI, calculate your expected return on investment.</p>

<h3 id="roi-calculation-framework">ROI Calculation Framework:</h3>

<p><strong>Time Savings Value</strong></p>

<ul>
  <li>Hours saved per week × hourly wage × 52 weeks = Annual time savings value</li>
  <li>Example: 10 hours/week × $25/hour × 52 = $13,000 annual savings</li>
</ul>

<p><strong>Revenue Enhancement</strong></p>

<ul>
  <li>Improved conversion rates × average customer value × annual customers</li>
  <li>Example: 5% conversion improvement × $500 average sale × 1,000 customers = $25,000</li>
</ul>

<p><strong>Cost Reductions</strong></p>

<ul>
  <li>Reduced errors, fewer returns, lower customer service costs</li>
  <li>Example: 20% reduction in customer service calls × $50 per call × 2,000 calls = $20,000</li>
</ul>

<p><strong>Total Annual Benefit: $58,000</strong>
<strong>Annual AI Investment: $12,000</strong>
<strong>ROI: 383%</strong></p>

<p>This framework helps justify AI investments to stakeholders and ensures you’re making data-driven decisions.</p>

<h2 id="step-4-implementation-best-practices">Step 4: Implementation Best Practices</h2>

<p>Successful AI implementation follows proven methodologies. Here’s how to ensure your small business AI project succeeds:</p>

<h3 id="phase-1-planning-and-preparation-weeks-1-2">Phase 1: Planning and Preparation (Weeks 1-2)</h3>

<ul>
  <li>Define clear objectives and success metrics</li>
  <li>Assess data quality and availability</li>
  <li>Identify key stakeholders and champions</li>
  <li>Create an implementation timeline</li>
</ul>

<h3 id="phase-2-pilot-testing-weeks-3-6">Phase 2: Pilot Testing (Weeks 3-6)</h3>

<ul>
  <li>Start with a small, low-risk use case</li>
  <li>Test with a limited user group</li>
  <li>Gather feedback and iterate quickly</li>
  <li>Document lessons learned</li>
</ul>

<h3 id="phase-3-full-deployment-weeks-7-10">Phase 3: Full Deployment (Weeks 7-10)</h3>

<ul>
  <li>Roll out to all relevant users</li>
  <li>Provide comprehensive training</li>
  <li>Monitor performance metrics closely</li>
  <li>Establish ongoing support processes</li>
</ul>

<h3 id="phase-4-optimization-and-scaling-weeks-11">Phase 4: Optimization and Scaling (Weeks 11+)</h3>

<ul>
  <li>Analyze performance data</li>
  <li>Fine-tune algorithms and processes</li>
  <li>Identify additional AI opportunities</li>
  <li>Plan next implementation phase</li>
</ul>

<h2 id="real-world-success-stories">Real-World Success Stories</h2>

<p><strong>Case Study 1: Local Restaurant Chain</strong>
Challenge: Managing inventory across 5 locations
AI Solution: Predictive analytics for demand forecasting
Results: 30% reduction in food waste, 15% increase in profit margins</p>

<p><strong>Case Study 2: Manufacturing Startup</strong>
Challenge: Quality control consistency
AI Solution: Computer vision inspection system
Results: 95% defect detection accuracy, 50% reduction in manual inspection time</p>

<p><strong>Case Study 3: E-commerce Retailer</strong>
Challenge: Customer service scalability
AI Solution: Intelligent chatbot with human handoff
Results: 80% of inquiries resolved automatically, 24/7 customer support coverage</p>

<h2 id="common-implementation-pitfalls-to-avoid">Common Implementation Pitfalls to Avoid</h2>

<p>Learning from others’ mistakes can save you time and money:</p>

<ol>
  <li><strong>Starting Too Big</strong>: Begin with simple, high-impact use cases</li>
  <li><strong>Ignoring Data Quality</strong>: Clean, organized data is essential for AI success</li>
  <li><strong>Skipping User Training</strong>: Even the best AI tools fail without proper adoption</li>
  <li><strong>Unrealistic Expectations</strong>: AI is powerful but not magic—set realistic timelines</li>
  <li><strong>Going It Alone</strong>: Partner with experienced AI consultants for complex implementations</li>
</ol>

<h2 id="getting-started-your-next-steps">Getting Started: Your Next Steps</h2>

<p>Ready to implement AI in your small business? Here’s your action plan:</p>

<p><strong>Week 1:</strong></p>

<ul>
  <li>Complete the AI readiness assessment</li>
  <li>Research 3-5 relevant AI tools for your industry</li>
  <li>Calculate potential ROI for your top opportunities</li>
</ul>

<p><strong>Week 2:</strong></p>

<ul>
  <li>Schedule demos with AI solution providers</li>
  <li>Consult with artificial intelligence consulting experts</li>
  <li>Create an implementation budget and timeline</li>
</ul>

<p><strong>Week 3:</strong></p>

<ul>
  <li>Select your first AI implementation</li>
  <li>Begin pilot testing with a small team</li>
  <li>Document your process for future scaling</li>
</ul>

<h2 id="why-partner-with-ai-consulting-experts">Why Partner with AI Consulting Experts</h2>

<p>While many AI tools are user-friendly, working with experienced artificial intelligence consulting professionals can accelerate your success and avoid costly mistakes. Professional AI consultants bring:</p>

<ul>
  <li>Industry-specific expertise and best practices</li>
  <li>Technical knowledge for complex integrations</li>
  <li>Objective vendor evaluation and selection</li>
  <li>Ongoing support and optimization services</li>
  <li>Strategic guidance for long-term AI adoption</li>
</ul>

<p>The investment in professional AI consulting often pays for itself through faster implementation, better tool selection, and avoiding common pitfalls.</p>

<h2 id="conclusion-the-future-is-ai-powered">Conclusion: The Future is AI-Powered</h2>

<p>Small business AI implementation is no longer a luxury—it’s a necessity for staying competitive in 2025 and beyond. By following this step-by-step guide, calculating your ROI, and learning from real-world examples, you can successfully integrate AI into your operations and unlock significant growth opportunities.</p>

<p>Remember, the goal isn’t to implement AI for its own sake, but to solve real business problems and create measurable value. Start small, measure results, and scale what works.</p>

<p>Ready to explore how AI can transform your small business? The journey begins with a single step—and the competitive advantages await those bold enough to take it.</p>

<hr />

<p><em>Need help implementing AI in your small business? RavSam Web Solutions specializes in artificial intelligence consulting for small and medium businesses. Contact us for a free AI readiness assessment and discover how we can help you leverage AI for growth.</em></p>

<p><strong>Related Resources:</strong></p>

<ul>
  <li>Small Business AI Tools Comparison Chart</li>
  <li>AI Implementation Checklist Template</li>
  <li>ROI Calculator Spreadsheet</li>
</ul>]]></content><author><name>Ravgeet Dhillon</name></author><category term="ai" /><category term="artificial-intelligence" /><category term="ai-consulting" /><category term="business-automation" /><category term="digital-transformation" /><category term="business-growth" /><summary type="html"><![CDATA[A step-by-step guide for small business owners to implement artificial intelligence solutions for competitive advantage in 2025.]]></summary><media:thumbnail xmlns:media="http://search.yahoo.com/mrss/" url="https://www.ravsam.in/assets/images/blogs/how-to-implement-ai-in-your-small-business-a-complete-2025-guide.png" /><media:content medium="image" url="https://www.ravsam.in/assets/images/blogs/how-to-implement-ai-in-your-small-business-a-complete-2025-guide.png" xmlns:media="http://search.yahoo.com/mrss/" /></entry><entry><title type="html">Create an App Information Component in Nuxt</title><link href="https://www.ravsam.in/blog/create-an-app-information-component-in-nuxt/" rel="alternate" type="text/html" title="Create an App Information Component in Nuxt" /><published>2021-12-20T12:00:00+00:00</published><updated>2025-08-18T07:51:05+00:00</updated><id>https://www.ravsam.in/blog/create-an-app-information-component-in-nuxt</id><content type="html" xml:base="https://www.ravsam.in/blog/create-an-app-information-component-in-nuxt/"><![CDATA[<p>You must have seen multiple apps which show the app’s information like <strong>app version</strong> and <strong>last updated at time</strong> in their footers or via a floating action button. In this tutorial, you’ll learn to create a component to show such kind of information in a Nuxt app.</p>

<h6 id="contents">Contents</h6>

<ul>
  <li><a href="#prerequisites">Prerequisites</a></li>
  <li><a href="#reading-app-information-files">Reading App Information Files</a></li>
  <li><a href="#creating-an-app-information-component">Creating an App Information Component</a></li>
  <li><a href="#conclusion">Conclusion</a></li>
</ul>

<h2 id="prerequisites">Prerequisites</h2>

<p>For this tutorial, it is assumed that you have already set up a Nuxt app and have a manual or automated way of adding <strong>.version</strong> and <strong>.last-updated-at</strong> files to your project.</p>

<p>We build our Nuxt app using Github Actions. In our workflow, we have set up a system that automatically determines the <em>next release version</em> and adds it to the <strong>.version</strong> file. At the same time, it also creates a <strong>.last-updated-at</strong> file and adds to it the <em>build date and time</em>.</p>

<h2 id="reading-app-information-files">Reading App Information Files</h2>

<p>The first step is to be able to read the contents of <strong>.version</strong> and <strong>.last-updated-at</strong> files. The only place this can be done is the <strong>nuxt.config.js</strong>.</p>

<p>To read the files on the file system, first, you need to install the <a href="https://www.npmjs.com/package/fs">fs</a> NPM package. To do so, open your terminal, navigate to your project directory and run the following command:</p>

<div class="language-shell highlighter-rouge"><div class="highlight"><pre class="highlight"><code>npm <span class="nb">install </span>fs
</code></pre></div></div>

<p>Next, add the following code at the start of the <strong>nuxt.config.js</strong> file:</p>

<div class="language-js highlighter-rouge"><div class="highlight"><pre class="highlight"><code><span class="k">import</span> <span class="nx">fs</span> <span class="k">from</span> <span class="dl">'</span><span class="s1">fs</span><span class="dl">'</span>

<span class="c1">// 1</span>
<span class="kd">let</span> <span class="nx">appVersion</span>
<span class="k">try</span> <span class="p">{</span>
  <span class="nx">appVersion</span> <span class="o">=</span> <span class="nx">fs</span><span class="p">.</span><span class="nf">readFileSync</span><span class="p">(</span><span class="dl">'</span><span class="s1">./.version</span><span class="dl">'</span><span class="p">,</span> <span class="dl">'</span><span class="s1">utf8</span><span class="dl">'</span><span class="p">)</span>
<span class="p">}</span> <span class="k">catch </span><span class="p">(</span><span class="nx">err</span><span class="p">)</span> <span class="p">{</span>
  <span class="nx">appVersion</span> <span class="o">=</span> <span class="dl">'</span><span class="s1">dev</span><span class="dl">'</span>
<span class="p">}</span>

<span class="c1">// 2</span>
<span class="kd">let</span> <span class="nx">appLastUpdatedAt</span>
<span class="k">try</span> <span class="p">{</span>
  <span class="nx">appLastUpdatedAt</span> <span class="o">=</span> <span class="nx">fs</span><span class="p">.</span><span class="nf">readFileSync</span><span class="p">(</span><span class="dl">'</span><span class="s1">./.last-updated-at</span><span class="dl">'</span><span class="p">,</span> <span class="dl">'</span><span class="s1">utf8</span><span class="dl">'</span><span class="p">)</span>
<span class="p">}</span> <span class="k">catch </span><span class="p">(</span><span class="nx">err</span><span class="p">)</span> <span class="p">{</span>
  <span class="nx">appLastUpdatedAt</span> <span class="o">=</span> <span class="k">new</span> <span class="nc">Date</span><span class="p">()</span>
<span class="p">}</span>
</code></pre></div></div>

<p>In the above code:</p>

<ol>
  <li>You try to read the <strong>.version</strong> file using the <code class="language-plaintext highlighter-rouge">fs.readFileSync</code> method and assign the result to <code class="language-plaintext highlighter-rouge">appVersion</code>. In case the <strong>.version</strong> file doesn’t exist, an error occurs, so <code class="language-plaintext highlighter-rouge">appVersion</code> is set to <code class="language-plaintext highlighter-rouge">dev</code>.</li>
  <li>In the same way, you try to read the <strong>.last-updated-at</strong> file using the <code class="language-plaintext highlighter-rouge">fs.readFileSync</code> method and assign the result to <code class="language-plaintext highlighter-rouge">appVersion</code>. In case the <strong>.last-updated-at</strong> file doesn’t exist, an error occurs, so <code class="language-plaintext highlighter-rouge">appLastUpdatedAt</code> is set to the current time (<code class="language-plaintext highlighter-rouge">new Date()</code>).</li>
</ol>

<p>Finally, in the <code class="language-plaintext highlighter-rouge">export default</code> object of the <strong>nuxt.config.js</strong>, add the <code class="language-plaintext highlighter-rouge">appVersion</code> and <code class="language-plaintext highlighter-rouge">appLastUpdatedAt</code> variables to the <code class="language-plaintext highlighter-rouge">publicRuntimeConfig</code> object:</p>

<div class="language-js highlighter-rouge"><div class="highlight"><pre class="highlight"><code><span class="k">export</span> <span class="k">default</span> <span class="p">{</span>
  <span class="p">...</span>

  <span class="c1">// environment variables used by nuxt</span>
  <span class="na">publicRuntimeConfig</span><span class="p">:</span> <span class="p">{</span>
    <span class="nx">appVersion</span><span class="p">,</span>
    <span class="nx">appLastUpdatedAt</span><span class="p">,</span>
  <span class="p">},</span>
  <span class="p">...</span>
<span class="p">}</span>
</code></pre></div></div>

<p>By adding variables to <code class="language-plaintext highlighter-rouge">publicRuntimeConfig</code>, you can access them anywhere - both <em>client</em> and <em>server</em> side - in the Nuxt app using <code class="language-plaintext highlighter-rouge">$config.appVersion</code> and <code class="language-plaintext highlighter-rouge">$config.appLastUpdatedAt</code>.</p>

<h2 id="creating-an-app-information-component">Creating an App Information Component</h2>

<p>Now that your configuration is set, it’s time to create an app information component.</p>

<p>First, create an <strong>AppInfo.vue</strong> file in the <strong>components</strong> directory and add the following template code to it:</p>

<div class="language-vue highlighter-rouge"><div class="highlight"><pre class="highlight"><code><span class="nt">&lt;</span><span class="k">template</span><span class="nt">&gt;</span>
  <span class="nt">&lt;div&gt;</span>
    Version: <span class="nt">&lt;b&gt;</span><span class="si">{{</span> <span class="nx">$config</span><span class="p">.</span><span class="nx">appVersion</span> <span class="si">}}</span><span class="nt">&lt;/b&gt;</span>
    <span class="nt">&lt;br</span> <span class="nt">/&gt;</span>
    Updated at: <span class="nt">&lt;b&gt;</span><span class="si">{{</span> <span class="nx">$config</span><span class="p">.</span><span class="nx">appLastUpdatedAt</span> <span class="si">}}</span><span class="nt">&lt;/b&gt;</span>
  <span class="nt">&lt;/div&gt;</span>
<span class="nt">&lt;/</span><span class="k">template</span><span class="nt">&gt;</span>
</code></pre></div></div>

<p>Next, you can import this component in a <strong>layout</strong> or in a <strong>page</strong> by adding the following code:</p>

<div class="language-vue highlighter-rouge"><div class="highlight"><pre class="highlight"><code><span class="nt">&lt;</span><span class="k">template</span><span class="nt">&gt;</span>
  <span class="nt">&lt;app-info</span> <span class="nt">/&gt;</span>
<span class="nt">&lt;/</span><span class="k">template</span><span class="nt">&gt;</span>
</code></pre></div></div>

<p>Finally, restart your Nuxt app by running the following command in your terminal:</p>

<div class="language-shell highlighter-rouge"><div class="highlight"><pre class="highlight"><code>npm run dev
</code></pre></div></div>

<p>Open your app in the browser and you’ll get something like this:</p>

<figure class="mb-0 w-100 rounded">
    <img src="https://www.ravsam.in/assets/images/resized/20/app-info-component-nuxt.png" width="100%" class="img-fluid mb-4 rounded blur-up lazyautosizes lazyload" sizes="auto" alt="App Information component in a Nuxt app" style="" data-srcset="            https://www.ravsam.in/assets/images/resized/20/app-info-component-nuxt.png 20w,            https://www.ravsam.in/assets/images/resized/64/app-info-component-nuxt.png 64w,            https://www.ravsam.in/assets/images/resized/576/app-info-component-nuxt.png 576w,            https://www.ravsam.in/assets/images/blog-assets/app-info-component-nuxt.png 700w" />
    
</figure>

<p>We have skipped the styling part as you can style the app information component as per your liking.</p>

<h2 id="conclusion">Conclusion</h2>

<p>That’s it! You have successfully implemented an app information component in your Nuxt app. In the same way, you can add things like <strong>Changelog</strong>, <strong>What’s New</strong>, and more to your app by taking the help of <code class="language-plaintext highlighter-rouge">publicRuntimeConfig</code> in a Nuxt app.</p>]]></content><author><name>Ravgeet Dhillon</name></author><category term="development" /><category term="javascript" /><category term="nuxt" /><category term="vue" /><category term="jamstack" /><summary type="html"><![CDATA[Learn how to create a component to show the App Version and Last Updated At time in a Nuxt app.]]></summary><media:thumbnail xmlns:media="http://search.yahoo.com/mrss/" url="https://www.ravsam.in/assets/images/blogs/create-an-app-information-component-in-nuxt.png" /><media:content medium="image" url="https://www.ravsam.in/assets/images/blogs/create-an-app-information-component-in-nuxt.png" xmlns:media="http://search.yahoo.com/mrss/" /></entry><entry><title type="html">Build a Tip Calculator App in Flutter</title><link href="https://www.ravsam.in/blog/build-a-tip-calculator-app-in-flutter/" rel="alternate" type="text/html" title="Build a Tip Calculator App in Flutter" /><published>2021-09-27T10:00:00+00:00</published><updated>2025-08-18T07:51:05+00:00</updated><id>https://www.ravsam.in/blog/build-a-tip-calculator-app-in-flutter</id><content type="html" xml:base="https://www.ravsam.in/blog/build-a-tip-calculator-app-in-flutter/"><![CDATA[<p>In this tutorial, you’ll create a Tip Calculator app and learn some of the basics of developing a Flutter app. The app will let the user input - <strong>Bill Amount</strong> and <strong>Tip Percentage</strong>. Based on these values, it will calculate <strong>Tip Amount</strong> and <strong>Total Amount</strong>.</p>

<h6 id="contents">Contents</h6>

<ul>
  <li><a href="#getting-started">Getting Started</a></li>
  <li><a href="#creating-a-new-project">Creating a New Project</a></li>
  <li><a href="#launching-an-emulator-device">Launching an Emulator Device</a></li>
  <li><a href="#building-ui">Building UI</a>
    <ul>
      <li><a href="#adding-a-form-for-user-input">Adding a Form for User Input</a></li>
      <li><a href="#adding-a-container-for-calculations">Adding a Container for Calculations</a></li>
    </ul>
  </li>
  <li><a href="#calculating-tip-and-total-amount">Calculating Tip and Total Amount</a>
    <ul>
      <li><a href="#updating-state">Updating State</a></li>
      <li><a href="#updating-ui-on-user-input">Updating UI on User Input</a></li>
    </ul>
  </li>
  <li><a href="#testing-the-app-manually">Testing the App Manually</a></li>
  <li><a href="#whats-next">What’s Next?</a></li>
</ul>

<h2 id="getting-started">Getting Started</h2>

<p>Flutter lets you create your project on many operating systems. For example, macOS, Linux, Windows, or even Chrome OS.</p>

<p>Before getting started with this project, you’ll need the following things:</p>
<ul>
  <li><a href="https://flutter.dev/docs/get-started/install">Flutter</a> - This tutorial uses Flutter 2.5</li>
  <li>IDE - <a href="https://code.visualstudio.com/download">VS Code</a> or <a href="https://developer.android.com/studio">Android Studio</a> - This tutorial uses VS Code.</li>
  <li><a href="https://dart.dev/">Dart</a> - This tutorial uses Flutter 2.13</li>
</ul>

<blockquote class="alert alert-info">
  <p>You can download the code used in this tutorial from this <a href="https://github.com/ravgeetdhillon/flutter-tip-calculator">GitHub repository</a>.</p>
</blockquote>

<h2 id="creating-a-new-project">Creating a New Project</h2>

<p>The first step is to create a new Flutter project. Open your terminal, navigate to a path of your choice and run the following command:</p>

<div class="language-shell highlighter-rouge"><div class="highlight"><pre class="highlight"><code>flutter create tip_calculator
</code></pre></div></div>

<p>Once your project is set up, navigate into the project directory and open it in your IDE. For VS Code, you can run the following commands:</p>

<div class="language-shell highlighter-rouge"><div class="highlight"><pre class="highlight"><code><span class="nb">cd </span>tip_calculator
code <span class="nb">.</span>
</code></pre></div></div>

<p>Locate <strong>lib/main.dart</strong> file and you’ll find a lot of boilerplate code written for you. You are here to learn to write code on your own, so replace the file contents with the following code:</p>

<div class="language-dart highlighter-rouge"><div class="highlight"><pre class="highlight"><code><span class="kn">import</span> <span class="s">'package:flutter/material.dart'</span><span class="o">;</span>

<span class="kt">void</span> <span class="nf">main</span><span class="p">()</span> <span class="p">{</span>
  <span class="n">runApp</span><span class="p">(</span><span class="kd">const</span> <span class="n">MyApp</span><span class="p">());</span>
<span class="p">}</span>

<span class="kd">class</span> <span class="nc">MyApp</span> <span class="kd">extends</span> <span class="n">StatelessWidget</span> <span class="p">{</span>
  <span class="kd">const</span> <span class="n">MyApp</span><span class="p">({</span><span class="n">Key</span><span class="o">?</span> <span class="n">key</span><span class="p">})</span> <span class="o">:</span> <span class="k">super</span><span class="p">(</span><span class="nl">key:</span> <span class="n">key</span><span class="p">);</span>
  
  <span class="nd">@override</span>
  <span class="n">Widget</span> <span class="n">build</span><span class="p">(</span><span class="n">BuildContext</span> <span class="n">context</span><span class="p">)</span> <span class="p">{</span>
    <span class="k">return</span> <span class="n">MaterialApp</span><span class="p">(</span>
      <span class="nl">title:</span> <span class="s">'Tip Calculator'</span><span class="p">,</span>
      <span class="nl">theme:</span> <span class="n">ThemeData</span><span class="p">(</span><span class="nl">primarySwatch:</span> <span class="n">Colors</span><span class="o">.</span><span class="na">green</span><span class="p">),</span>
      <span class="nl">home:</span> <span class="kd">const</span> <span class="n">FormView</span><span class="p">(),</span>
    <span class="p">);</span>
  <span class="p">}</span>
<span class="p">}</span>
</code></pre></div></div>

<p>As you can see in the above code, you need a <code class="language-plaintext highlighter-rouge">FormView</code> screen as the home page of your app. So in the <strong>lib/main.dart</strong>, add the following code:</p>

<div class="language-dart highlighter-rouge"><div class="highlight"><pre class="highlight"><code><span class="kd">class</span> <span class="nc">FormView</span> <span class="kd">extends</span> <span class="n">StatefulWidget</span> <span class="p">{</span>
  <span class="kd">const</span> <span class="n">FormView</span><span class="p">({</span><span class="n">Key</span><span class="o">?</span> <span class="n">key</span><span class="p">})</span> <span class="o">:</span> <span class="k">super</span><span class="p">(</span><span class="nl">key:</span> <span class="n">key</span><span class="p">);</span>
  
  <span class="nd">@override</span>
  <span class="n">_FormViewState</span> <span class="n">createState</span><span class="p">()</span> <span class="o">=</span><span class="p">&gt;</span> <span class="n">_FormViewState</span><span class="p">();</span>
<span class="p">}</span>

<span class="kd">class</span> <span class="nc">_FormViewState</span> <span class="kd">extends</span> <span class="n">State</span><span class="p">&lt;</span><span class="n">FormView</span><span class="p">&gt;</span> <span class="p">{</span>
  <span class="nd">@override</span>
  <span class="kt">void</span> <span class="n">initState</span><span class="p">()</span> <span class="p">{</span>
    <span class="k">super</span><span class="o">.</span><span class="na">initState</span><span class="p">();</span>
  <span class="p">}</span>
  
  <span class="nd">@override</span>
  <span class="n">Widget</span> <span class="n">build</span><span class="p">(</span><span class="n">BuildContext</span> <span class="n">context</span><span class="p">)</span> <span class="p">{</span>
    <span class="k">return</span> <span class="n">Scaffold</span><span class="p">(</span>
      <span class="nl">appBar:</span> <span class="n">AppBar</span><span class="p">(</span>
        <span class="nl">title:</span> <span class="kd">const</span> <span class="n">Text</span><span class="p">(</span><span class="s">'Tip Calculator'</span><span class="p">),</span>
      <span class="p">),</span>
    <span class="p">);</span>
  <span class="p">}</span>
  
  <span class="nd">@override</span>
  <span class="kt">void</span> <span class="n">dispose</span><span class="p">()</span> <span class="p">{</span>
    <span class="k">super</span><span class="o">.</span><span class="na">dispose</span><span class="p">();</span>
  <span class="p">}</span>
<span class="p">}</span>
</code></pre></div></div>

<p>At this point, you have a <code class="language-plaintext highlighter-rouge">MyApp</code> class which is a <strong>Stateless widget</strong>, and a <code class="language-plaintext highlighter-rouge">FormView</code> class which is a <strong>Stateful widget</strong>.</p>

<p>You use a stateful widget when you want to keep track of the state of your app. The UI of a stateful widget is always the function of the state of the widget. For example, a cart page in an eCommerce app. In all other cases, a stateless widget is often handier. It always builds the same UI regardless of the state of the app. For example, the logo for your app on an appbar.</p>

<p>The beauty of Flutter is you can compose Stateful widgets in Stateless widgets. As you develop more and more Flutter apps, you’ll learn to use Stateless widgets more often.</p>

<h2 id="launching-an-emulator-device">Launching an Emulator Device</h2>

<p>At this point, you have enough code to launch your app without any build errors. The next thing you need to do is to connect to a physical device or an emulator. In this tutorial, you’ll work on an emulator.</p>

<p>In VS Code, open the <strong>Command Palette</strong> by pressing <strong>Control-Shift-P</strong>, type <strong>Flutter: Launch Emulator</strong>, and press <strong>Enter</strong>. Select a <strong>Mobile Device emulator</strong> and wait for it to initialize.</p>

<figure class="mb-0 w-100 rounded">
    <img src="https://www.ravsam.in/assets/images/resized/20/vscode-emulator.png" width="100%" class="img-fluid mb-4 rounded blur-up lazyautosizes lazyload" sizes="auto" alt="Menu for selecting Flutter emulator in VS Code" style="" data-srcset="            https://www.ravsam.in/assets/images/resized/20/vscode-emulator.png 20w,            https://www.ravsam.in/assets/images/resized/64/vscode-emulator.png 64w,            https://www.ravsam.in/assets/images/resized/576/vscode-emulator.png 576w,            https://www.ravsam.in/assets/images/blog-assets/vscode-emulator.png 733w" />
    
</figure>

<p>Once your emulator is up and running, press <strong>F5</strong> to build and run your Flutter app in debug mode. You’ll see the following screen pop up on your emulator:</p>

<figure class="mb-0 w-100 rounded">
    <img src="https://www.ravsam.in/assets/images/resized/20/flutter-tip-app-1.png" width="100%" class="img-fluid mb-4 rounded blur-up lazyautosizes lazyload" sizes="auto" alt="Flutter App with Appbar" style="" data-srcset="            https://www.ravsam.in/assets/images/resized/20/flutter-tip-app-1.png 20w,            https://www.ravsam.in/assets/images/resized/64/flutter-tip-app-1.png 64w,            https://www.ravsam.in/assets/images/resized/576/flutter-tip-app-1.png 576w,            https://www.ravsam.in/assets/images/resized/960/flutter-tip-app-1.png 960w,            https://www.ravsam.in/assets/images/blog-assets/flutter-tip-app-1.png 1100w" />
    
</figure>

<p>This screen contains an app bar with your app title.</p>

<h2 id="building-ui">Building UI</h2>

<p>Now your Flutter app is up and running, it is time to build the UI of the app. This app will have a <strong>Form</strong> with two <strong>Text fields</strong> and a <strong>Column</strong> for showing Tip Amount and Total Amount.</p>

<h3 id="adding-a-form-for-user-input">Adding a Form for User Input</h3>

<p>Update the <code class="language-plaintext highlighter-rouge">build</code> function of the <code class="language-plaintext highlighter-rouge">_FormViewState</code> class by adding <code class="language-plaintext highlighter-rouge">body</code> for your <code class="language-plaintext highlighter-rouge">FormView</code> as in the following code:</p>

<div class="language-dart highlighter-rouge"><div class="highlight"><pre class="highlight"><code><span class="nl">body:</span> <span class="n">Container</span><span class="p">(</span>
  <span class="nl">padding:</span> <span class="kd">const</span> <span class="n">EdgeInsets</span><span class="o">.</span><span class="na">all</span><span class="p">(</span><span class="mf">16.0</span><span class="p">),</span>
  <span class="nl">child:</span> <span class="n">Form</span><span class="p">(</span>
    <span class="nl">child:</span> <span class="n">Column</span><span class="p">(</span>
      <span class="nl">children:</span> <span class="p">[</span>
        <span class="n">TextFormField</span><span class="p">(</span>
          <span class="nl">decoration:</span> <span class="kd">const</span> <span class="n">InputDecoration</span><span class="p">(</span><span class="nl">labelText:</span> <span class="s">'Bill Amount'</span><span class="p">),</span>
          <span class="nl">keyboardType:</span> <span class="kd">const</span> <span class="n">TextInputType</span><span class="o">.</span><span class="na">numberWithOptions</span><span class="p">(</span>
            <span class="nl">decimal:</span> <span class="kc">true</span><span class="p">,</span>
          <span class="p">),</span>
        <span class="p">),</span>
        <span class="kd">const</span> <span class="n">SizedBox</span><span class="p">(</span><span class="nl">height:</span> <span class="mi">16</span><span class="p">),</span>
        <span class="n">TextFormField</span><span class="p">(</span>
          <span class="nl">decoration:</span> <span class="kd">const</span> <span class="n">InputDecoration</span><span class="p">(</span><span class="nl">labelText:</span> <span class="s">'Tip Percentage'</span><span class="p">),</span>
          <span class="nl">keyboardType:</span> <span class="kd">const</span> <span class="n">TextInputType</span><span class="o">.</span><span class="na">numberWithOptions</span><span class="p">(</span>
            <span class="nl">decimal:</span> <span class="kc">true</span><span class="p">,</span>
          <span class="p">),</span>
        <span class="p">),</span>
        <span class="kd">const</span> <span class="n">SizedBox</span><span class="p">(</span><span class="nl">height:</span> <span class="mi">32</span><span class="p">),</span>
        <span class="c1">// todo</span>
      <span class="p">],</span>
    <span class="p">),</span>
  <span class="p">),</span>
<span class="p">),</span>
</code></pre></div></div>

<p>Save your progress by pressing <strong>Control-S</strong> and you’ll experience the <strong>Hot Reload</strong> feature of Flutter. Whenever you update your code, Flutter only rebuilds the part of the widget tree which is dependent upon the changed code rather than rebuilding the entire app. This feature in Flutter is called Hot Reload which lets you develop applications rapidly.</p>

<p>Build and run:</p>

<figure class="mb-0 w-100 rounded">
    <img src="https://www.ravsam.in/assets/images/resized/20/flutter-tip-app-3.png" width="100%" class="img-fluid mb-4 rounded blur-up lazyautosizes lazyload" sizes="auto" alt="Flutter App with a Form" style="" data-srcset="            https://www.ravsam.in/assets/images/resized/20/flutter-tip-app-3.png 20w,            https://www.ravsam.in/assets/images/resized/64/flutter-tip-app-3.png 64w,            https://www.ravsam.in/assets/images/resized/576/flutter-tip-app-3.png 576w,            https://www.ravsam.in/assets/images/resized/960/flutter-tip-app-3.png 960w,            https://www.ravsam.in/assets/images/blog-assets/flutter-tip-app-3.png 1100w" />
    
</figure>

<p>At this point, you have a <code class="language-plaintext highlighter-rouge">Form</code> with two <code class="language-plaintext highlighter-rouge">TextFormField</code> widgets for Bill Amount and Tip Percentage.</p>

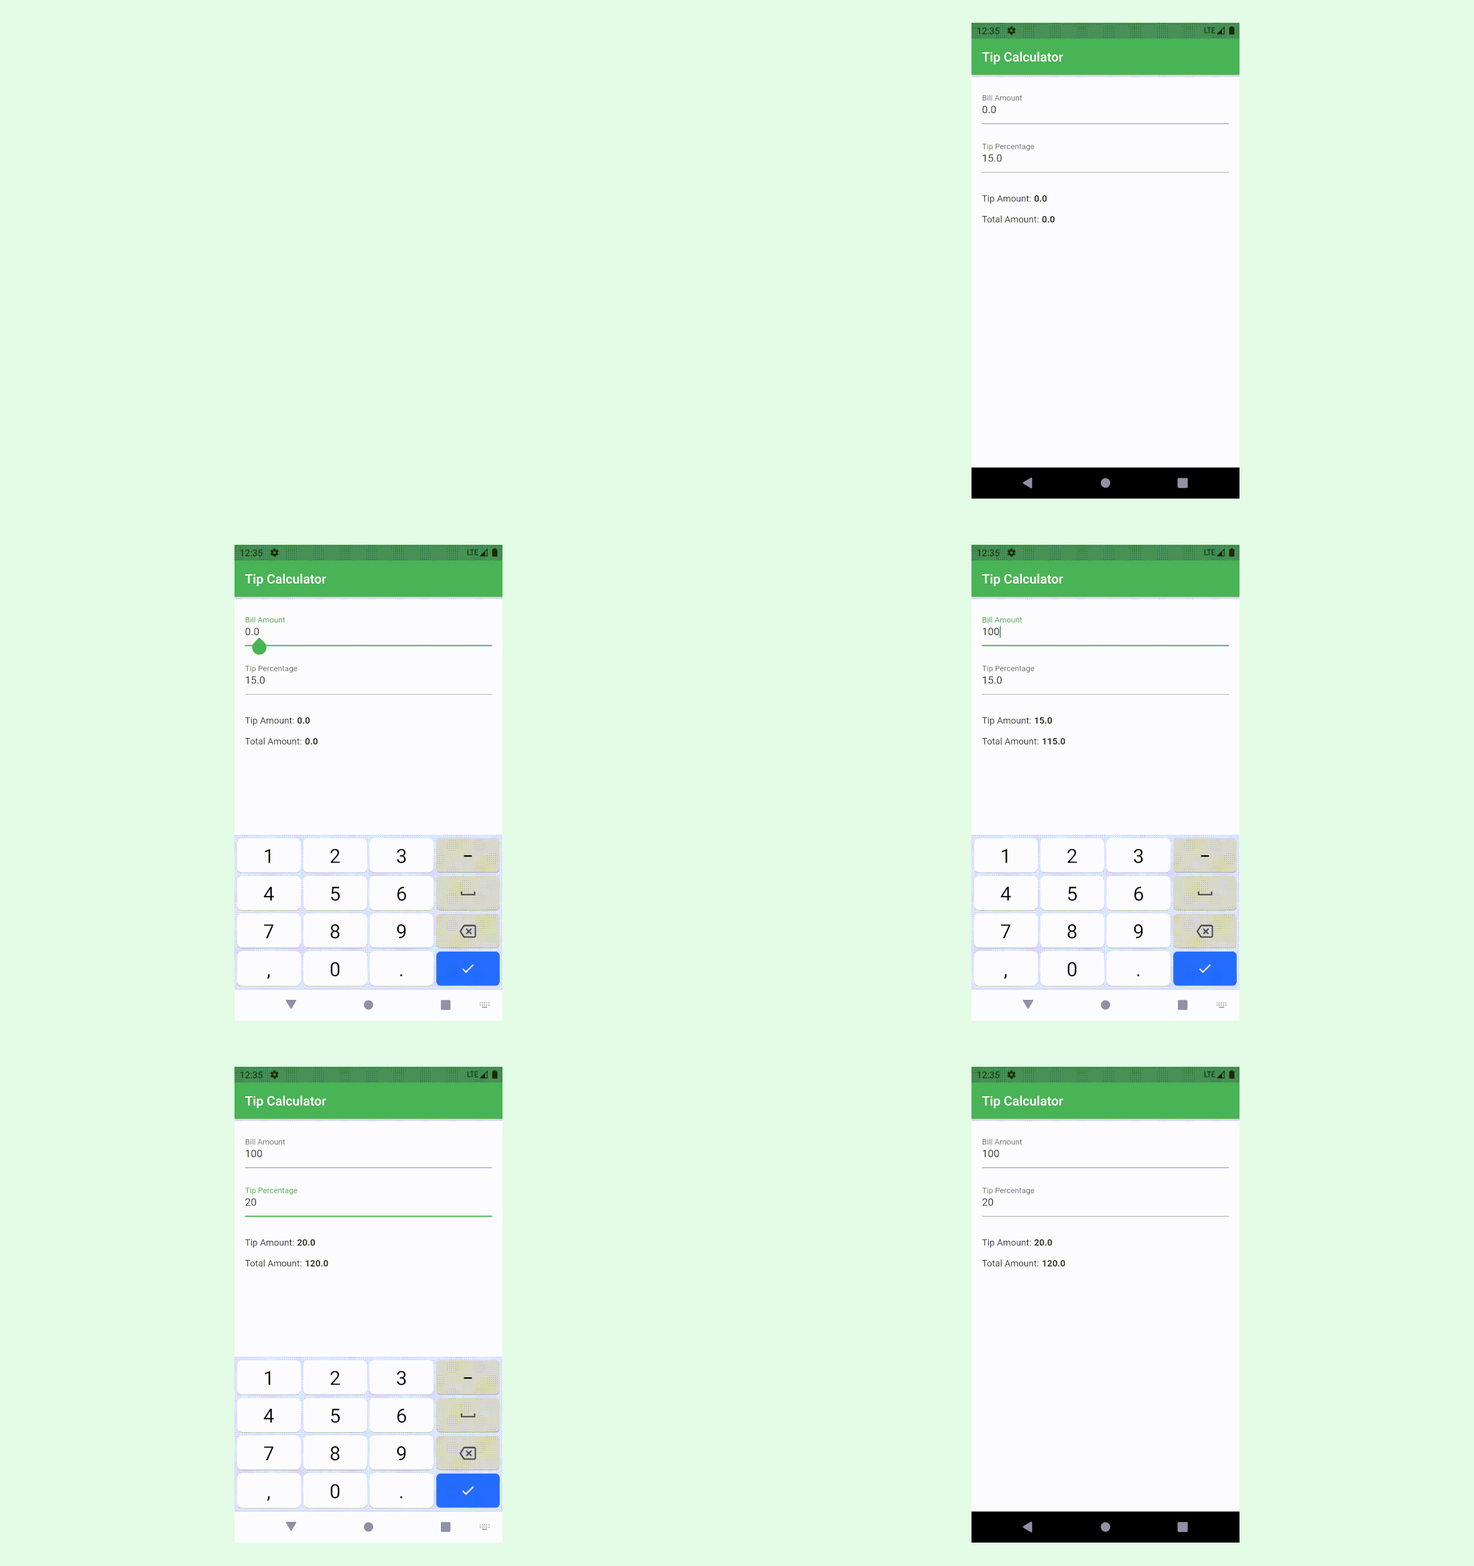
<p>One of the specifications of the app is to have default values of <strong>0</strong> and <strong>15</strong> for the Bill Amount and Total Amount fields respectively.</p>

<p>So, in the <code class="language-plaintext highlighter-rouge">_FormViewState</code> class, add the following two class variables:</p>

<div class="language-dart highlighter-rouge"><div class="highlight"><pre class="highlight"><code><span class="kt">double</span> <span class="n">_billAmount</span> <span class="o">=</span> <span class="mi">0</span><span class="p">;</span>
<span class="kt">double</span> <span class="n">_tipPercentage</span> <span class="o">=</span> <span class="mi">15</span><span class="p">;</span>
</code></pre></div></div>

<p>Update the <code class="language-plaintext highlighter-rouge">TextFormField</code> widget for Bill Amount as in the following snippet:</p>

<div class="language-dart highlighter-rouge"><div class="highlight"><pre class="highlight"><code><span class="nl">initialValue:</span> <span class="n">_billAmount</span><span class="o">.</span><span class="na">toString</span><span class="p">(),</span>
</code></pre></div></div>

<p>Then, update the <code class="language-plaintext highlighter-rouge">TextFormField</code> widget for Tip Percentage as in the following snippet:</p>

<div class="language-dart highlighter-rouge"><div class="highlight"><pre class="highlight"><code><span class="nl">initialValue:</span> <span class="n">_tipPercentage</span><span class="o">.</span><span class="na">toString</span><span class="p">(),</span>
</code></pre></div></div>

<p>This will assign a default value to both fields. Since <code class="language-plaintext highlighter-rouge">initialValue</code> needs to be a <em>string</em>, so you need to parse the <em>double</em> to a <em>string</em>.</p>

<p>At this point, if you try to do a Hot Reload, it won’t update your app for the changes you have made. This is because the global and static fields relate to the state and Hot Reload excludes any changes made to the app state. In this case, you need to <strong>Hot Restart</strong> your app.</p>

<p>In VS Code, build and run by pressing <strong>Control-Shift-F5</strong> for Hot restart:</p>

<p>At this point, you have successfully rendered your form with two text fields for taking the user input.</p>

<figure class="mb-0 w-100 rounded">
    <img src="https://www.ravsam.in/assets/images/resized/20/flutter-tip-app-2.png" width="100%" class="img-fluid mb-4 rounded blur-up lazyautosizes lazyload" sizes="auto" alt="Flutter App with Form fields having default values" style="" data-srcset="            https://www.ravsam.in/assets/images/resized/20/flutter-tip-app-2.png 20w,            https://www.ravsam.in/assets/images/resized/64/flutter-tip-app-2.png 64w,            https://www.ravsam.in/assets/images/resized/576/flutter-tip-app-2.png 576w,            https://www.ravsam.in/assets/images/resized/960/flutter-tip-app-2.png 960w,            https://www.ravsam.in/assets/images/blog-assets/flutter-tip-app-2.png 1100w" />
    
</figure>

<h3 id="adding-a-container-for-calculations">Adding a Container for Calculations</h3>

<p>Your form UI is complete at this stage. Next, you need to add some <code class="language-plaintext highlighter-rouge">Text</code> widgets to show the calculations for Tip Amount and Total Amount.</p>

<p>Add the following widget to the <code class="language-plaintext highlighter-rouge">build</code> function of the <code class="language-plaintext highlighter-rouge">_FormViewState</code>:</p>

<div class="language-dart highlighter-rouge"><div class="highlight"><pre class="highlight"><code><span class="n">Column</span><span class="p">(</span>
  <span class="nl">children:</span> <span class="p">[</span>
    <span class="n">Row</span><span class="p">(</span>
      <span class="nl">children:</span> <span class="p">[</span>
        <span class="kd">const</span> <span class="n">Text</span><span class="p">(</span><span class="s">'Tip Amount: '</span><span class="p">),</span>
        <span class="n">Text</span><span class="p">(</span>
          <span class="n">_totalTip</span><span class="o">.</span><span class="na">toString</span><span class="p">(),</span>
          <span class="nl">style:</span> <span class="kd">const</span> <span class="n">TextStyle</span><span class="p">(</span><span class="nl">fontWeight:</span> <span class="n">FontWeight</span><span class="o">.</span><span class="na">bold</span><span class="p">),</span>
        <span class="p">),</span>
      <span class="p">],</span>
    <span class="p">),</span>
    <span class="kd">const</span> <span class="n">SizedBox</span><span class="p">(</span><span class="nl">height:</span> <span class="mi">16</span><span class="p">),</span>
    <span class="n">Row</span><span class="p">(</span>
      <span class="nl">children:</span> <span class="p">[</span>
        <span class="kd">const</span> <span class="n">Text</span><span class="p">(</span><span class="s">'Total Amount: '</span><span class="p">),</span>
        <span class="n">Text</span><span class="p">(</span>
          <span class="n">_totalAmount</span><span class="o">.</span><span class="na">toString</span><span class="p">(),</span>
          <span class="nl">style:</span> <span class="kd">const</span> <span class="n">TextStyle</span><span class="p">(</span><span class="nl">fontWeight:</span> <span class="n">FontWeight</span><span class="o">.</span><span class="na">bold</span><span class="p">),</span>
        <span class="p">),</span>
      <span class="p">],</span>
    <span class="p">),</span>
  <span class="p">],</span>
<span class="p">),</span>
</code></pre></div></div>

<p>If you try to build and run your project, you’ll get some build errors. This is because, in the <code class="language-plaintext highlighter-rouge">Text</code> widgets, you are referencing the <code class="language-plaintext highlighter-rouge">_tipAmount</code> and <code class="language-plaintext highlighter-rouge">_totalAmount</code> variables which you haven’t declared yet.</p>

<p>So, in the <code class="language-plaintext highlighter-rouge">_FormViewState</code> class, add the following two class variables:</p>

<div class="language-dart highlighter-rouge"><div class="highlight"><pre class="highlight"><code><span class="kt">double</span> <span class="n">_totalTip</span> <span class="o">=</span> <span class="mi">0</span><span class="p">;</span>
<span class="kt">double</span> <span class="n">_totalAmount</span> <span class="o">=</span> <span class="mi">0</span><span class="p">;</span>
</code></pre></div></div>

<p>These variables store the calculations related to Tip Amount and Total Amount.</p>

<p>Build and run your project:</p>

<figure class="mb-0 w-100 rounded">
    <img src="https://www.ravsam.in/assets/images/resized/20/flutter-tip-app-4.png" width="100%" class="img-fluid mb-4 rounded blur-up lazyautosizes lazyload" sizes="auto" alt="Flutter App with Form and Text Labels" style="" data-srcset="            https://www.ravsam.in/assets/images/resized/20/flutter-tip-app-4.png 20w,            https://www.ravsam.in/assets/images/resized/64/flutter-tip-app-4.png 64w,            https://www.ravsam.in/assets/images/resized/576/flutter-tip-app-4.png 576w,            https://www.ravsam.in/assets/images/resized/960/flutter-tip-app-4.png 960w,            https://www.ravsam.in/assets/images/blog-assets/flutter-tip-app-4.png 1100w" />
    
</figure>

<p>At this point, you have successfully rendered a column containing two text labels to show calculations.</p>

<h2 id="calculating-tip-and-total-amount">Calculating Tip and Total Amount</h2>

<p>The app’s UI is complete at this stage. Next, you need to write business logic for calculating Tip Amount and Total Amount.</p>

<h3 id="updating-state">Updating State</h3>

<p>In the <code class="language-plaintext highlighter-rouge">_FormViewState</code> class, add the <code class="language-plaintext highlighter-rouge">_updateAmounts</code> function as in the following code snippet:</p>

<div class="language-dart highlighter-rouge"><div class="highlight"><pre class="highlight"><code><span class="kt">void</span> <span class="nf">_updateAmounts</span><span class="p">()</span> <span class="p">{</span>
  <span class="n">setState</span><span class="p">(()</span> <span class="p">{</span>
    <span class="n">_totalTip</span> <span class="o">=</span> <span class="n">_billAmount</span> <span class="o">*</span> <span class="n">_tipPercentage</span> <span class="o">/</span> <span class="mi">100</span><span class="p">;</span>
    <span class="n">_totalAmount</span> <span class="o">=</span> <span class="n">_billAmount</span> <span class="o">+</span> <span class="n">_totalTip</span><span class="p">;</span>
  <span class="p">});</span>
<span class="p">}</span>
</code></pre></div></div>

<p>You might ask what is <code class="language-plaintext highlighter-rouge">setState</code>? Well, <code class="language-plaintext highlighter-rouge">setState</code> is a function provided by a Stateful widget using which you can update the state of your app. Whenever you call <code class="language-plaintext highlighter-rouge">setState</code>, Flutter executes the <code class="language-plaintext highlighter-rouge">build</code> function associated with the Stateful widget. This updates the UI of your app.</p>

<p>In the <code class="language-plaintext highlighter-rouge">setState</code> function, you have used some basic maths for calculating the total tip and total amount.</p>

<p>In this app, you don’t have to worry about government tax. It is better to keep governments out when you are learning something.</p>

<h3 id="updating-ui-on-user-input">Updating UI on User Input</h3>

<p>One requirement of this app is to calculate Tip Amount and Total Amount as soon as the user starts typing in the form fields. For this effect, you can use the <code class="language-plaintext highlighter-rouge">onChanged</code> callback provided by the <code class="language-plaintext highlighter-rouge">TextFormField</code> widget. It runs whenever the user types or deletes anything in a form field. It provides the current value of a form field as a function parameter.</p>

<p>Add the following parameter to the <code class="language-plaintext highlighter-rouge">TextFormField</code> widget for Bill Amount:</p>

<div class="language-dart highlighter-rouge"><div class="highlight"><pre class="highlight"><code><span class="nl">onChanged:</span> <span class="p">(</span><span class="n">val</span><span class="p">)</span> <span class="p">{</span>
  <span class="n">_billAmount</span> <span class="o">=</span> <span class="kt">double</span><span class="o">.</span><span class="na">tryParse</span><span class="p">(</span><span class="n">val</span><span class="p">)</span> <span class="o">??</span> <span class="mi">0</span><span class="p">;</span>
  <span class="n">_updateAmounts</span><span class="p">();</span>
<span class="p">},</span>
</code></pre></div></div>

<p>Then, add the following parameter to the <code class="language-plaintext highlighter-rouge">TextFormField</code> widget for Tip Percentage:</p>

<div class="language-dart highlighter-rouge"><div class="highlight"><pre class="highlight"><code><span class="nl">onChanged:</span> <span class="p">(</span><span class="n">val</span><span class="p">)</span> <span class="p">{</span>
  <span class="n">_tipPercentage</span> <span class="o">=</span> <span class="kt">double</span><span class="o">.</span><span class="na">tryParse</span><span class="p">(</span><span class="n">val</span><span class="p">)</span> <span class="o">??</span> <span class="mi">0</span><span class="p">;</span>
  <span class="n">_updateAmounts</span><span class="p">();</span>
<span class="p">},</span>
</code></pre></div></div>

<p>Here what’s going on in the code above:</p>

<ul>
  <li>You cannot assign the <code class="language-plaintext highlighter-rouge">val</code> variable to the <code class="language-plaintext highlighter-rouge">_billAmount</code> variable as the former is a <em>string</em> and the latter is a <em>double</em>. Hence, you use the <code class="language-plaintext highlighter-rouge">double.tryParse</code> function to parse a <em>string</em> to a <em>double</em>.</li>
  <li>Since user input can be empty, so <code class="language-plaintext highlighter-rouge">val</code> can be empty, hence <code class="language-plaintext highlighter-rouge">double.tryParse</code> can return a <em>null</em> value. So, you use a null check operator(<code class="language-plaintext highlighter-rouge">??</code>) to assign <code class="language-plaintext highlighter-rouge">_billAmount</code> to 0 when the user input is empty.</li>
  <li>After determining the <code class="language-plaintext highlighter-rouge">_billAmount</code>, you call the <code class="language-plaintext highlighter-rouge">_updateAmounts</code> function. It calculates the Tip Amount and Bill Amount and updates the UI of the app.</li>
</ul>

<p>The same procedure applies to the working of the Tip Percentage text field.</p>

<h2 id="testing-the-app-manually">Testing the App Manually</h2>

<p>The coding part of your app is complete and the final step is to test whether it is doing the right calculations.</p>

<p>A good test covers some common use cases. You can test each of the below three test cases and make sure the app’s output matches the required output.</p>

<table>
  <thead>
    <tr>
      <th>Bill Amount(Input)</th>
      <th>Tip Percentage(Input)</th>
      <th>Tip Amount(Output)</th>
      <th>Total Amount(Output)</th>
    </tr>
  </thead>
  <tbody>
    <tr>
      <td>0</td>
      <td>15</td>
      <td>0</td>
      <td>0</td>
    </tr>
    <tr>
      <td>100</td>
      <td>15</td>
      <td>15</td>
      <td>115</td>
    </tr>
    <tr>
      <td>100</td>
      <td>20</td>
      <td>20</td>
      <td>120</td>
    </tr>
  </tbody>
</table>

<p>Before testing, make sure to use Hot Restart to build and run your app:</p>

<p><img src="https://www.ravsam.in/assets/images/blog-assets/flutter-tip-app.gif" alt="Flutter Tip Calculator App in Action" class="img-fluid mb-4 rounded" /></p>

<p>Congratulations! The app is showing accurate results. You are ready to use it when you go out for lunch and tip the waiter.</p>

<h2 id="whats-next">What’s Next?</h2>

<p>In this tutorial, you learned about creating UI in Flutter, Stateless and Stateful widgets, Hot Reloading, managing state, and updating UI. You can add more features to your app, like a <strong>Number of Friends</strong> field, which you can use to divide the total amount between your friends.</p>]]></content><author><name>Ravgeet Dhillon</name></author><category term="development" /><category term="flutter" /><category term="mobile-app" /><summary type="html"><![CDATA[Learn the basics of Flutter and Dart by building a Tip Calculator app in 10 minutes.]]></summary><media:thumbnail xmlns:media="http://search.yahoo.com/mrss/" url="https://www.ravsam.in/assets/images/blogs/build-a-tip-calculator-app-in-flutter.png" /><media:content medium="image" url="https://www.ravsam.in/assets/images/blogs/build-a-tip-calculator-app-in-flutter.png" xmlns:media="http://search.yahoo.com/mrss/" /></entry><entry><title type="html">Progress Bar in Next.js</title><link href="https://www.ravsam.in/blog/progress-bar-in-next-js/" rel="alternate" type="text/html" title="Progress Bar in Next.js" /><published>2021-07-21T08:45:00+00:00</published><updated>2025-08-18T07:51:05+00:00</updated><id>https://www.ravsam.in/blog/progress-bar-in-next-js</id><content type="html" xml:base="https://www.ravsam.in/blog/progress-bar-in-next-js/"><![CDATA[<p>Sometimes when you transition from one route to another, it takes a little time to do so due to different factors. Behind the scenes, it may be rendering a complex page component or doing an API call. In such cases, the app looks like it has frozen for some seconds and then suddenly transitions to the next route. This results in a poor UX. In such cases, it is better to add a progress bar to your app which gives your users a sense that something is loading.</p>

<p>In this tutorial, you’ll learn to implement a progress bar in a Next.js app.</p>

<h6 id="contents">Contents</h6>

<ul>
  <li><a href="#installing-nprogress">Installing NProgress</a></li>
  <li><a href="#understanding-basic-usage">Understanding Basic Usage</a></li>
  <li><a href="#results">Results</a></li>
</ul>

<h2 id="installing-nprogress">Installing NProgress</h2>

<p>The first thing you need to do is to install <a href="https://www.npmjs.com/package/nprogress">nprogress</a> NPM package.</p>

<p>To install <strong>nprogress</strong>, run the following command in your terminal:</p>

<div class="language-bash highlighter-rouge"><div class="highlight"><pre class="highlight"><code>npm i nprogress
</code></pre></div></div>

<h2 id="understanding-basic-usage">Understanding Basic Usage</h2>

<p>In the <strong>pages/_app.js</strong>, import the following modules:</p>

<div class="language-js highlighter-rouge"><div class="highlight"><pre class="highlight"><code><span class="k">import</span> <span class="nx">Router</span> <span class="k">from</span> <span class="dl">'</span><span class="s1">next/router</span><span class="dl">'</span>
<span class="k">import</span> <span class="nx">NProgress</span> <span class="k">from</span> <span class="dl">'</span><span class="s1">nprogress</span><span class="dl">'</span>
</code></pre></div></div>

<p>Now, you need to add some <em>router</em> events to control the behaviour of the progress bar.</p>

<p>In the <strong>pages/_app.js</strong>, add the following code:</p>

<div class="language-js highlighter-rouge"><div class="highlight"><pre class="highlight"><code><span class="nx">Router</span><span class="p">.</span><span class="nx">events</span><span class="p">.</span><span class="nf">on</span><span class="p">(</span><span class="dl">'</span><span class="s1">routeChangeStart</span><span class="dl">'</span><span class="p">,</span> <span class="p">()</span> <span class="o">=&gt;</span> <span class="nx">NProgress</span><span class="p">.</span><span class="nf">start</span><span class="p">())</span>
<span class="nx">Router</span><span class="p">.</span><span class="nx">events</span><span class="p">.</span><span class="nf">on</span><span class="p">(</span><span class="dl">'</span><span class="s1">routeChangeComplete</span><span class="dl">'</span><span class="p">,</span> <span class="p">()</span> <span class="o">=&gt;</span> <span class="nx">NProgress</span><span class="p">.</span><span class="nf">done</span><span class="p">())</span>
<span class="nx">Router</span><span class="p">.</span><span class="nx">events</span><span class="p">.</span><span class="nf">on</span><span class="p">(</span><span class="dl">'</span><span class="s1">routeChangeError</span><span class="dl">'</span><span class="p">,</span> <span class="p">()</span> <span class="o">=&gt;</span> <span class="nx">NProgress</span><span class="p">.</span><span class="nf">done</span><span class="p">())</span>
</code></pre></div></div>

<p>Depending upon your use case, you can remove the default loading spinner.</p>

<div class="language-js highlighter-rouge"><div class="highlight"><pre class="highlight"><code><span class="nx">NProgress</span><span class="p">.</span><span class="nf">configure</span><span class="p">({</span> <span class="na">showSpinner</span><span class="p">:</span> <span class="kc">false</span> <span class="p">})</span>
</code></pre></div></div>

<p>The final code for <strong>pages/_app.js</strong> will look like this:</p>

<div class="language-js highlighter-rouge"><div class="highlight"><pre class="highlight"><code><span class="k">import</span> <span class="nx">Router</span> <span class="k">from</span> <span class="dl">'</span><span class="s1">next/router</span><span class="dl">'</span>
<span class="k">import</span> <span class="nx">NProgress</span> <span class="k">from</span> <span class="dl">'</span><span class="s1">nprogress</span><span class="dl">'</span>

<span class="nx">Router</span><span class="p">.</span><span class="nx">events</span><span class="p">.</span><span class="nf">on</span><span class="p">(</span><span class="dl">'</span><span class="s1">routeChangeStart</span><span class="dl">'</span><span class="p">,</span> <span class="p">()</span> <span class="o">=&gt;</span> <span class="nx">NProgress</span><span class="p">.</span><span class="nf">start</span><span class="p">())</span>
<span class="nx">Router</span><span class="p">.</span><span class="nx">events</span><span class="p">.</span><span class="nf">on</span><span class="p">(</span><span class="dl">'</span><span class="s1">routeChangeComplete</span><span class="dl">'</span><span class="p">,</span> <span class="p">()</span> <span class="o">=&gt;</span> <span class="nx">NProgress</span><span class="p">.</span><span class="nf">done</span><span class="p">())</span>
<span class="nx">Router</span><span class="p">.</span><span class="nx">events</span><span class="p">.</span><span class="nf">on</span><span class="p">(</span><span class="dl">'</span><span class="s1">routeChangeError</span><span class="dl">'</span><span class="p">,</span> <span class="p">()</span> <span class="o">=&gt;</span> <span class="nx">NProgress</span><span class="p">.</span><span class="nf">done</span><span class="p">())</span>

<span class="nx">NProgress</span><span class="p">.</span><span class="nf">configure</span><span class="p">({</span> <span class="na">showSpinner</span><span class="p">:</span> <span class="kc">false</span> <span class="p">})</span>

<span class="kd">function</span> <span class="nf">MyApp</span><span class="p">({</span> <span class="nx">Component</span><span class="p">,</span> <span class="nx">pageProps</span> <span class="p">})</span> <span class="p">{</span>
  <span class="k">return</span> <span class="o">&lt;</span><span class="nx">Component</span> <span class="p">{...</span><span class="nx">pageProps</span><span class="p">}</span> <span class="sr">/</span><span class="err">&gt;
</span><span class="p">}</span>

<span class="k">export</span> <span class="k">default</span> <span class="nx">MyApp</span>
</code></pre></div></div>

<h2 id="results">Results</h2>

<p>At this point, you are done with the code and the final step is to test your app.</p>

<p>Go to your Next.js app and navigate to a new route. Your progress bar will be displayed like this:</p>

<p><img src="https://www.ravsam.in/assets/images/blog-assets/progress-bar-nextjs.gif" class="img-fluid mb-4 rounded" /></p>]]></content><author><name>Ravgeet Dhillon</name></author><category term="development" /><category term="react" /><category term="nextjs" /><category term="web-design" /><category term="web-development" /><summary type="html"><![CDATA[Display a Progress Bar on route changes in a Next.js app.]]></summary><media:thumbnail xmlns:media="http://search.yahoo.com/mrss/" url="https://www.ravsam.in/assets/images/blogs/progress-bar-in-next-js.png" /><media:content medium="image" url="https://www.ravsam.in/assets/images/blogs/progress-bar-in-next-js.png" xmlns:media="http://search.yahoo.com/mrss/" /></entry><entry><title type="html">Setup and Customize Bootstrap in Next.js</title><link href="https://www.ravsam.in/blog/setup-and-customize-bootstrap-in-nextjs/" rel="alternate" type="text/html" title="Setup and Customize Bootstrap in Next.js" /><published>2021-07-01T08:10:00+00:00</published><updated>2025-08-18T07:51:05+00:00</updated><id>https://www.ravsam.in/blog/setup-and-customize-bootstrap-in-nextjs</id><content type="html" xml:base="https://www.ravsam.in/blog/setup-and-customize-bootstrap-in-nextjs/"><![CDATA[<p>A few months back, we wrote a blog on <a href="/blog/how-to-add-customize-bootstrap-in-nuxtjs/">how to add and customize Bootstrap in Nuxt.js</a>. Today, we will learn how to set up Bootstrap in a Next.js project. We will also install <a href="https://www.npmjs.com/package/react-bootstrap">react-bootstrap</a> to use Bootstrap based React components.</p>

<h3 id="contents">Contents</h3>

<ul>
  <li><a href="#1-installing-bootstrap">1. Installing Bootstrap</a></li>
  <li><a href="#2-creating-a-custom-scss">2. Creating a Custom SCSS</a></li>
  <li><a href="#3-configuring-next-config">3. Configuring Next Config</a></li>
  <li><a href="#4-importing-bootstrap">4. Importing Bootstrap</a></li>
</ul>

<h2 id="1-installing-bootstrap">1. Installing Bootstrap</h2>

<p>Let us get started by installing the required NPM packages. We will install <a href="https://getbootstrap.com">bootstrap</a> and optionally <a href="https://react-bootstrap.github.io/">react-bootstrap</a>.</p>

<p>Since we are going to create custom <em>SCSS</em> files, we also need to install <em>node-sass</em>.</p>

<div class="language-bash highlighter-rouge"><div class="highlight"><pre class="highlight"><code>npm <span class="nb">install </span>bootstrap react-bootstrap
npm <span class="nb">install </span>node-sass <span class="nt">--save-dev</span>
</code></pre></div></div>

<h2 id="2-creating-a-custom-scss">2. Creating a Custom SCSS</h2>

<p>Let us now create a custom <em>scss</em> file in the <code class="language-plaintext highlighter-rouge">styles/scss</code> directory, and name it <em>global.scss</em>. In this file, we need to import Bootstrap’s <code class="language-plaintext highlighter-rouge">bootstrap.scss</code>. For the sake of simplicity, let us override the default colour system provided by Bootstrap.</p>

<div class="language-scss highlighter-rouge"><div class="highlight"><pre class="highlight"><code><span class="nv">$theme-colors</span><span class="p">:</span> <span class="p">(</span>
  <span class="s1">'primary'</span><span class="o">:</span> <span class="mh">#145bea</span><span class="o">,</span>
  <span class="s1">'secondary'</span><span class="o">:</span> <span class="mh">#833bec</span><span class="o">,</span>
  <span class="s1">'success'</span><span class="o">:</span> <span class="mh">#1ce1ac</span><span class="o">,</span>
  <span class="s1">'info'</span><span class="o">:</span> <span class="mh">#ff7d50</span><span class="o">,</span>
  <span class="s1">'warning'</span><span class="o">:</span> <span class="mh">#ffbe0b</span><span class="o">,</span>
  <span class="s1">'danger'</span><span class="o">:</span> <span class="mh">#ff007f</span><span class="o">,</span>
  <span class="s1">'light'</span><span class="o">:</span> <span class="mh">#c0ccda</span><span class="o">,</span>
  <span class="s1">'dark'</span><span class="o">:</span> <span class="mh">#001738</span><span class="o">,</span>
<span class="p">);</span>

<span class="k">@import</span> <span class="s1">'/node_modules/bootstrap/scss/bootstrap.scss'</span><span class="p">;</span>
</code></pre></div></div>

<h2 id="3-configuring-next-config">3. Configuring Next Config</h2>

<p>The best part about the newer versions of Next is that they provide built-in SASS/SCSS support. All we need to tell Next is where our styles are stored by configuring the <code class="language-plaintext highlighter-rouge">next.config.js</code> and adding the following piece of code:</p>

<div class="language-js highlighter-rouge"><div class="highlight"><pre class="highlight"><code><span class="kd">const</span> <span class="nx">path</span> <span class="o">=</span> <span class="nf">require</span><span class="p">(</span><span class="dl">'</span><span class="s1">path</span><span class="dl">'</span><span class="p">)</span>

<span class="nx">module</span><span class="p">.</span><span class="nx">exports</span> <span class="o">=</span> <span class="p">{</span>
  
  <span class="p">...</span>

  <span class="na">sassOptions</span><span class="p">:</span> <span class="p">{</span>
    <span class="na">includePaths</span><span class="p">:</span> <span class="p">[</span><span class="nx">path</span><span class="p">.</span><span class="nf">join</span><span class="p">(</span><span class="nx">__dirname</span><span class="p">,</span> <span class="dl">'</span><span class="s1">styles</span><span class="dl">'</span><span class="p">)],</span>
  <span class="p">},</span>
<span class="p">}</span>
</code></pre></div></div>

<h2 id="4-importing-bootstrap">4. Importing Bootstrap</h2>

<p>The final step is to import our custom Bootstrap into our project. Based on where we need to use the custom styles, we can import our <code class="language-plaintext highlighter-rouge">global.scss</code>. In this example, let us configure it to be used by the entire project.</p>

<p>In <code class="language-plaintext highlighter-rouge">pages/_app.js</code> file, we need to add the following code:</p>

<div class="language-js highlighter-rouge"><div class="highlight"><pre class="highlight"><code><span class="k">import</span> <span class="dl">'</span><span class="s1">styles/scss/global.scss</span><span class="dl">'</span> <span class="c1">// added</span>

<span class="kd">function</span> <span class="nf">MyApp</span><span class="p">({</span> <span class="nx">Component</span><span class="p">,</span> <span class="nx">pageProps</span> <span class="p">})</span> <span class="p">{</span>
  <span class="k">return</span> <span class="o">&lt;</span><span class="nx">Component</span> <span class="p">{...</span><span class="nx">pageProps</span><span class="p">}</span> <span class="sr">/</span><span class="err">&gt;
</span><span class="p">}</span>

<span class="k">export</span> <span class="k">default</span> <span class="nx">MyApp</span>
</code></pre></div></div>

<p>We have done it. We have set up Bootstrap in our Next project.</p>]]></content><author><name>Ravgeet Dhillon</name></author><category term="design" /><category term="next" /><category term="bootstrap" /><category term="javascript" /><category term="web-design" /><summary type="html"><![CDATA[Learn how to improve the look and feel of the Next project by configuring the default Bootstrap behaviour.]]></summary><media:thumbnail xmlns:media="http://search.yahoo.com/mrss/" url="https://www.ravsam.in/assets/images/blogs/setup-and-customize-bootstrap-in-nextjs.png" /><media:content medium="image" url="https://www.ravsam.in/assets/images/blogs/setup-and-customize-bootstrap-in-nextjs.png" xmlns:media="http://search.yahoo.com/mrss/" /></entry><entry><title type="html">Script as a Task using VS Code IDE</title><link href="https://www.ravsam.in/blog/script-as-a-task-using-vs-code-ide/" rel="alternate" type="text/html" title="Script as a Task using VS Code IDE" /><published>2021-06-17T14:10:00+00:00</published><updated>2025-08-18T07:51:05+00:00</updated><id>https://www.ravsam.in/blog/script-as-a-task-using-vs-code-ide</id><content type="html" xml:base="https://www.ravsam.in/blog/script-as-a-task-using-vs-code-ide/"><![CDATA[<p>VS Code comes with a great feature of specifying <em>tasks</em> and running them through <strong>Command Palette</strong>. There can be a variety of scripts that you need to run while developing your applications. For example, before releasing a new build, there are a lot of things that need to be done by the release team - bumping release version, creating release notes, generating changelog and the list goes on.</p>

<p>In this tutorial, you’ll learn to use VS Code Tasks by taking the example of pre-release commands and ensure that no step is missed along the way.</p>

<h6 id="contents">Contents</h6>
<ul>
  <li><a href="#prerequisites">Prerequisites</a></li>
  <li><a href="#writing-pre-release-script">Writing Pre Release Script</a></li>
  <li><a href="#setting-tasks">Setting Tasks</a></li>
  <li><a href="#running-tasks">Running Tasks</a></li>
  <li><a href="#conclusion">Conclusion</a></li>
</ul>

<h2 id="prerequisites">Prerequisites</h2>

<ul>
  <li>A Local Git Repository</li>
  <li>VS Code Editor</li>
  <li>Linux Environment</li>
</ul>

<h2 id="writing-pre-release-script">Writing Pre Release Script</h2>

<p>The first thing you need to do is to create a script - in this case, a <em>bash</em> script. In this script, you’ll define what steps you need to perform as a part of your pre-release operation.</p>

<p>Assume that before releasing, you do two operations. First, you create a <strong>.version</strong> file and add <em>today’s date</em> to it. Then you create an empty commit with a message - <em>do-production-release</em>.</p>

<p>With the steps determined, create a <strong>pre-release.sh</strong> in <strong>.vscode</strong> directory and add the following code:</p>

<div class="language-bash highlighter-rouge"><div class="highlight"><pre class="highlight"><code><span class="c">#!/bin/sh</span>

<span class="nb">date</span> <span class="o">&gt;</span> .version
git commit <span class="nt">--allow-empty</span> <span class="nt">-m</span> <span class="s2">"do-production-release"</span>
</code></pre></div></div>

<p>You can test the above script by doing:</p>

<div class="language-bash highlighter-rouge"><div class="highlight"><pre class="highlight"><code>bash .vscode/pre-release.sh
</code></pre></div></div>

<blockquote class="alert alert-info">
  <p>Make sure to give proper permissions to the script before running it.</p>
</blockquote>

<h2 id="setting-tasks">Setting Tasks</h2>

<p>Now comes the most interesting part of the tutorial. VS Code allows you to specify tasks in <strong>tasks.json</strong>. The beauty of the VS Code tasks is that you can run them directly from VS Code <strong>Command Palette</strong> which is especially helpful for non-technical members of your team.</p>

<p>Create a <strong>tasks.json</strong> file in the <strong>.vscode</strong> directory and add the following contents in the file:</p>

<div class="language-json highlighter-rouge"><div class="highlight"><pre class="highlight"><code><span class="p">{</span><span class="w">
    </span><span class="nl">"version"</span><span class="p">:</span><span class="w"> </span><span class="s2">"2.0.0"</span><span class="p">,</span><span class="w">
    </span><span class="nl">"tasks"</span><span class="p">:</span><span class="w"> </span><span class="p">[</span><span class="w">
        </span><span class="p">{</span><span class="w">
            </span><span class="nl">"label"</span><span class="p">:</span><span class="w"> </span><span class="s2">"Pre-Release Setup"</span><span class="p">,</span><span class="w">
            </span><span class="nl">"type"</span><span class="p">:</span><span class="w"> </span><span class="s2">"shell"</span><span class="p">,</span><span class="w">
            </span><span class="nl">"command"</span><span class="p">:</span><span class="w"> </span><span class="s2">"bash"</span><span class="p">,</span><span class="w">
            </span><span class="nl">"args"</span><span class="p">:</span><span class="w"> </span><span class="p">[</span><span class="s2">"${workspaceFolder}/.vscode/pre-release.sh"</span><span class="p">]</span><span class="w">
        </span><span class="p">}</span><span class="w">
    </span><span class="p">]</span><span class="w">
</span><span class="p">}</span><span class="w">
</span></code></pre></div></div>

<p>It is important to understand what you are doing so that you can customize the workflow according to your needs.</p>

<p><code class="language-plaintext highlighter-rouge">label</code> is used to identify the script in the VS Code Command Palette.</p>

<div class="language-json highlighter-rouge"><div class="highlight"><pre class="highlight"><code><span class="nl">"label"</span><span class="p">:</span><span class="w"> </span><span class="s2">"Pre-Release Setup"</span><span class="w">
</span></code></pre></div></div>

<p><code class="language-plaintext highlighter-rouge">type</code> is set to <em>shell</em> since you need to execute a shell script.</p>

<div class="language-json highlighter-rouge"><div class="highlight"><pre class="highlight"><code><span class="nl">"type"</span><span class="p">:</span><span class="w"> </span><span class="s2">"shell"</span><span class="w">
</span></code></pre></div></div>

<p><code class="language-plaintext highlighter-rouge">command</code> is used the specify the <em>base</em> command to which the arguments can be passed.</p>

<div class="language-json highlighter-rouge"><div class="highlight"><pre class="highlight"><code><span class="nl">"command"</span><span class="p">:</span><span class="w"> </span><span class="s2">"bash"</span><span class="w">
</span></code></pre></div></div>

<p><code class="language-plaintext highlighter-rouge">args</code> is an array that provides arguments to the <code class="language-plaintext highlighter-rouge">command</code>. <code class="language-plaintext highlighter-rouge">${workspaceFolder}</code> is the internal variable provided by the VS Code. It is the absolute path to your project’s root directory.</p>

<div class="language-json highlighter-rouge"><div class="highlight"><pre class="highlight"><code><span class="nl">"args"</span><span class="p">:</span><span class="w"> </span><span class="p">[</span><span class="s2">"${workspaceFolder}/.vscode/pre-release.sh"</span><span class="p">]</span><span class="w">
</span></code></pre></div></div>

<h2 id="running-tasks">Running Tasks</h2>

<p>Open the VS Code Command Palette by pressing <kbd>Ctrl</kbd> + <kbd>Shift</kbd> + <kbd>P</kbd>, type <strong>Tasks: Run Task</strong> and press <strong>Enter</strong>.</p>

<p><img src="https://www.ravsam.in/assets/images/blog-assets/vscode-run-task.png" alt="VS Code Command Palette to run tasks" class="img-fluid mb-4 rounded" /></p>

<p>You’ll be presented with a list of tasks that you specified in the <strong>tasks.json</strong>. Next, select the <strong>Pre-Release Setup</strong> and press <strong>Enter</strong>. You’ll see the task output in VS Code Integrated Terminal.</p>

<p><img src="https://www.ravsam.in/assets/images/blog-assets/vscode-select-task.png" alt="VS Code Command Palette to select tasks" class="img-fluid mb-4 rounded" /></p>

<h2 id="conclusion">Conclusion</h2>

<p>You now have a good overview of how you can use VS Code tasks to run your <em>scripts as tasks</em> in a better way. You can also add more tasks like running <em>pre-staging release</em>, running <em>pre-dev release</em>, etc.</p>]]></content><author><name>Ravgeet Dhillon</name></author><category term="automation" /><category term="bash" /><category term="vscode" /><category term="productivity" /><category term="automation" /><summary type="html"><![CDATA[Convert NPM, Bash scripts to VS Code tasks and run them from anywhere.]]></summary><media:thumbnail xmlns:media="http://search.yahoo.com/mrss/" url="https://www.ravsam.in/assets/images/blogs/script-as-a-task-using-vs-code-ide.png" /><media:content medium="image" url="https://www.ravsam.in/assets/images/blogs/script-as-a-task-using-vs-code-ide.png" xmlns:media="http://search.yahoo.com/mrss/" /></entry><entry><title type="html">Best VS Code extensions for Nuxt/Vue Projects</title><link href="https://www.ravsam.in/blog/best-vs-code-extensions-for-nuxt-vue-projects/" rel="alternate" type="text/html" title="Best VS Code extensions for Nuxt/Vue Projects" /><published>2021-05-19T12:00:00+00:00</published><updated>2025-08-18T07:51:05+00:00</updated><id>https://www.ravsam.in/blog/best-vs-code-extensions-for-nuxt-vue-projects</id><content type="html" xml:base="https://www.ravsam.in/blog/best-vs-code-extensions-for-nuxt-vue-projects/"><![CDATA[<p>Using the right set of tools can make you a happy and better developer. Right tools reduce friction and help you develop applications faster. In this blog, you’ll take a look at some of the best VS Code extensions that you can use for developing Nuxt/Vue apps. These extensions can help you with things like linting, formatting, debugging, and more.</p>

<h6 id="contents">Contents</h6>

<ul>
  <li><a href="#1-vetur">1. Vetur</a></li>
  <li><a href="#2-vue-discovery">2. Vue Discovery</a></li>
  <li><a href="#3-vue-peek">3. Vue Peek</a></li>
  <li><a href="#4-html-css-class-completion">4. HTML CSS Class Completion</a></li>
  <li><a href="#5-import-cost">5. Import Cost</a></li>
  <li><a href="#6-internationalization">6. Internationalization</a></li>
  <li><a href="#7-path-intellisense">7. Path Intellisense</a></li>
  <li><a href="#8-svgo">8. SVGO</a></li>
</ul>

<h2 id="1-vetur">1. <a href="https://marketplace.visualstudio.com/items?itemName=octref.vetur">Vetur</a></h2>

<figure class="mb-0 w-100 rounded">
    <img src="https://www.ravsam.in/assets/images/resized/20/vetur.png" width="100%" class="img-fluid mb-4 rounded blur-up lazyautosizes lazyload" sizes="auto" alt="Vetur Extension VS Code" style="" data-srcset="            https://www.ravsam.in/assets/images/resized/20/vetur.png 20w,            https://www.ravsam.in/assets/images/resized/64/vetur.png 64w,            https://www.ravsam.in/assets/images/resized/576/vetur.png 576w,            https://www.ravsam.in/assets/images/resized/960/vetur.png 960w,            https://www.ravsam.in/assets/images/blog-assets/vetur.png 1036w" />
    
</figure>

<p><strong>Vetur</strong> is the king of all extensions you need as a Vue/Nuxt Developer. It is a Vue tooling for VS Code. It comes with <strong>Vue Language Server</strong> and other features like syntax highlighting, formatting, intellisense, debugging, and more.</p>

<h2 id="2-vue-discovery">2. <a href="https://marketplace.visualstudio.com/items?itemName=Maantje.vue-discovery">Vue Discovery</a></h2>

<p><img src="https://www.ravsam.in/assets/images/blog-assets/vue-discovery.gif" alt="Vue Discovery VS Code" class="img-fluid mb-4 rounded" /></p>

<p><strong>Vue Discovery</strong> is a great plugin that adds to the powers of Vetur. This extension discovers Vue components in your workspace and provides <strong>IntelliSense</strong> for them. It provides intellisense for components in the template section, allows you to automatically import, register, and expand required props, and more.</p>

<p>In Short: <em>Vue component name completion across a project</em></p>

<h2 id="3-vue-peek">3. <a href="https://marketplace.visualstudio.com/items?itemName=dariofuzinato.vue-peek">Vue Peek</a></h2>

<p><img src="https://www.ravsam.in/assets/images/blog-assets/vue-peek.gif" alt="Vue Peek Extension VS Code" class="img-fluid mb-4 rounded" /></p>

<p><strong>Vue Peek</strong> allows you to go to the definition for your Vue components. It allows you to look under the hood of the Vue component declarations. It allows you to quickly jump to or peek into files that are referenced as components (from template), or as module imports (from a script).</p>

<p>The extension supports all the normal capabilities of symbol definition tracking and does it for CSS selectors - classes and IDs - as well.</p>

<p>In Short: <em>Peek inside Vue SFCs</em></p>

<h2 id="4-html-css-class-completion">4. <a href="https://marketplace.visualstudio.com/items?itemName=Zignd.html-css-class-completion">HTML CSS Class Completion</a></h2>

<p><img src="https://www.ravsam.in/assets/images/blog-assets/html-css-class-completion.gif" alt="HTML CSS Class Completion Extension VS Code" class="img-fluid mb-4 rounded" /></p>

<p><strong>HTML CSS Class Completion</strong> is an amazing Visual Studio Code extension that provides CSS class name completion for the HTML class attribute based on the definitions found in your workspace or external files referenced through the link element. It is extremely handy while designing the UI of the application as it gives you quick access to the CSS classes available.</p>

<p>In Short: <em>CSS class completion in your HTML template</em></p>

<h2 id="5-import-cost">5. <a href="https://marketplace.visualstudio.com/items?itemName=wix.vscode-import-cost">Import Cost</a></h2>

<p><img src="https://www.ravsam.in/assets/images/blog-assets/import-cost.gif" alt="Import Cost Extension VS Code" class="img-fluid mb-4 rounded" /></p>

<p>As a developer, your primary concern is to make sure that the application size doesn’t go beyond a certain limit. <strong>Import Cost</strong> extension displays the size of the imported package inline in the editor.</p>

<p>It currently supports</p>

<ul>
  <li>Default importing: <code class="language-plaintext highlighter-rouge">import Func from 'utils'</code>;</li>
  <li>Entire content importing: <code class="language-plaintext highlighter-rouge">import * as Utils from 'utils'</code>;</li>
  <li>Selective importing: <code class="language-plaintext highlighter-rouge">import {Func} from 'utils'</code>;</li>
  <li>Selective importing with alias: <code class="language-plaintext highlighter-rouge">import {orig as alias} from 'utils'</code>;</li>
  <li>Submodule importing: <code class="language-plaintext highlighter-rouge">import Func from 'utils/Func'</code>;</li>
  <li>Require: <code class="language-plaintext highlighter-rouge">const Func = require('utils').Func</code>;</li>
  <li>Both Javascript and Typescript</li>
</ul>

<p>In Short: <em>Tells you the size of your npm imports</em></p>

<h2 id="6-internationalization">6. <a href="https://marketplace.visualstudio.com/items?itemName=Lokalise.i18n-ally">Internationalization</a></h2>

<p>Internationalization or <strong>i18n</strong> allows you to write your application text in different languages for different regions.</p>

<p><img src="https://www.ravsam.in/assets/images/blog-assets/i18n.gif" alt="i18n Extension VS Code" class="img-fluid mb-4 rounded" /></p>

<p>i18n supports multi-root workspaces, remote development, many popular frameworks, linked locale messages, and eliminates the need to use JSON files for i18n as is done traditionally.</p>

<p>In Short: <em>i18n toolset for multilingual support, works great with vue-i18n</em></p>

<h2 id="7-path-intellisense">7. <a href="https://marketplace.visualstudio.com/items?itemName=christian-kohler.path-intellisense">Path Intellisense</a></h2>

<p><img src="https://www.ravsam.in/assets/images/blog-assets/path-intellisense.gif" alt="Path IntelliSense Extension VS Code" class="img-fluid mb-4 rounded" /></p>

<p>One of the VS Code extensions that we use at RavSam is <strong>Path Intellisense</strong>. It provides autocompletion for file paths present in your current VS Code workspace.</p>

<p>In Short: <em>File path completion</em></p>

<h2 id="8-svgo">8. <a href="https://marketplace.visualstudio.com/items?itemName=1000ch.svgo">SVGO</a></h2>

<figure class="mb-0 w-100 rounded">
    <img src="https://www.ravsam.in/assets/images/resized/20/svgo-1.png" width="100%" class="img-fluid rounded blur-up lazyautosizes lazyload" sizes="auto" alt="SVGO Extenstion VS Code - 1" style="" data-srcset="            https://www.ravsam.in/assets/images/resized/20/svgo-1.png 20w,            https://www.ravsam.in/assets/images/resized/64/svgo-1.png 64w,            https://www.ravsam.in/assets/images/resized/576/svgo-1.png 576w,            https://www.ravsam.in/assets/images/blog-assets/svgo-1.png 640w" />
    
</figure>

<p><strong>SVGO</strong> Extension for Visual Studio Code is built on the top of <a href="https://github.com/svg/svgo">SVGO NPM module</a>. It allows you to minify and prettify the SVG file in place.</p>

<p>In Short: <em>Minimize SVG files in two keystrokes</em></p>]]></content><author><name>Ravgeet Dhillon</name></author><category term="development" /><category term="nuxt" /><category term="vue" /><category term="jamstack" /><category term="javascript" /><category term="web-development" /><summary type="html"><![CDATA[Supercharge your Nuxt/Vue App Development by using these extensions in VS Code Editor.]]></summary><media:thumbnail xmlns:media="http://search.yahoo.com/mrss/" url="https://www.ravsam.in/assets/images/blogs/best-vs-code-extensions-for-nuxt-vue-projects.png" /><media:content medium="image" url="https://www.ravsam.in/assets/images/blogs/best-vs-code-extensions-for-nuxt-vue-projects.png" xmlns:media="http://search.yahoo.com/mrss/" /></entry><entry><title type="html">Automating Project Maintenance on Github</title><link href="https://www.ravsam.in/blog/automating-project-maintenance-on-github/" rel="alternate" type="text/html" title="Automating Project Maintenance on Github" /><published>2021-05-03T08:30:00+00:00</published><updated>2025-08-18T07:51:05+00:00</updated><id>https://www.ravsam.in/blog/automating-project-maintenance-on-github</id><content type="html" xml:base="https://www.ravsam.in/blog/automating-project-maintenance-on-github/"><![CDATA[<p>Most of the effort in building software goes into the maintenance of the code that already exists. Once the software is built, many factors affect its performance over time. We need to fix bugs, address security vulnerabilities, make performance improvements, and decrease technical debt.</p>

<p>Managing a single piece of software is easy but as a developer, we often have to deal with more than one. And this is exactly where maintenance gets hard. The best way to handle <strong>Maintenance debt</strong> is to upgrade the dependencies on which our project depends regularly.</p>

<p>All these problems can be solved by automation. At RavSam, we use <a href="http://github.com/ravsamhq">Github</a> for our code handling and Github Apps and Github Actions for CI/CD purposes.</p>

<h6 id="contents">Contents</h6>

<ul>
  <li><a href="#renovate---automated-dependency-updates">Renovate - Automated Dependency Updates</a></li>
  <li><a href="#imgbot---automated-image-optimization">Imgbot - Automated Image Optimization</a></li>
  <li><a href="#ravsam-bot---a-github-probot-app">RavSam Bot - A Github Probot App</a></li>
</ul>

<h2 id="renovate---automated-dependency-updates">Renovate - Automated Dependency Updates</h2>

<p><a href="https://github.com/marketplace/renovate">Renovate</a> is one of those apps that make our idea of automated maintenance a reality. It is a free, open-source, customizable GitHub app that helps us to automatically update our dependencies in software projects by receiving pull requests and that too for <a href="/platforms/">multiple languages</a>.</p>

<figure class="mb-0 w-100 rounded">
    <img src="https://www.ravsam.in/assets/images/resized/20/renovate-bot.png" width="100%" class="img-fluid rounded blur-up lazyautosizes lazyload" sizes="auto" alt="Dependency Updates by Renovate" style="" data-srcset="            https://www.ravsam.in/assets/images/resized/20/renovate-bot.png 20w,            https://www.ravsam.in/assets/images/resized/64/renovate-bot.png 64w,            https://www.ravsam.in/assets/images/resized/576/renovate-bot.png 576w,            https://www.ravsam.in/assets/images/resized/960/renovate-bot.png 960w,            https://www.ravsam.in/assets/images/resized/1400/renovate-bot.png 1400w,            https://www.ravsam.in/assets/images/blog-assets/renovate-bot.png 1596w" />
    
        <figcaption class="text-center text-muted mt-2 mb-4">Dependency Updates by Renovate</figcaption>
    
</figure>

<p>The best part is that you can write a single config and use it for all of your projects in your GitHub organization. Here is a Renovate bot config that we use at RavSam:</p>

<div class="language-json highlighter-rouge"><div class="highlight"><pre class="highlight"><code><span class="p">{</span><span class="w">
  </span><span class="nl">"extends"</span><span class="p">:</span><span class="w"> </span><span class="p">[</span><span class="s2">"config:base"</span><span class="p">,</span><span class="w"> </span><span class="s2">"group:monorepos"</span><span class="p">],</span><span class="w">
  </span><span class="nl">"dependencyDashboard"</span><span class="p">:</span><span class="w"> </span><span class="kc">false</span><span class="p">,</span><span class="w">
  </span><span class="nl">"automergeType"</span><span class="p">:</span><span class="w"> </span><span class="s2">"branch"</span><span class="p">,</span><span class="w">
  </span><span class="nl">"major"</span><span class="p">:</span><span class="w"> </span><span class="p">{</span><span class="w">
    </span><span class="nl">"enabled"</span><span class="p">:</span><span class="w"> </span><span class="kc">false</span><span class="w">
  </span><span class="p">},</span><span class="w">
  </span><span class="nl">"packageRules"</span><span class="p">:</span><span class="w"> </span><span class="p">[</span><span class="w">
    </span><span class="p">{</span><span class="w">
      </span><span class="nl">"matchUpdateTypes"</span><span class="p">:</span><span class="w"> </span><span class="p">[</span><span class="s2">"minor"</span><span class="p">,</span><span class="w"> </span><span class="s2">"patch"</span><span class="p">,</span><span class="w"> </span><span class="s2">"pin"</span><span class="p">,</span><span class="w"> </span><span class="s2">"digest"</span><span class="p">],</span><span class="w">
      </span><span class="nl">"automerge"</span><span class="p">:</span><span class="w"> </span><span class="kc">true</span><span class="p">,</span><span class="w">
      </span><span class="nl">"labels"</span><span class="p">:</span><span class="w"> </span><span class="p">[</span><span class="s2">"dependencies"</span><span class="p">]</span><span class="w">
    </span><span class="p">},</span><span class="w">
    </span><span class="p">{</span><span class="w">
      </span><span class="nl">"depTypeList"</span><span class="p">:</span><span class="w"> </span><span class="p">[</span><span class="s2">"devDependencies"</span><span class="p">],</span><span class="w">
      </span><span class="nl">"schedule"</span><span class="p">:</span><span class="w"> </span><span class="p">[</span><span class="s2">"before 9am on the first day of the month"</span><span class="p">],</span><span class="w">
      </span><span class="nl">"matchUpdateTypes"</span><span class="p">:</span><span class="w"> </span><span class="p">[</span><span class="s2">"minor"</span><span class="p">,</span><span class="w"> </span><span class="s2">"patch"</span><span class="p">,</span><span class="w"> </span><span class="s2">"pin"</span><span class="p">,</span><span class="w"> </span><span class="s2">"digest"</span><span class="p">],</span><span class="w">
      </span><span class="nl">"automerge"</span><span class="p">:</span><span class="w"> </span><span class="kc">true</span><span class="p">,</span><span class="w">
      </span><span class="nl">"labels"</span><span class="p">:</span><span class="w"> </span><span class="p">[</span><span class="s2">"dev-dependencies"</span><span class="p">]</span><span class="w">
    </span><span class="p">}</span><span class="w">
  </span><span class="p">],</span><span class="w">
  </span><span class="nl">"prCreation"</span><span class="p">:</span><span class="w"> </span><span class="s2">"not-pending"</span><span class="p">,</span><span class="w">
  </span><span class="nl">"schedule"</span><span class="p">:</span><span class="w"> </span><span class="p">[</span><span class="s2">"before 9am every weekend"</span><span class="p">],</span><span class="w">
  </span><span class="nl">"stabilityDays"</span><span class="p">:</span><span class="w"> </span><span class="mi">3</span><span class="p">,</span><span class="w">
  </span><span class="nl">"timezone"</span><span class="p">:</span><span class="w"> </span><span class="s2">"Asia/Kolkata"</span><span class="w">
</span><span class="p">}</span><span class="w">
</span></code></pre></div></div>

<p>We have configured Renovate to run the <em>development dependencies</em> updation process only on the first day of the month to prevent noise and distractions. We have enabled auto-merge when the update type is one of the following: <em>minor</em>, <em>patch</em>, <em>pin</em>, or <em>digest</em>.</p>

<h2 id="imgbot---automated-image-optimization">Imgbot - Automated Image Optimization</h2>

<p>The performance of a Web App is often dependent on the images. Hence it is crucial to optimize images or else lose customers. Another advantage of optimized images is that it reduces the bandwidth costs for us as well as our visitors.</p>

<p>We love <a href="https://github.com/marketplace/imgbot">Imgbot</a> app. It optimizes the images and creates a pull request against our default branch - <em>master</em>. Imgbot is verified by GitHub which means there is no point worrying about the security.</p>

<h2 id="ravsam-bot---a-github-probot-app">RavSam Bot - A Github Probot App</h2>

<p>We have built our custom serverless GitHub Probot - <a href="https://github.com/apps/ravsam-bot">RavSam Bot</a>, our employee #1. It helps us automate various tasks like managing issues by raising their priority, assigning confirmed issues to developers, assigning reviewers to the pull requests, auto-merging them once the changes have been approved, and many more things.</p>

<p>A fun fact about this bot is that it has made more commits than the actual humans.</p>

<figure class="mb-0 w-100 rounded">
    <img src="https://www.ravsam.in/assets/images/resized/20/ravsam-bot.png" width="100%" class="img-fluid rounded blur-up lazyautosizes lazyload" sizes="auto" alt="Approved pull request merged by RavSam Bot" style="" data-srcset="            https://www.ravsam.in/assets/images/resized/20/ravsam-bot.png 20w,            https://www.ravsam.in/assets/images/resized/64/ravsam-bot.png 64w,            https://www.ravsam.in/assets/images/resized/576/ravsam-bot.png 576w,            https://www.ravsam.in/assets/images/resized/960/ravsam-bot.png 960w,            https://www.ravsam.in/assets/images/resized/1400/ravsam-bot.png 1400w,            https://www.ravsam.in/assets/images/blog-assets/ravsam-bot.png 1596w" />
    
        <figcaption class="text-center text-muted mt-2 mb-4">Approved pull request merged by RavSam Bot</figcaption>
    
</figure>

<p>Probot apps are easy to write, deploy, and share. We have deployed <a href="/blog/deploy-a-serverless-probot-github-app-on-netlify-functions/">our probot app on Netlify Functions</a> and it spends the entire day doing mundane tasks for us tirelessly.</p>]]></content><author><name>Ravgeet Dhillon</name></author><category term="businesses-and-startups" /><category term="github" /><category term="github-actions" /><category term="bots" /><category term="automation" /><summary type="html"><![CDATA[Know about the Maintenance stack we use at RavSam to keep our projects updated and secure.]]></summary><media:thumbnail xmlns:media="http://search.yahoo.com/mrss/" url="https://www.ravsam.in/assets/images/blogs/automating-project-maintenance-on-github.png" /><media:content medium="image" url="https://www.ravsam.in/assets/images/blogs/automating-project-maintenance-on-github.png" xmlns:media="http://search.yahoo.com/mrss/" /></entry><entry><title type="html">Deploy a Serverless Probot/GitHub App on Netlify Functions</title><link href="https://www.ravsam.in/blog/deploy-a-serverless-probot-github-app-on-netlify-functions/" rel="alternate" type="text/html" title="Deploy a Serverless Probot/GitHub App on Netlify Functions" /><published>2021-04-19T08:10:00+00:00</published><updated>2025-08-18T07:51:05+00:00</updated><id>https://www.ravsam.in/blog/deploy-a-serverless-probot-github-app-on-netlify-functions</id><content type="html" xml:base="https://www.ravsam.in/blog/deploy-a-serverless-probot-github-app-on-netlify-functions/"><![CDATA[<p>Automation is love. We all love automating repetitive things. There is one such thing called Probot. <a href="https://probot.github.io/">Probot</a> is one of the most popular frameworks for developing GitHub Apps using Javascript. It is easy to set up as most of the things like setting up authentication, registering webhooks, managing permissions, are all handled by Probot itself. You just need to write your code for responding to <a href="https://docs.github.com/en/free-pro-team@latest/developers/webhooks-and-events/webhook-events-and-payloads">different events</a> that happen on GitHub.</p>

<p>In this article, you’ll build a serverless bot and deploy it to Netlify Functions. The advantage of using Netlify Functions is that it is <em>free</em> for up to 125,000 requests per month which is more than enough for a startup or a small organization.</p>

<h6 id="contents">Contents</h6>

<ul>
  <li><a href="#prerequisites">Prerequisites</a></li>
  <li><a href="#writing-application-logic">Writing Application Logic</a></li>
  <li><a href="#deploying-on-netlify-functions">Deploying on Netlify Functions</a></li>
  <li><a href="#updating-webhook-url">Updating Webhook URL</a></li>
  <li><a href="#results">Results</a></li>
</ul>

<h2 id="prerequisites">Prerequisites</h2>

<ul>
  <li>You can follow this <a href="https://probot.github.io/docs/development/">guide on how to set up Probot</a>.</li>
</ul>

<h2 id="writing-application-logic">Writing Application Logic</h2>

<p>Once your Probot is set up, you need to do some changes to your directory structure to deploy it to Netlify Functions.</p>

<p>Create an <strong>src</strong> directory and add the following code in a new file - <strong>app.js</strong>:</p>

<div class="language-js highlighter-rouge"><div class="highlight"><pre class="highlight"><code><span class="cm">/**
 * This is the main entrypoint to your Probot app
 * @param {import('probot').Probot} app
 */</span>

<span class="nx">module</span><span class="p">.</span><span class="nx">exports</span> <span class="o">=</span> <span class="p">(</span><span class="nx">app</span><span class="p">)</span> <span class="o">=&gt;</span> <span class="p">{</span>
  <span class="nx">app</span><span class="p">.</span><span class="nx">log</span><span class="p">.</span><span class="nf">info</span><span class="p">(</span><span class="dl">'</span><span class="s1">App has loaded</span><span class="dl">'</span><span class="p">);</span>

  <span class="nx">app</span><span class="p">.</span><span class="nf">on</span><span class="p">(</span><span class="dl">'</span><span class="s1">issues.opened</span><span class="dl">'</span><span class="p">,</span> <span class="k">async </span><span class="p">(</span><span class="nx">context</span><span class="p">)</span> <span class="o">=&gt;</span> <span class="p">{</span>
    <span class="nx">context</span><span class="p">.</span><span class="nx">octokit</span><span class="p">.</span><span class="nx">issues</span><span class="p">.</span><span class="nf">createComment</span><span class="p">(</span>
      <span class="nx">context</span><span class="p">.</span><span class="nf">issue</span><span class="p">({</span>
        <span class="na">body</span><span class="p">:</span> <span class="dl">'</span><span class="s1">Thanks for opening this issue!</span><span class="dl">'</span><span class="p">,</span>
      <span class="p">})</span>
    <span class="p">);</span>
  <span class="p">});</span>
<span class="p">};</span>
</code></pre></div></div>

<p>In the above code whenever a new issue is opened, it creates an issue comment thanking the issue author.</p>

<p>Netlify Functions are <strong>AWS Lambda</strong> functions but their deployment to AWS is handled by Netlify. For deploying your Probot on Netlify, you can use the AWS Lambda adapter for Probot.</p>

<p>In your terminal, execute the following command:</p>

<div class="language-bash highlighter-rouge"><div class="highlight"><pre class="highlight"><code>npm <span class="nb">install</span> @probot/adapter-aws-lambda-serverless
</code></pre></div></div>

<p>The next thing you need to do is to create a <strong>functions</strong> directory that will be used by Netlify to deploy your serverless functions. Every <em>JS</em> file in the <strong>functions</strong> directory is deployed as an individual function which can be accessed at <code class="language-plaintext highlighter-rouge">&lt;domain&gt;/.netlify/functions/&lt;function_name&gt;</code>.</p>

<p>In the <strong>functions</strong> directory, create an <strong>index.js</strong> file and add the following code:</p>

<div class="language-js highlighter-rouge"><div class="highlight"><pre class="highlight"><code><span class="kd">const</span> <span class="p">{</span> <span class="nx">createLambdaFunction</span><span class="p">,</span> <span class="nx">createProbot</span> <span class="p">}</span> <span class="o">=</span> <span class="nf">require</span><span class="p">(</span><span class="dl">'</span><span class="s1">@probot/adapter-aws-lambda-serverless</span><span class="dl">'</span><span class="p">);</span>
<span class="kd">const</span> <span class="nx">app</span> <span class="o">=</span> <span class="nf">require</span><span class="p">(</span><span class="dl">'</span><span class="s1">../src/app</span><span class="dl">'</span><span class="p">);</span>

<span class="nx">module</span><span class="p">.</span><span class="nx">exports</span><span class="p">.</span><span class="nx">handler</span> <span class="o">=</span> <span class="nf">createLambdaFunction</span><span class="p">(</span><span class="nx">app</span><span class="p">,</span> <span class="p">{</span>
  <span class="na">probot</span><span class="p">:</span> <span class="nf">createProbot</span><span class="p">(),</span>
<span class="p">});</span>
</code></pre></div></div>

<p>At this point, your code is finally done and the next step is to deploy your application to Netlify.</p>

<h2 id="deploying-on-netlify-functions">Deploying on Netlify Functions</h2>

<p>Before proceeding with setup for deployment, there are some issues to be addressed. You need to create a configuration file, <strong>netlify.toml</strong> at the root of the project, and tell some important things to Netlify to consider when deploying your bot.</p>

<p>Add the following code in the <strong>netlify.toml</strong>:</p>

<div class="language-toml highlighter-rouge"><div class="highlight"><pre class="highlight"><code><span class="nn">[build]</span>
<span class="py">command</span> <span class="p">=</span> <span class="s">"npm install --production"</span>
<span class="py">functions</span> <span class="p">=</span> <span class="s">"./functions"</span>
</code></pre></div></div>

<p>You are telling Netlify to run <code class="language-plaintext highlighter-rouge">npm install</code> before deploying your functions which are present in the <strong>functions</strong> directory.</p>

<p>To deploy on Netlify, you can use <a href="https://www.netlify.com/products/dev/">Netlify Dev</a>. For that you need to install <strong>netlify-cli</strong> by doing:</p>

<div class="language-bash highlighter-rouge"><div class="highlight"><pre class="highlight"><code>npm <span class="nb">install </span>netlify-cli <span class="nt">-g</span>
</code></pre></div></div>

<p>Next, log in to your Netlify account by doing:</p>

<div class="language-bash highlighter-rouge"><div class="highlight"><pre class="highlight"><code>netlify login
</code></pre></div></div>

<p>Once you are logged in, connect your local project directory to Netlify Functions. You can either connect to an existing one or create a new one by doing:</p>

<div class="language-bash highlighter-rouge"><div class="highlight"><pre class="highlight"><code>netlify init
</code></pre></div></div>

<p>Once your site is connected, you can build your site locally and deploy it to Netlify by doing:</p>

<div class="language-bash highlighter-rouge"><div class="highlight"><pre class="highlight"><code>netlify build
netlify deploy <span class="nt">--prod</span>
</code></pre></div></div>

<blockquote>
  <p>You can also connect your GitHub Repository to your Netlify project or <a href="/blog/deploy-a-website-on-netlify-through-github-actions">use GitHub Actions to deploy your bot to Netlify</a>.
{.alert alert-info}</p>
</blockquote>

<h2 id="updating-webhook-url">Updating Webhook URL</h2>

<p>Once you have deployed your Probot, you need to update the <strong>Webhook URL</strong> to tell Github where to send the event payloads. To do so, visit <code class="language-plaintext highlighter-rouge">[https://github.com/settings/apps/&lt;app-name&gt;](https://github.com/settings/apps/&lt;app-name&gt;)</code> and update the Webhook URL with your Netlify website URL.</p>

<h2 id="results">Results</h2>

<p>You are done with developing and deploying your Probot and now need to test it by creating an issue on a repository where you installed your GitHub app and see whether your bot responds back or not.</p>

<p>Awesome! You can see that your bot welcomed you with a message that you wrote in your code.</p>

<figure class="mb-0 w-100 rounded">
    <img src="https://www.ravsam.in/assets/images/resized/20/github-probot-netlify-functions.png" width="100%" class="img-fluid rounded blur-up lazyautosizes lazyload" sizes="auto" alt="Setting up our master branch on Github" style="" data-srcset="            https://www.ravsam.in/assets/images/resized/20/github-probot-netlify-functions.png 20w,            https://www.ravsam.in/assets/images/resized/64/github-probot-netlify-functions.png 64w,            https://www.ravsam.in/assets/images/resized/576/github-probot-netlify-functions.png 576w,            https://www.ravsam.in/assets/images/resized/960/github-probot-netlify-functions.png 960w,            https://www.ravsam.in/assets/images/resized/1400/github-probot-netlify-functions.png 1400w,            https://www.ravsam.in/assets/images/blog-assets/github-probot-netlify-functions.png 2091w" />
    
        <figcaption class="text-center text-muted mt-2 mb-4">Setting up our master branch on Github</figcaption>
    
</figure>

<p>There are many things to automate on Github like auto assigning developers to the issues, auto assigning reviewers to a pull request, auto merging pull requests created by <em>dependabot</em> alerts, and much more.</p>]]></content><author><name>Ravgeet Dhillon</name></author><category term="devops" /><category term="github-bot" /><category term="netlify" /><category term="automation" /><category term="serverless" /><summary type="html"><![CDATA[Build and Deploy a Serverless Probot/GitHub App on Netlify Functions to automate your GitHub and achieve infinite scalability.]]></summary><media:thumbnail xmlns:media="http://search.yahoo.com/mrss/" url="https://www.ravsam.in/assets/images/blogs/deploy-a-serverless-probot-github-app-on-netlify-functions.png" /><media:content medium="image" url="https://www.ravsam.in/assets/images/blogs/deploy-a-serverless-probot-github-app-on-netlify-functions.png" xmlns:media="http://search.yahoo.com/mrss/" /></entry><entry><title type="html">Deploy Strapi on VPS with Ubuntu, MySQL</title><link href="https://www.ravsam.in/blog/deploy-strapi-on-vps-with-ubuntu-mysql/" rel="alternate" type="text/html" title="Deploy Strapi on VPS with Ubuntu, MySQL" /><published>2021-04-08T08:00:00+00:00</published><updated>2025-08-18T07:51:05+00:00</updated><id>https://www.ravsam.in/blog/deploy-strapi-on-vps-with-ubuntu-mysql</id><content type="html" xml:base="https://www.ravsam.in/blog/deploy-strapi-on-vps-with-ubuntu-mysql/"><![CDATA[<p>So you have built your Strapi project and the next thing you need to do is to deploy it on a production server. In this blog, you’ll learn to set up a Virtual Private Server(VPS) and then deploy your Strapi app. You can apply this guide to any kind of servers like Linode, DigitalOcean, and many more.</p>

<h5 id="contents">Contents</h5>

<ul>
  <li><a href="#1-create-a-non-root-user">1. Create a Non-Root User</a></li>
  <li><a href="#2-create-a-public-private-key-pair">2. Create a Public-Private Key Pair</a></li>
  <li><a href="#3-ssh-as-a-new-user">3. SSH as a new user</a></li>
  <li><a href="#4-add-ssh-key-to-authorized-keys">4. Add SSH Key to Authorized Keys</a></li>
  <li><a href="#5-configure-firewall">5. Configure Firewall</a></li>
  <li><a href="#6-remove-apache-and-install-nginx">6. Remove Apache and Install Nginx</a></li>
  <li><a href="#7-install-node-using-nvm">7. Install Node Using NVM</a></li>
  <li><a href="#8-install-pm2">8. Install PM2</a></li>
  <li><a href="#9-install-database-mariadbmysql">9. Install Database (MariaDB/MySQL)</a></li>
  <li><a href="#10-create-nginx-server-blocks">10. Create Nginx Server Blocks</a></li>
  <li><a href="#11-setup-dns">11. Setup DNS</a></li>
  <li><a href="#12-install-ssl">12. Install SSL</a></li>
  <li><a href="#13-run-strapi-app">13. Run Strapi App</a></li>
</ul>

<h3 id="prerequisites">Prerequisites</h3>

<p>To follow along, make sure you have the following</p>

<ul>
  <li>Hostinger VPS Plan 1</li>
  <li>Ubuntu 20.04</li>
</ul>

<blockquote class="alert alert-info">
  <p>Replace all the values in &lt;&gt; with your own values while following this tutorial.</p>
</blockquote>

<h2 id="1-create-a-non-root-user">1. Create a Non-Root User</h2>

<p>It is a good idea to create a <strong>non-root</strong> user with <em>sudo</em> privileges. All the commands will be run through this user. The first step is to log in as the root user.</p>

<div class="language-bash highlighter-rouge"><div class="highlight"><pre class="highlight"><code>ssh root@&lt;VPSIPADDRESS&gt;
</code></pre></div></div>

<p>The very first thing to do on a new machine is to update the packages and remove the older ones. To do so, run the following commands:</p>

<div class="language-bash highlighter-rouge"><div class="highlight"><pre class="highlight"><code><span class="nb">sudo </span>apt update <span class="nt">-y</span> <span class="o">&amp;&amp;</span> <span class="nb">sudo </span>apt upgrade <span class="nt">-y</span> <span class="o">&amp;&amp;</span> <span class="nb">sudo </span>apt autoremove <span class="nt">-y</span>
</code></pre></div></div>

<p>Now your machine is up to date and you need to create a new user and log out of the session.</p>

<div class="language-bash highlighter-rouge"><div class="highlight"><pre class="highlight"><code>adduser &lt;NEWUSER&gt;
usermod <span class="nt">-aG</span> <span class="nb">sudo</span> &lt;NEWUSER&gt;
<span class="nb">exit</span>
</code></pre></div></div>

<h2 id="2-create-a-public-private-key-pair">2. Create a Public-Private Key Pair</h2>

<p>It is great to use Public-Private key pair to SSH into a remote server. You can create a new one by doing:</p>

<div class="language-bash highlighter-rouge"><div class="highlight"><pre class="highlight"><code>ssh-keygen
</code></pre></div></div>

<p>or copy the existing one’s public key onto your clipboard by running the following command:</p>

<div class="language-bash highlighter-rouge"><div class="highlight"><pre class="highlight"><code>xclip <span class="nt">-selection</span> clipboard <span class="nt">-in</span> ~/.ssh/hostinger_rsa.pub
</code></pre></div></div>

<h2 id="3-ssh-as-a-new-user">3. SSH as a new user</h2>

<p>Next, SSH as a new user using password authentication.</p>

<div class="language-bash highlighter-rouge"><div class="highlight"><pre class="highlight"><code>ssh &lt;NEWUSER&gt;@&lt;VPSIPADDRESS&gt;
</code></pre></div></div>

<p>Once you are logged in, you need to create a directory for the new user identified by its name.</p>

<div class="language-bash highlighter-rouge"><div class="highlight"><pre class="highlight"><code><span class="nb">mkdir</span> <span class="nt">-p</span> &lt;NEWUSER&gt;
<span class="nb">cd</span> &lt;NEWUSER&gt;
</code></pre></div></div>

<h2 id="4-add-ssh-key-to-authorized-keys">4. Add SSH Key to Authorized Keys</h2>

<p>Register your public key by adding it to your authorized keys so that you can log in using a private key.</p>

<div class="language-bash highlighter-rouge"><div class="highlight"><pre class="highlight"><code><span class="nb">mkdir</span> <span class="nt">-p</span>  ~/.ssh/
<span class="nb">sudo echo</span> <span class="s2">"&lt;COPIED_PUBLIC_KEY&gt;"</span> <span class="o">&gt;&gt;</span> ~/.ssh/authorized_keys
</code></pre></div></div>

<h2 id="5-configure-firewall">5. Configure Firewall</h2>

<p>Now is the time to set up a firewall. A firewall is essential while setting up VPS to restrict unwanted traffic going out or into your VPS. Install <strong>ufw</strong> and configure a firewall to allow SSH operations by doing:</p>

<div class="language-bash highlighter-rouge"><div class="highlight"><pre class="highlight"><code><span class="nb">sudo </span>apt <span class="nb">install </span>ufw <span class="nt">-y</span>
<span class="nb">sudo </span>ufw allow OpenSSH
<span class="nb">sudo </span>ufw <span class="nb">enable</span> <span class="nt">-y</span>
<span class="nb">sudo </span>ufw status
</code></pre></div></div>

<h2 id="6-remove-apache-and-install-nginx">6. Remove Apache and Install Nginx</h2>

<p>Nginx is a much better server than Apache. It is <em>lightweight</em>, easy to set up, and allows you to set up proxies.</p>

<p>Before installing Nginx, you can remove Apache which is available by default in Ubuntu 20.04 by running the following commands:</p>

<div class="language-bash highlighter-rouge"><div class="highlight"><pre class="highlight"><code><span class="nb">sudo </span>systemctl stop apache2 <span class="o">&amp;&amp;</span> <span class="nb">sudo </span>systemctl disable apache2
<span class="nb">sudo </span>apt remove apache2 <span class="nt">-y</span> <span class="o">&amp;&amp;</span> <span class="nb">sudo rm</span> /var/www/html/index.html
<span class="nb">sudo </span>apt autoremove <span class="nt">-y</span>
</code></pre></div></div>

<p>Now install Nginx by doing:</p>

<div class="language-bash highlighter-rouge"><div class="highlight"><pre class="highlight"><code><span class="nb">sudo </span>apt <span class="nb">install </span>nginx <span class="nt">-y</span>
<span class="nb">sudo </span>systemctl start nginx
<span class="nb">sudo </span>systemctl status nginx
</code></pre></div></div>

<p>Next, configure the firewall to allow HTTP and HTTPS traffic to pass through it.</p>

<div class="language-bash highlighter-rouge"><div class="highlight"><pre class="highlight"><code><span class="nb">sudo </span>ufw allow <span class="s1">'Nginx Full'</span>
<span class="nb">sudo </span>ufw <span class="nb">enable</span> <span class="nt">-y</span>
<span class="nb">sudo </span>ufw status
</code></pre></div></div>

<p>You can also allow either HTTP or HTTPS by using:</p>

<div class="language-bash highlighter-rouge"><div class="highlight"><pre class="highlight"><code><span class="nb">sudo </span>ufw allow <span class="s1">'Nginx HTTP'</span>
<span class="c"># or </span>
<span class="nb">sudo </span>ufw allow <span class="s1">'Nginx HTTPS'</span>
</code></pre></div></div>

<blockquote class="alert alert-info">
  <p>To verify Nginx installation, visit the IP address of the VPS.<br />
You can find IP address by <code class="language-plaintext highlighter-rouge">curl -4 icanhazip.com</code>.</p>
</blockquote>

<h2 id="7-install-node-using-nvm">7. Install Node Using NVM</h2>

<p>Next, it is time to install Node using NVM. The following code helps you find the current <em>nvm version</em>:</p>

<div class="language-bash highlighter-rouge"><div class="highlight"><pre class="highlight"><code><span class="nv">nvmversion</span><span class="o">=</span><span class="si">$(</span>curl <span class="nt">--silent</span> <span class="s2">"https://api.github.com/repos/nvm-sh/nvm/releases/latest"</span> | <span class="nb">grep</span> <span class="s1">'"tag_name":'</span> | <span class="nb">sed</span> <span class="nt">-E</span> <span class="s1">'s/.*"([^"]+)".*/\1/'</span><span class="si">)</span>
curl <span class="nt">-o-</span> <span class="s2">"https://raw.githubusercontent.com/nvm-sh/nvm/</span><span class="nv">$nvmversion</span><span class="s2">/install.sh"</span> | bash
</code></pre></div></div>

<p>Some NPM packages require to refer to numerous packages needed for building software in general. So you’ll need to install the <strong>build-essential</strong> package by doing:</p>

<div class="language-bash highlighter-rouge"><div class="highlight"><pre class="highlight"><code><span class="nb">sudo </span>apt <span class="nb">install </span>build-essential <span class="nt">-y</span>
</code></pre></div></div>

<h2 id="8-install-pm2">8. Install PM2</h2>

<p><strong>PM2</strong> is a process manager built for production-level apps. It can help you run your Strapi app when the server restarts. It can watch for file changes and restart the server automatically for us.</p>

<div class="language-bash highlighter-rouge"><div class="highlight"><pre class="highlight"><code>npm i <span class="nt">-g</span> pm2@latest
<span class="nb">cd</span> ~
pm2 startup systemd
</code></pre></div></div>

<blockquote class="alert alert-info">
  <p>Follow the rest of the instructions as specified on the terminal and then do <code class="language-plaintext highlighter-rouge">pm2 save</code>.</p>
</blockquote>

<h2 id="9-install-database-mariadbmysql">9. Install Database (MariaDB/MySQL)</h2>

<p>MariaDB is a fork of MySQL with lots of performance gains. So, install this database server by doing:</p>

<div class="language-bash highlighter-rouge"><div class="highlight"><pre class="highlight"><code><span class="nb">sudo </span>apt <span class="nb">install </span>mariadb-server <span class="nt">-y</span>
<span class="nb">sudo </span>mysql_secure_installation
</code></pre></div></div>

<blockquote class="alert alert-info">
  <p>Follow all the instructions and complete the setup.</p>
</blockquote>

<p>Once your MariaDB server is installed, you need to create a non-root user with root privileges for database operations.</p>

<div class="language-bash highlighter-rouge"><div class="highlight"><pre class="highlight"><code><span class="nb">sudo </span>mariadb
</code></pre></div></div>

<div class="language-sql highlighter-rouge"><div class="highlight"><pre class="highlight"><code><span class="k">GRANT</span> <span class="k">ALL</span> <span class="k">ON</span> <span class="o">*</span><span class="p">.</span><span class="o">*</span> <span class="k">TO</span> <span class="s1">'&lt;NEWUSER&gt;'</span><span class="o">@</span><span class="s1">'localhost'</span> <span class="n">IDENTIFIED</span> <span class="k">BY</span> <span class="s1">'&lt;PASSWORD&gt;`'</span> <span class="k">WITH</span> <span class="k">GRANT</span> <span class="k">OPTION</span><span class="p">;</span>
<span class="n">FLUSH</span> <span class="k">PRIVILEGES</span><span class="p">;</span>
<span class="n">EXIT</span><span class="p">;</span>
</code></pre></div></div>

<p>Once this is done, restart your database server by doing:</p>

<div class="language-bash highlighter-rouge"><div class="highlight"><pre class="highlight"><code><span class="nb">sudo </span>systemctl restart mariadb
</code></pre></div></div>

<h2 id="10-create-nginx-server-blocks">10. Create Nginx Server Blocks</h2>

<p>It is always a good idea to server blocks rather than to change the default Nginx configuration. This helps you to host multiple websites on the same server. To create a server block, run the following command:</p>

<div class="language-bash highlighter-rouge"><div class="highlight"><pre class="highlight"><code><span class="nb">sudo </span>nano /etc/nginx/sites-available/&lt;YOUR_DOMAIN&gt;
</code></pre></div></div>

<p>Then, add the following configuration code in it:</p>

<div class="language-conf highlighter-rouge"><div class="highlight"><pre class="highlight"><code><span class="n">upstream</span> &lt;<span class="n">YOUR_DOMAIN</span>&gt; {
  <span class="n">server</span> <span class="m">127</span>.<span class="m">0</span>.<span class="m">0</span>.<span class="m">1</span>:<span class="m">1337</span>;
  <span class="n">keepalive</span> <span class="m">64</span>;
}

<span class="n">server</span> {
  <span class="n">server_name</span> &lt;<span class="n">YOUR_DOMAIN</span>&gt;;
  <span class="n">access_log</span> /<span class="n">var</span>/<span class="n">log</span>/<span class="n">nginx</span>/&lt;<span class="n">YOUR_DOMAIN</span>&gt;-<span class="n">access</span>.<span class="n">log</span>;
  <span class="n">error_log</span> /<span class="n">var</span>/<span class="n">log</span>/<span class="n">nginx</span>/&lt;<span class="n">YOUR_DOMAIN</span>&gt;-<span class="n">error</span>.<span class="n">log</span>;
  <span class="n">location</span> / {
    <span class="n">proxy_set_header</span> <span class="n">X</span>-<span class="n">Real</span>-<span class="n">IP</span> $<span class="n">remote_addr</span>;
    <span class="n">proxy_set_header</span> <span class="n">X</span>-<span class="n">Forwarded</span>-<span class="n">For</span> $<span class="n">proxy_add_x_forwarded_for</span>;
    <span class="n">proxy_set_header</span> <span class="n">X</span>-<span class="n">Forwarded</span>-<span class="n">Proto</span> $<span class="n">scheme</span>;
    <span class="n">proxy_set_header</span> <span class="n">Host</span> $<span class="n">http_host</span>;
    <span class="n">proxy_set_header</span> <span class="n">X</span>-<span class="n">NginX</span>-<span class="n">Proxy</span> <span class="n">true</span>;
    <span class="n">proxy_set_header</span> <span class="n">Upgrade</span> $<span class="n">http_upgrade</span>;
    <span class="n">proxy_set_header</span> <span class="n">Connection</span> <span class="s2">"upgrade"</span>;
    <span class="n">proxy_pass</span> <span class="n">http</span>://&lt;<span class="n">YOUR_DOMAIN</span>&gt;;
    <span class="n">proxy_redirect</span> <span class="n">off</span>;
    <span class="n">proxy_http_version</span> <span class="m">1</span>.<span class="m">1</span>;
    <span class="n">proxy_cache_bypass</span> $<span class="n">http_upgrade</span>;
  }
}

<span class="n">server</span> {
  <span class="n">listen</span> <span class="m">80</span>;
  <span class="n">server_name</span> &lt;<span class="n">YOUR_DOMAIN</span>&gt;;
}
</code></pre></div></div>

<blockquote class="alert alert-info">
  <p>This configuration assumes that your Strapi app will run on <code class="language-plaintext highlighter-rouge">127.0.0.1:1337</code>.</p>
</blockquote>

<p>Once your configuration is set up, you need to enable your website by creating a symbolic link for your configuration file. To do so, run the following command:</p>

<div class="language-bash highlighter-rouge"><div class="highlight"><pre class="highlight"><code><span class="nb">sudo ln</span> <span class="nt">-s</span> /etc/nginx/sites-available/&lt;YOUR_DOMAIN&gt; /etc/nginx/sites-enabled/
</code></pre></div></div>

<p>This is optional but if you are serving multiple domains or subdomains from your server, you need to edit your <code class="language-plaintext highlighter-rouge">nginx.conf</code> by uncommenting this line <code class="language-plaintext highlighter-rouge">server_names_hash_bucket_size 64;</code> using:</p>

<div class="language-bash highlighter-rouge"><div class="highlight"><pre class="highlight"><code><span class="nb">sudo </span>nano /etc/nginx/nginx.conf
</code></pre></div></div>

<p>Quickly check that your configurations are error-free by running:</p>

<div class="language-bash highlighter-rouge"><div class="highlight"><pre class="highlight"><code><span class="nb">sudo </span>nginx <span class="nt">-t</span>
</code></pre></div></div>

<p>The output will tell you whether an error exists or not. If any error comes up, you need to resolve it and then finally restart the server by doing:</p>

<div class="language-bash highlighter-rouge"><div class="highlight"><pre class="highlight"><code><span class="nb">sudo </span>systemctl restart nginx
</code></pre></div></div>

<h2 id="11-setup-dns">11. Setup DNS</h2>

<p>In your domain provider, you need to add an <strong>A record</strong> to point your subdomain to the VPS as follows:</p>

<table>
  <thead>
    <tr>
      <th>Type</th>
      <th>Name</th>
      <th>Content</th>
      <th>TTL</th>
    </tr>
  </thead>
  <tbody>
    <tr>
      <td>A</td>
      <td>subdomain</td>
      <td>«VPSIPADDRESS»</td>
      <td>3600</td>
    </tr>
  </tbody>
</table>

<blockquote class="alert alert-warning">
  <p>The DNS propagation can take upto 24 hours.</p>
</blockquote>

<h2 id="12-install-ssl">12. Install SSL</h2>

<p>The final step is to issue an SSL certificate for your Strapi app. You can automate the process of issuing certificates to your domain using <strong>certbot</strong>. Running the following commands will help you issue a <strong>Let’s Encrypt SSL certificate</strong> for your domain.</p>

<div class="language-bash highlighter-rouge"><div class="highlight"><pre class="highlight"><code><span class="nb">sudo </span>apt <span class="nb">install </span>certbot python3-certbot-nginx <span class="nt">-y</span>
<span class="nb">sudo </span>certbot <span class="nt">--nginx</span> <span class="nt">-d</span> &lt;YOUR_DOMAIN&gt;
</code></pre></div></div>

<blockquote class="alert alert-info">
  <p>Follow all the instructions on the terminal. Use the Redirect option to redirect HTTP traffic to HTTPS.</p>
</blockquote>

<p>The advantage of the above commands is that the <strong>certbot</strong> process runs twice a day to check if any certificates will expire within a month. It automatically renews the certificates so you don’t have to worry about certificate expiration. You can verify this by running:</p>

<div class="language-bash highlighter-rouge"><div class="highlight"><pre class="highlight"><code><span class="nb">sudo </span>systemctl status certbot.timer
</code></pre></div></div>

<h2 id="13-run-strapi-app">13. Run Strapi App</h2>

<p>Now that your server setup is complete and it is time to run your Strapi app using PM2 by running the following commands:</p>

<div class="language-bash highlighter-rouge"><div class="highlight"><pre class="highlight"><code><span class="nb">cd</span> ~
<span class="nb">cd </span>api
pm2 start ecosystem.config.js
</code></pre></div></div>

<p>At this point, visit your Strapi domain and verify that your Strapi app is running.</p>]]></content><author><name>Ravgeet Dhillon</name></author><category term="devops" /><category term="strapi" /><category term="vps" /><category term="automation" /><summary type="html"><![CDATA[Learn how to set up a Strapi app on VPS, DigitalOcean, Linode with Ubuntu, MySQL.]]></summary><media:thumbnail xmlns:media="http://search.yahoo.com/mrss/" url="https://www.ravsam.in/assets/images/blogs/deploy-strapi-on-vps-with-ubuntu-mysql.png" /><media:content medium="image" url="https://www.ravsam.in/assets/images/blogs/deploy-strapi-on-vps-with-ubuntu-mysql.png" xmlns:media="http://search.yahoo.com/mrss/" /></entry><entry><title type="html">Setup GitHub Actions for a Dart project</title><link href="https://www.ravsam.in/blog/setup-github-actions-for-dart-project/" rel="alternate" type="text/html" title="Setup GitHub Actions for a Dart project" /><published>2021-03-27T10:00:00+00:00</published><updated>2025-08-18T07:51:05+00:00</updated><id>https://www.ravsam.in/blog/setup-github-actions-for-dart-project</id><content type="html" xml:base="https://www.ravsam.in/blog/setup-github-actions-for-dart-project/"><![CDATA[<p>When working in a team or even as an individual, humans often break rules. But sometimes breaking rules can result in a poor quality code which over time grows out to be messy. You can take advantage of linting and static analysis to check whether the written code adheres to your code styling rules. This can be automated using GitHub Actions.</p>

<p>In this blog, you’ll see how to set up GitHub Actions workflows for static analyzing your code before merging it with your production codebase.</p>

<h6 id="contents">Contents</h6>

<ul>
  <li><a href="#prerequisites">Prerequisites</a></li>
  <li><a href="#basic-analysis-options">Basic Analysis Options</a></li>
  <li><a href="#setting-up-github-actions">Setting up GitHub Actions</a></li>
  <li><a href="#results">Results</a></li>
</ul>

<h2 id="prerequisites">Prerequisites</h2>

<p>Before getting started, make sure to have a Dart project ready. For this tutorial, you can follow along with:</p>

<ul>
  <li><a href="https://github.com/ravgeetdhillon/dart_shelf_server_sample">A Sample Dart Project</a></li>
</ul>

<h2 id="basic-analysis-options">Basic Analysis Options</h2>

<p>Static Analysis helps you to find problems in your code before executing it. It’s a great tool that you can integrate into your development environment to prevent bugs and ensure that your code conforms to styling guidelines especially when you are working in a team.</p>

<p><strong>analysis_options.yaml</strong> is a YAML file that you can use to specify the lint rules. Create this file at the root of your project and add the following code to it:</p>

<div class="language-yml highlighter-rouge"><div class="highlight"><pre class="highlight"><code><span class="na">include</span><span class="pi">:</span> <span class="s">package:lint/analysis_options.yaml</span>

<span class="na">analyzer</span><span class="pi">:</span>
  <span class="na">errors</span><span class="pi">:</span>
    <span class="na">avoid_function_literals_in_foreach_calls</span><span class="pi">:</span> <span class="s">ignore</span>
    <span class="na">avoid_print</span><span class="pi">:</span> <span class="s">ignore</span>
    <span class="na">omit_local_variable_types</span><span class="pi">:</span> <span class="s">ignore</span>
    <span class="na">overridden_fields</span><span class="pi">:</span> <span class="s">ignore</span>
    <span class="na">prefer_collection_literals</span><span class="pi">:</span> <span class="s">ignore</span>
    <span class="na">unnecessary_await_in_return</span><span class="pi">:</span> <span class="s">ignore</span>
    <span class="na">unnecessary_this</span><span class="pi">:</span> <span class="s">ignore</span>
    <span class="na">use_setters_to_change_properties</span><span class="pi">:</span> <span class="s">ignore</span>
</code></pre></div></div>

<h2 id="setting-up-github-actions">Setting up GitHub Actions</h2>

<p>Next, create a GitHub Actions workflow for doing a static analysis of your project’s source code and even run some tests. This workflow will run on each push and pull request made to the <em>master</em> branch.</p>

<p>Create a <strong>ci.yml</strong> file in the <strong>.github/workflows</strong> directory and add the following code to it:</p>

<div class="language-yml highlighter-rouge"><div class="highlight"><pre class="highlight"><code><span class="na">name</span><span class="pi">:</span> <span class="s">CI</span>

<span class="na">on</span><span class="pi">:</span>
  <span class="na">push</span><span class="pi">:</span>
    <span class="na">branches</span><span class="pi">:</span> <span class="pi">[</span><span class="nv">master</span><span class="pi">]</span>
  <span class="na">pull_request</span><span class="pi">:</span>
    <span class="na">branches</span><span class="pi">:</span> <span class="pi">[</span><span class="nv">master</span><span class="pi">]</span>

<span class="na">jobs</span><span class="pi">:</span>
  <span class="na">lint</span><span class="pi">:</span>
    <span class="na">runs-on</span><span class="pi">:</span> <span class="s">ubuntu-latest</span>
    <span class="na">steps</span><span class="pi">:</span>
      <span class="pi">-</span> <span class="na">name</span><span class="pi">:</span> <span class="s">Set up Repository</span>
        <span class="na">uses</span><span class="pi">:</span> <span class="s">actions/checkout@v2</span>
      
      <span class="pi">-</span> <span class="na">name</span><span class="pi">:</span> <span class="s">Set up Dart</span>
        <span class="na">uses</span><span class="pi">:</span> <span class="s">dart-lang/setup-dart@v1</span>

      <span class="pi">-</span> <span class="na">name</span><span class="pi">:</span> <span class="s">Install Pub Dependencies</span>
        <span class="na">run</span><span class="pi">:</span> <span class="s">dart pub get</span>

      <span class="pi">-</span> <span class="na">name</span><span class="pi">:</span> <span class="s">Verify Formatting</span>
        <span class="na">run</span><span class="pi">:</span> <span class="s">dart format --output=none --set-exit-if-changed .</span>

      <span class="pi">-</span> <span class="na">name</span><span class="pi">:</span> <span class="s">Analyze Project Source</span>
        <span class="na">run</span><span class="pi">:</span> <span class="s">dart analyze</span>
      
      <span class="pi">-</span> <span class="na">name</span><span class="pi">:</span> <span class="s">Run tests</span>
        <span class="na">run</span><span class="pi">:</span> <span class="s">dart test</span>
</code></pre></div></div>

<p>In the above workflow, you are using a <em>stable</em> version of Dart. However, if you want to set up a different Dart configuration, you can use <code class="language-plaintext highlighter-rouge">sdk</code> input with <em>dart-lang/setup-dart</em> action as in the following code:</p>

<div class="language-yml highlighter-rouge"><div class="highlight"><pre class="highlight"><code><span class="pi">-</span> <span class="na">name</span><span class="pi">:</span> <span class="s">Set up Dart</span>
  <span class="na">uses</span><span class="pi">:</span> <span class="s">dart-lang/setup-dart@v1</span>
  <span class="na">with</span><span class="pi">:</span>
    <span class="na">sdk</span><span class="pi">:</span> <span class="s">2.10.3</span>

<span class="c1"># or</span>

<span class="pi">-</span> <span class="na">name</span><span class="pi">:</span> <span class="s">Set up Dart</span>
  <span class="na">uses</span><span class="pi">:</span> <span class="s">dart-lang/setup-dart@v1</span>
  <span class="na">with</span><span class="pi">:</span>
    <span class="na">sdk</span><span class="pi">:</span> <span class="s">dev</span>
</code></pre></div></div>

<h2 id="results">Results</h2>

<p>At this stage, you can push directly to the master branch and check out the execution of your GitHub Action.</p>

<figure class="mb-0 w-100 rounded">
    <img src="https://www.ravsam.in/assets/images/resized/20/dart-github-actions.png" width="100%" class="img-fluid rounded blur-up lazyautosizes lazyload" sizes="auto" alt="Github Actions for Dart" style="" data-srcset="            https://www.ravsam.in/assets/images/resized/20/dart-github-actions.png 20w,            https://www.ravsam.in/assets/images/resized/64/dart-github-actions.png 64w,            https://www.ravsam.in/assets/images/resized/576/dart-github-actions.png 576w,            https://www.ravsam.in/assets/images/resized/960/dart-github-actions.png 960w,            https://www.ravsam.in/assets/images/resized/1400/dart-github-actions.png 1400w,            https://www.ravsam.in/assets/images/blog-assets/dart-github-actions.png 2091w" />
    
        <figcaption class="text-center text-muted mt-2 mb-4">All steps passed successfully</figcaption>
    
</figure>

<p>So, you have been able to set up your <strong>lint pipeline</strong> in less than two minutes. This power of GitHub Actions can help any team to achieve better developer workflow and faster releases.</p>]]></content><author><name>Ravgeet Dhillon</name></author><category term="automation" /><category term="github-actions" /><category term="dart" /><category term="flutter" /><category term="automation" /><summary type="html"><![CDATA[Format, Static Analyse, and Test a Dart project using GitHub Actions.]]></summary><media:thumbnail xmlns:media="http://search.yahoo.com/mrss/" url="https://www.ravsam.in/assets/images/blogs/setup-github-actions-for-dart-project.png" /><media:content medium="image" url="https://www.ravsam.in/assets/images/blogs/setup-github-actions-for-dart-project.png" xmlns:media="http://search.yahoo.com/mrss/" /></entry><entry><title type="html">Turn a Google Sheet into a REST API</title><link href="https://www.ravsam.in/blog/turning-a-google-sheet-into-a-rest-api/" rel="alternate" type="text/html" title="Turn a Google Sheet into a REST API" /><published>2021-03-08T12:30:00+00:00</published><updated>2025-08-18T07:51:05+00:00</updated><id>https://www.ravsam.in/blog/turning-a-google-sheet-into-a-rest-api</id><content type="html" xml:base="https://www.ravsam.in/blog/turning-a-google-sheet-into-a-rest-api/"><![CDATA[<p>Wouldn’t it be awesome if you can use your Google Sheets as a CMS? What if you want the data in your Google Sheet to be publicly available? This can be done easily using Google Sheets and Google Apps Script.</p>

<p>In this blog, you’ll take a look at how you can convert a Google Sheet into a REST API and access it publicly from any app you want.</p>

<h6 id="contents">Contents</h6>

<ul>
  <li><a href="#setting-up-a-spreadsheet">Setting up a Spreadsheet</a></li>
  <li><a href="#creating-a-google-apps-script">Creating a Google Apps Script</a></li>
  <li><a href="#converting-data-to-json-format">Converting Data to JSON format</a></li>
  <li><a href="#creating-a-web-app">Creating a Web App</a></li>
  <li><a href="#results">Results</a></li>
</ul>

<h2 id="setting-up-a-spreadsheet">Setting up a Spreadsheet</h2>

<p>The first task is to set up a Spreadsheet and initialize it with some data.</p>

<figure class="mb-0 w-100 rounded">
    <img src="https://www.ravsam.in/assets/images/resized/20/google-sheet-for-rest-api.png" width="100%" class="img-fluid rounded blur-up lazyautosizes lazyload" sizes="auto" alt="Format for Google Spreadsheet" style="" data-srcset="            https://www.ravsam.in/assets/images/resized/20/google-sheet-for-rest-api.png 20w,            https://www.ravsam.in/assets/images/resized/64/google-sheet-for-rest-api.png 64w,            https://www.ravsam.in/assets/images/resized/576/google-sheet-for-rest-api.png 576w,            https://www.ravsam.in/assets/images/resized/960/google-sheet-for-rest-api.png 960w,            https://www.ravsam.in/assets/images/resized/1400/google-sheet-for-rest-api.png 1400w,            https://www.ravsam.in/assets/images/blog-assets/google-sheet-for-rest-api.png 2091w" />
    
        <figcaption class="text-center text-muted mt-2 mb-4">Google Spreadsheet with some data</figcaption>
    
</figure>

<h2 id="creating-a-google-apps-script">Creating a Google Apps Script</h2>

<p>The next step in your journey is to be able to access the data in the Google Sheet. So, from <em>Tools</em>, select <em>Script Editor</em>. This will create a <strong>new Apps Script project</strong>.</p>

<p>In your newly created Apps Script project, create a <strong>Code.gs</strong> file and add the following code to it:</p>

<div class="language-js highlighter-rouge"><div class="highlight"><pre class="highlight"><code><span class="kd">function</span> <span class="nf">json</span><span class="p">(</span><span class="nx">sheetName</span><span class="p">)</span> <span class="p">{</span>
  <span class="kd">const</span> <span class="nx">spreadsheet</span> <span class="o">=</span> <span class="nx">SpreadsheetApp</span><span class="p">.</span><span class="nf">getActiveSpreadsheet</span><span class="p">()</span>
  <span class="kd">const</span> <span class="nx">sheet</span> <span class="o">=</span> <span class="nx">spreadsheet</span><span class="p">.</span><span class="nf">getSheetByName</span><span class="p">(</span><span class="nx">sheetName</span><span class="p">)</span>
  <span class="kd">const</span> <span class="nx">data</span> <span class="o">=</span> <span class="nx">sheet</span><span class="p">.</span><span class="nf">getDataRange</span><span class="p">().</span><span class="nf">getValues</span><span class="p">()</span>
  <span class="kd">const</span> <span class="nx">jsonData</span> <span class="o">=</span> <span class="nf">convertToJson</span><span class="p">(</span><span class="nx">data</span><span class="p">)</span>
  <span class="k">return</span> <span class="nx">ContentService</span>
        <span class="p">.</span><span class="nf">createTextOutput</span><span class="p">(</span><span class="nx">JSON</span><span class="p">.</span><span class="nf">stringify</span><span class="p">(</span><span class="nx">jsonData</span><span class="p">))</span>
        <span class="p">.</span><span class="nf">setMimeType</span><span class="p">(</span><span class="nx">ContentService</span><span class="p">.</span><span class="nx">MimeType</span><span class="p">.</span><span class="nx">JSON</span><span class="p">)</span>
<span class="p">}</span>
</code></pre></div></div>

<p>In the above function:</p>

<ol>
  <li>You get the current active <code class="language-plaintext highlighter-rouge">spreadsheet</code> to which this Apps Script project is linked with.</li>
  <li>You get your specific <code class="language-plaintext highlighter-rouge">sheet</code> by its name.</li>
  <li>You retrieve the <code class="language-plaintext highlighter-rouge">data</code> in that sheet.</li>
  <li>You convert the data to JSON format using <code class="language-plaintext highlighter-rouge">convertToJson</code> function and store it in <code class="language-plaintext highlighter-rouge">jsonData</code> variable.</li>
  <li>Finally, you return the JSON response.</li>
</ol>

<h2 id="converting-data-to-json-format">Converting Data to JSON format</h2>

<p>The data returned by the <code class="language-plaintext highlighter-rouge">sheet.getDataRange().getValues()</code> is of the following format:</p>

<div class="language-json highlighter-rouge"><div class="highlight"><pre class="highlight"><code><span class="p">[</span><span class="w">
  </span><span class="p">[</span><span class="err">'name'</span><span class="p">,</span><span class="w"> </span><span class="err">'age'</span><span class="p">,</span><span class="w"> </span><span class="err">'role'</span><span class="p">],</span><span class="w">
  </span><span class="p">[</span><span class="err">'John'</span><span class="p">,</span><span class="w"> </span><span class="mf">28.0</span><span class="p">,</span><span class="w"> </span><span class="err">'Front</span><span class="w"> </span><span class="err">End</span><span class="w"> </span><span class="err">Engineer'</span><span class="p">],</span><span class="w">
  </span><span class="p">[</span><span class="err">'Marry'</span><span class="p">,</span><span class="w"> </span><span class="mf">21.0</span><span class="p">,</span><span class="w"> </span><span class="err">'Staff</span><span class="w"> </span><span class="err">Engineer'</span><span class="p">],</span><span class="w">
  </span><span class="p">[</span><span class="err">'Jackson'</span><span class="p">,</span><span class="w"> </span><span class="mf">22.0</span><span class="p">,</span><span class="w"> </span><span class="err">'Backend</span><span class="w"> </span><span class="err">Engineer'</span><span class="p">]</span><span class="w">
</span><span class="p">]</span><span class="w">
</span></code></pre></div></div>

<p>In the above snippet, you can see that there is a custom function <code class="language-plaintext highlighter-rouge">convertToJson</code> that needs to be written. To convert your sheet data with headers into JSON format, add the following code in <strong>Code.gs</strong> file:</p>

<div class="language-js highlighter-rouge"><div class="highlight"><pre class="highlight"><code><span class="kd">function</span> <span class="nf">convertToJson</span><span class="p">(</span><span class="nx">data</span><span class="p">)</span> <span class="p">{</span>
  <span class="kd">const</span> <span class="nx">headers</span> <span class="o">=</span> <span class="nx">data</span><span class="p">[</span><span class="mi">0</span><span class="p">]</span>
  <span class="kd">const</span> <span class="nx">raw_data</span> <span class="o">=</span> <span class="nx">data</span><span class="p">.</span><span class="nf">slice</span><span class="p">(</span><span class="mi">1</span><span class="p">,)</span>
  <span class="kd">let</span> <span class="nx">json</span> <span class="o">=</span> <span class="p">[]</span>
  <span class="nx">raw_data</span><span class="p">.</span><span class="nf">forEach</span><span class="p">(</span><span class="nx">d</span> <span class="o">=&gt;</span> <span class="p">{</span>
      <span class="kd">let</span> <span class="nx">object</span> <span class="o">=</span> <span class="p">{}</span>
      <span class="k">for </span><span class="p">(</span><span class="kd">let</span> <span class="nx">i</span> <span class="o">=</span> <span class="mi">0</span><span class="p">;</span> <span class="nx">i</span> <span class="o">&lt;</span> <span class="nx">headers</span><span class="p">.</span><span class="nx">length</span><span class="p">;</span> <span class="nx">i</span><span class="o">++</span><span class="p">)</span> <span class="p">{</span>
        <span class="nx">object</span><span class="p">[</span><span class="nx">headers</span><span class="p">[</span><span class="nx">i</span><span class="p">]]</span> <span class="o">=</span> <span class="nx">d</span><span class="p">[</span><span class="nx">i</span><span class="p">]</span>
      <span class="p">}</span>
      <span class="nx">json</span><span class="p">.</span><span class="nf">push</span><span class="p">(</span><span class="nx">object</span><span class="p">)</span>
  <span class="p">});</span>
  <span class="k">return</span> <span class="nx">json</span>
<span class="p">}</span>
</code></pre></div></div>

<h2 id="creating-a-web-app">Creating a Web App</h2>

<p>To access your Google Sheet as a REST API, you need to deploy your Google Apps Script as a <strong>Web App</strong>. This web app will handle the <strong>GET</strong> requests.</p>

<p>In the <strong>Code.gs</strong> file, add the following code:</p>

<div class="language-js highlighter-rouge"><div class="highlight"><pre class="highlight"><code><span class="kd">function</span> <span class="nf">doGet</span><span class="p">(</span><span class="nx">e</span><span class="p">)</span> <span class="p">{</span>
  <span class="kd">const</span> <span class="nx">path</span> <span class="o">=</span> <span class="nx">e</span><span class="p">.</span><span class="nx">parameter</span><span class="p">.</span><span class="nx">path</span>
  <span class="k">return</span> <span class="nf">json</span><span class="p">(</span><span class="nx">path</span><span class="p">)</span>
<span class="p">}</span>
</code></pre></div></div>

<p>Once you are done with this, the final step is to publish your Apps Script as a Web App. You can simply create a <em>New Deployment</em> and set the <em>Execute As</em> to <strong>me</strong> and <em>Who has access</em> to <strong>Anyone</strong>. These settings allow your Web App to be publicly accessible.</p>

<h2 id="results">Results</h2>

<p>To the webapp, you can send a <em>GET</em> request to it by using <strong>Postman</strong>. The path for the <em>GET</em> request would be your Web App’s <em>URL</em> and query parameter <strong>path</strong> would be your Google Sheet’s name.</p>

<p>In this case, the URL is <code class="language-plaintext highlighter-rouge">https://script.google.com/macros/s/AKfycbw9gpHbIauF8obidyDjxe3_L9qA-Ww-e8bv6pvNNGavAv-xxxxxxxxxxxxxxxxxxxxxxx/exec?path=people</code>.</p>

<p>Alright! You can see that you have transformed your Google Sheet into a REST API in under five minutes using the above code.</p>

<figure class="mb-0 w-100 rounded">
    <img src="https://www.ravsam.in/assets/images/resized/20/google-sheet-rest-api-response.png" width="100%" class="img-fluid rounded blur-up lazyautosizes lazyload" sizes="auto" alt="Google Sheet data returned in a REST API format" style="" data-srcset="            https://www.ravsam.in/assets/images/resized/20/google-sheet-rest-api-response.png 20w,            https://www.ravsam.in/assets/images/resized/64/google-sheet-rest-api-response.png 64w,            https://www.ravsam.in/assets/images/resized/576/google-sheet-rest-api-response.png 576w,            https://www.ravsam.in/assets/images/blog-assets/google-sheet-rest-api-response.png 772w" />
    
        <figcaption class="text-center text-muted mt-2 mb-4">Google Sheet data returned in a REST API format</figcaption>
    
</figure>

<p>You can add more sheets in your spreadsheet and access them simply using the sheet name in the <em>path</em> query parameter when sending a <em>GET</em> request.</p>]]></content><author><name>Ravgeet Dhillon</name></author><category term="development" /><category term="google-apps-script" /><category term="web-app" /><category term="rest-api" /><summary type="html"><![CDATA[Turn your Google Sheet into a REST API and access it in any app.]]></summary><media:thumbnail xmlns:media="http://search.yahoo.com/mrss/" url="https://www.ravsam.in/assets/images/blogs/turning-a-google-sheet-into-a-rest-api.png" /><media:content medium="image" url="https://www.ravsam.in/assets/images/blogs/turning-a-google-sheet-into-a-rest-api.png" xmlns:media="http://search.yahoo.com/mrss/" /></entry><entry><title type="html">Add Unsubscribe Link in Emails using Google Apps Script</title><link href="https://www.ravsam.in/blog/add-unsubscribe-link-in-emails-using-google-apps-script/" rel="alternate" type="text/html" title="Add Unsubscribe Link in Emails using Google Apps Script" /><published>2021-02-12T08:40:00+00:00</published><updated>2025-08-18T07:51:05+00:00</updated><id>https://www.ravsam.in/blog/add-unsubscribe-link-in-emails-using-google-apps-script</id><content type="html" xml:base="https://www.ravsam.in/blog/add-unsubscribe-link-in-emails-using-google-apps-script/"><![CDATA[<p>When you are <a href="https://www.ravsam.in/blog/setup-email-marketing-using-google-apps-script/">setting up email marketing campaigns</a> or newsletters, one thing often forgotten is an <strong>Unsubscribe link</strong>. Not providing an option to unsubscribe from the mailing list can land your emails in spam.</p>

<p>In this tutorial, you’ll learn to add an Unsubscribe link in your emails sent using Google Apps Script.</p>

<h6 id="contents">Contents</h6>

<ul>
  <li><a href="#setting-up-a-spreadsheet">Setting Up a Spreadsheet</a></li>
  <li><a href="#writing-a-hash-function">Writing a Hash Function</a></li>
  <li><a href="#writing-email-template">Writing Email Template</a></li>
  <li><a href="#writing-unsubscribe-code">Writing Unsubscribe Code</a></li>
  <li><a href="#results">Results</a></li>
</ul>

<h2 id="setting-up-a-spreadsheet">Setting Up a Spreadsheet</h2>

<p>The first task is to set up a Spreadsheet. For this:</p>

<ol>
  <li>Create a new Google Spreadsheet and name the sheet as <em>emails</em>.</li>
  <li>Add the following fields in the first row of your spreadsheet.</li>
</ol>

<figure class="mb-0 w-100 rounded">
    <img src="https://www.ravsam.in/assets/images/resized/20/unsubscribe-setup.png" width="100%" class="img-fluid rounded blur-up lazyautosizes lazyload" sizes="auto" alt="Format for Google Spreadsheet" style="" data-srcset="            https://www.ravsam.in/assets/images/resized/20/unsubscribe-setup.png 20w,            https://www.ravsam.in/assets/images/resized/64/unsubscribe-setup.png 64w,            https://www.ravsam.in/assets/images/resized/576/unsubscribe-setup.png 576w,            https://www.ravsam.in/assets/images/resized/960/unsubscribe-setup.png 960w,            https://www.ravsam.in/assets/images/resized/1400/unsubscribe-setup.png 1400w,            https://www.ravsam.in/assets/images/blog-assets/unsubscribe-setup.png 2091w" />
    
        <figcaption class="text-center text-muted mt-2 mb-4">Format for Google Spreadsheet</figcaption>
    
</figure>

<h2 id="writing-a-hash-function">Writing a Hash Function</h2>

<p>To provide a secure way to unsubscribe, you need to create a unique token for each of your subscribers. Google Apps Script provides you with utility functions to create a <strong>hash</strong> of a string using the <strong>MD5 hashing algorithm</strong>. The following function is used to create a hash of the string <code class="language-plaintext highlighter-rouge">value</code>, provided as a parameter:</p>

<div class="language-js highlighter-rouge"><div class="highlight"><pre class="highlight"><code><span class="kd">function</span> <span class="nf">getMD5Hash</span><span class="p">(</span><span class="nx">value</span><span class="p">)</span> <span class="p">{</span>
  <span class="kd">const</span> <span class="nx">digest</span> <span class="o">=</span> <span class="nx">Utilities</span><span class="p">.</span><span class="nf">computeDigest</span><span class="p">(</span><span class="nx">Utilities</span><span class="p">.</span><span class="nx">DigestAlgorithm</span><span class="p">.</span><span class="nx">MD5</span><span class="p">,</span>
                                         <span class="nx">value</span><span class="p">,</span>
                                         <span class="nx">Utilities</span><span class="p">.</span><span class="nx">Charset</span><span class="p">.</span><span class="nx">UTF_8</span><span class="p">)</span>
  <span class="kd">let</span> <span class="nx">hash</span> <span class="o">=</span> <span class="dl">''</span>
  <span class="k">for </span><span class="p">(</span><span class="nx">i</span> <span class="o">=</span> <span class="mi">0</span><span class="p">;</span> <span class="nx">i</span> <span class="o">&lt;</span> <span class="nx">digest</span><span class="p">.</span><span class="nx">length</span><span class="p">;</span> <span class="nx">i</span><span class="o">++</span><span class="p">)</span> <span class="p">{</span>
    <span class="kd">let</span> <span class="nx">byte</span> <span class="o">=</span> <span class="nx">digest</span><span class="p">[</span><span class="nx">i</span><span class="p">]</span>
    <span class="k">if </span><span class="p">(</span><span class="nx">byte</span> <span class="o">&lt;</span> <span class="mi">0</span><span class="p">)</span> <span class="nx">byte</span> <span class="o">+=</span> <span class="mi">256</span>
    <span class="kd">let</span> <span class="nx">bStr</span> <span class="o">=</span> <span class="nx">byte</span><span class="p">.</span><span class="nf">toString</span><span class="p">(</span><span class="mi">16</span><span class="p">)</span>
    <span class="k">if </span><span class="p">(</span><span class="nx">bStr</span><span class="p">.</span><span class="nx">length</span> <span class="o">==</span> <span class="mi">1</span><span class="p">)</span> <span class="nx">bStr</span> <span class="o">=</span> <span class="dl">'</span><span class="s1">0</span><span class="dl">'</span> <span class="o">+</span> <span class="nx">bStr</span>
    <span class="nx">hash</span> <span class="o">+=</span> <span class="nx">bStr</span>
  <span class="p">}</span>
  <span class="k">return</span> <span class="nx">hash</span>
<span class="p">}</span>
</code></pre></div></div>

<p>Since no two strings in the world have the same hash, this is the right way to provide unsubscribe tokens to your subscribers in your marketing campaigns or newsletters.</p>

<p>However, there is a security issue involved. If anyone knows the email of your subscriber, the attacker can easily compute the hash and unsubscribe the subscriber from your email list. So, to make the hash impossible to guess, you can add some randomness to your email string. You can create a random string and append it to your original email string.</p>

<p>The following snippet of code will help you to achieve your purpose:</p>

<div class="language-js highlighter-rouge"><div class="highlight"><pre class="highlight"><code><span class="kd">function</span> <span class="nf">getMD5Hash</span><span class="p">(</span><span class="nx">value</span><span class="p">)</span> <span class="p">{</span>
  <span class="nx">value</span> <span class="o">=</span> <span class="nx">value</span> <span class="o">+</span> <span class="nf">generateRandomString</span><span class="p">(</span><span class="mi">8</span><span class="p">)</span> <span class="c1">// added this</span>
  <span class="kd">const</span> <span class="nx">digest</span> <span class="o">=</span> <span class="nx">Utilities</span><span class="p">.</span><span class="nf">computeDigest</span><span class="p">(</span><span class="nx">Utilities</span><span class="p">.</span><span class="nx">DigestAlgorithm</span><span class="p">.</span><span class="nx">MD5</span><span class="p">,</span>
                                         <span class="nx">value</span><span class="p">,</span>
                                         <span class="nx">Utilities</span><span class="p">.</span><span class="nx">Charset</span><span class="p">.</span><span class="nx">UTF_8</span><span class="p">)</span>
  <span class="kd">let</span> <span class="nx">hash</span> <span class="o">=</span> <span class="dl">''</span>
  <span class="k">for </span><span class="p">(</span><span class="nx">i</span> <span class="o">=</span> <span class="mi">0</span><span class="p">;</span> <span class="nx">i</span> <span class="o">&lt;</span> <span class="nx">digest</span><span class="p">.</span><span class="nx">length</span><span class="p">;</span> <span class="nx">i</span><span class="o">++</span><span class="p">)</span> <span class="p">{</span>
    <span class="kd">let</span> <span class="nx">byte</span> <span class="o">=</span> <span class="nx">digest</span><span class="p">[</span><span class="nx">i</span><span class="p">]</span>
    <span class="k">if </span><span class="p">(</span><span class="nx">byte</span> <span class="o">&lt;</span> <span class="mi">0</span><span class="p">)</span> <span class="nx">byte</span> <span class="o">+=</span> <span class="mi">256</span>
    <span class="kd">let</span> <span class="nx">bStr</span> <span class="o">=</span> <span class="nx">byte</span><span class="p">.</span><span class="nf">toString</span><span class="p">(</span><span class="mi">16</span><span class="p">)</span>
    <span class="k">if </span><span class="p">(</span><span class="nx">bStr</span><span class="p">.</span><span class="nx">length</span> <span class="o">==</span> <span class="mi">1</span><span class="p">)</span> <span class="nx">bStr</span> <span class="o">=</span> <span class="dl">'</span><span class="s1">0</span><span class="dl">'</span> <span class="o">+</span> <span class="nx">bStr</span>
    <span class="nx">hash</span> <span class="o">+=</span> <span class="nx">bStr</span>
  <span class="p">}</span>
  <span class="k">return</span> <span class="nx">hash</span>
<span class="p">}</span>

<span class="kd">function</span> <span class="nf">generateRandomString</span><span class="p">(</span><span class="nx">length</span><span class="p">)</span> <span class="p">{</span>
  <span class="kd">const</span> <span class="nx">randomNumber</span> <span class="o">=</span> <span class="nb">Math</span><span class="p">.</span><span class="nf">pow</span><span class="p">(</span><span class="mi">36</span><span class="p">,</span> <span class="nx">length</span> <span class="o">+</span> <span class="mi">1</span><span class="p">)</span> <span class="o">-</span> <span class="nb">Math</span><span class="p">.</span><span class="nf">random</span><span class="p">()</span> <span class="o">*</span> <span class="nb">Math</span><span class="p">.</span><span class="nf">pow</span><span class="p">(</span><span class="mi">36</span><span class="p">,</span> <span class="nx">length</span><span class="p">)</span>
  <span class="kd">const</span> <span class="nx">randomString</span> <span class="o">=</span> <span class="nb">Math</span><span class="p">.</span><span class="nf">round</span><span class="p">(</span><span class="nx">randomNumber</span><span class="p">).</span><span class="nf">toString</span><span class="p">(</span><span class="mi">36</span><span class="p">).</span><span class="nf">slice</span><span class="p">(</span><span class="mi">1</span><span class="p">)</span>
  <span class="k">return</span> <span class="nx">randomString</span>
<span class="p">}</span>
</code></pre></div></div>

<figure class="mb-0 w-100 rounded">
    <img src="https://www.ravsam.in/assets/images/resized/20/unsubscribe-hash.png" width="100%" class="img-fluid rounded blur-up lazyautosizes lazyload" sizes="auto" alt="Google Spreadsheet with Unsubscribe Hashes" style="" data-srcset="            https://www.ravsam.in/assets/images/resized/20/unsubscribe-hash.png 20w,            https://www.ravsam.in/assets/images/resized/64/unsubscribe-hash.png 64w,            https://www.ravsam.in/assets/images/resized/576/unsubscribe-hash.png 576w,            https://www.ravsam.in/assets/images/resized/960/unsubscribe-hash.png 960w,            https://www.ravsam.in/assets/images/resized/1400/unsubscribe-hash.png 1400w,            https://www.ravsam.in/assets/images/blog-assets/unsubscribe-hash.png 2091w" />
    
        <figcaption class="text-center text-muted mt-2 mb-4">Google Spreadsheet with Unsubscribe Hashes</figcaption>
    
</figure>

<h2 id="writing-email-template">Writing Email Template</h2>

<p>You can use a basic HTML template for testing your Google Apps Script for the unsubscribing feature:</p>

<div class="language-html highlighter-rouge"><div class="highlight"><pre class="highlight"><code><span class="cp">&lt;!DOCTYPE html&gt;</span>
<span class="nt">&lt;html&gt;</span>
  <span class="nt">&lt;head&gt;</span>
    <span class="nt">&lt;base</span> <span class="na">target=</span><span class="s">"_top"</span><span class="nt">&gt;</span>
  <span class="nt">&lt;/head&gt;</span>
  <span class="nt">&lt;body&gt;</span>
    <span class="nt">&lt;h1&gt;</span>We are testing our unsubscribe feature<span class="nt">&lt;/h1&gt;</span>
    <span class="nt">&lt;a</span> <span class="na">href=</span><span class="s">"{{WEBAPP_URL}}?email={{EMAIL}}&amp;unsubscribe_hash={{TOKEN}}"</span><span class="nt">&gt;</span>Unsubscribe<span class="nt">&lt;/a&gt;</span>
  <span class="nt">&lt;/body&gt;</span>
<span class="nt">&lt;/html&gt;</span>
</code></pre></div></div>

<p>This email template contains the link for unsubscribing. You have also provided two parameters, <code class="language-plaintext highlighter-rouge">email</code> and <code class="language-plaintext highlighter-rouge">unsubscribe_hash</code>. When the subscriber will tap this link, it will send a <strong>GET request</strong> to your Google Apps Script deployed as a Web App.</p>

<blockquote class="alert alert-warning">
  <p>Make sure to replace the values in curly braces.</p>
</blockquote>

<h2 id="writing-unsubscribe-code">Writing Unsubscribe Code</h2>

<p>The final step to bring your workflow together is to write a code that handles your unsubscribe functionality.</p>

<p>In your <strong>Main.gs</strong>, add the following code to handle the <em>GET</em> request made to your Apps Script web app:</p>

<div class="language-js highlighter-rouge"><div class="highlight"><pre class="highlight"><code><span class="kd">function</span> <span class="nf">doGet</span><span class="p">(</span><span class="nx">e</span><span class="p">)</span> <span class="p">{</span>
  <span class="kd">const</span> <span class="nx">email</span> <span class="o">=</span> <span class="nx">e</span><span class="p">.</span><span class="nx">parameter</span><span class="p">[</span><span class="dl">'</span><span class="s1">email</span><span class="dl">'</span><span class="p">]</span>
  <span class="kd">const</span> <span class="nx">unsubscribeHash</span> <span class="o">=</span> <span class="nx">e</span><span class="p">.</span><span class="nx">parameter</span><span class="p">[</span><span class="dl">'</span><span class="s1">unsubscribe_hash</span><span class="dl">'</span><span class="p">]</span>
  <span class="kd">const</span> <span class="nx">success</span> <span class="o">=</span> <span class="nf">unsubscribeUser</span><span class="p">(</span><span class="nx">email</span><span class="p">,</span> <span class="nx">unsubscribeHash</span><span class="p">)</span>
  <span class="k">if </span><span class="p">(</span><span class="nx">success</span><span class="p">)</span> <span class="p">{</span>
    <span class="k">return</span> <span class="nx">ContentService</span><span class="p">.</span><span class="nf">createTextOutput</span><span class="p">().</span><span class="nf">append</span><span class="p">(</span><span class="dl">'</span><span class="s1">You have unsubscribed</span><span class="dl">'</span><span class="p">)</span>
  <span class="p">}</span>
  <span class="k">return</span> <span class="nx">ContentService</span><span class="p">.</span><span class="nf">createTextOutput</span><span class="p">().</span><span class="nf">append</span><span class="p">(</span><span class="dl">'</span><span class="s1">Failed</span><span class="dl">'</span><span class="p">)</span>
<span class="p">}</span>
</code></pre></div></div>

<p>In the above script, you retrieve the <code class="language-plaintext highlighter-rouge">email</code> and <code class="language-plaintext highlighter-rouge">unsubscribe_hash</code> from the query parameters and pass them to your <code class="language-plaintext highlighter-rouge">unsubscribeUser</code> function. Based on the output of your function, you return an appropriate response.</p>

<p>Next, add the implementation for <code class="language-plaintext highlighter-rouge">unsubscribeUser</code> function in the <strong>Main.gs</strong> file:</p>

<div class="language-js highlighter-rouge"><div class="highlight"><pre class="highlight"><code><span class="kd">function</span> <span class="nf">unsubscribeUser</span><span class="p">(</span><span class="nx">emailToUnsubscribe</span><span class="p">,</span> <span class="nx">unsubscribeHash</span><span class="p">)</span> <span class="p">{</span>  
  <span class="c1">// get the active sheet which contains your emails</span>
  <span class="kd">const</span> <span class="nx">sheet</span> <span class="o">=</span> <span class="nx">SpreadsheetApp</span><span class="p">.</span><span class="nf">getActiveSpreadsheet</span><span class="p">().</span><span class="nf">getSheetByName</span><span class="p">(</span><span class="dl">'</span><span class="s1">emails</span><span class="dl">'</span><span class="p">)</span>

  <span class="c1">// get the data in it</span>
  <span class="kd">const</span> <span class="nx">data</span> <span class="o">=</span> <span class="nx">sheet</span><span class="p">.</span><span class="nf">getDataRange</span><span class="p">().</span><span class="nf">getValues</span><span class="p">()</span>
  
  <span class="c1">// get sheet headers i.e. top row of the sheet</span>
  <span class="kd">const</span> <span class="nx">headers</span> <span class="o">=</span> <span class="nx">data</span><span class="p">[</span><span class="mi">0</span><span class="p">]</span>

  <span class="c1">// get the index for each header</span>
  <span class="kd">const</span> <span class="nx">emailIndex</span> <span class="o">=</span> <span class="nx">headers</span><span class="p">.</span><span class="nf">indexOf</span><span class="p">(</span><span class="dl">'</span><span class="s1">email</span><span class="dl">'</span><span class="p">)</span>
  <span class="kd">const</span> <span class="nx">unsubscribeHashIndex</span> <span class="o">=</span> <span class="nx">headers</span><span class="p">.</span><span class="nf">indexOf</span><span class="p">(</span><span class="dl">'</span><span class="s1">unsubscribe_hash</span><span class="dl">'</span><span class="p">)</span>
  <span class="kd">const</span> <span class="nx">subscribedIndex</span> <span class="o">=</span> <span class="nx">headers</span><span class="p">.</span><span class="nf">indexOf</span><span class="p">(</span><span class="dl">'</span><span class="s1">subscribed</span><span class="dl">'</span><span class="p">)</span>
  
  <span class="c1">// iterate through the data, starting at index 1</span>
  <span class="k">for </span><span class="p">(</span><span class="kd">let</span> <span class="nx">i</span> <span class="o">=</span> <span class="mi">1</span><span class="p">;</span> <span class="nx">i</span> <span class="o">&lt;</span> <span class="nx">data</span><span class="p">.</span><span class="nx">length</span><span class="p">;</span> <span class="nx">i</span><span class="o">++</span><span class="p">)</span> <span class="p">{</span>
    <span class="kd">const</span> <span class="nx">row</span> <span class="o">=</span> <span class="nx">data</span><span class="p">[</span><span class="nx">i</span><span class="p">];</span>
    <span class="kd">const</span> <span class="nx">email</span> <span class="o">=</span> <span class="nx">row</span><span class="p">[</span><span class="nx">emailIndex</span><span class="p">];</span>
    <span class="kd">const</span> <span class="nx">hash</span> <span class="o">=</span> <span class="nx">row</span><span class="p">[</span><span class="nx">unsubscribeHashIndex</span><span class="p">];</span>

    <span class="c1">// if the email and unsubscribe hash match with the values in the sheet</span>
    <span class="c1">// then update the subscribed value to 'no'</span>
    <span class="k">if </span><span class="p">(</span><span class="nx">emailToUnsubscribe</span> <span class="o">===</span> <span class="nx">email</span> <span class="o">&amp;&amp;</span> <span class="nx">unsubscribeHash</span> <span class="o">===</span> <span class="nx">hash</span><span class="p">)</span> <span class="p">{</span>
      <span class="nx">sheet</span><span class="p">.</span><span class="nf">getRange</span><span class="p">(</span><span class="nx">i</span><span class="o">+</span><span class="mi">1</span><span class="p">,</span> <span class="nx">subscribedIndex</span><span class="o">+</span><span class="mi">1</span><span class="p">).</span><span class="nf">setValue</span><span class="p">(</span><span class="dl">'</span><span class="s1">no</span><span class="dl">'</span><span class="p">)</span>
      <span class="k">return</span> <span class="kc">true</span><span class="p">;</span>
    <span class="p">}</span>
  <span class="p">}</span>
<span class="p">}</span>
</code></pre></div></div>

<p>In the above function, you simply iterate over your <code class="language-plaintext highlighter-rouge">sheet</code> using the <code class="language-plaintext highlighter-rouge">for</code> loop and check for the details for every subscriber. If the subscriber’s <code class="language-plaintext highlighter-rouge">email</code> and <code class="language-plaintext highlighter-rouge">unsubscribeHash</code> match with those sent as a query parameter, you unsubscribe the subscriber by updating the value in the <code class="language-plaintext highlighter-rouge">sheet</code>.</p>

<h2 id="results">Results</h2>

<p>For testing the script, send a test email to one of your subscribers specified in the Google Sheet. You can see that you have received an email with an option to <strong>Unsubscribe</strong>.</p>

<figure class="mb-0 w-100 rounded">
    <img src="https://www.ravsam.in/assets/images/resized/20/unsubscribe-email.png" width="100%" class="img-fluid rounded blur-up lazyautosizes lazyload" sizes="auto" alt="Email with Unsubscribe link" style="" data-srcset="            https://www.ravsam.in/assets/images/resized/20/unsubscribe-email.png 20w,            https://www.ravsam.in/assets/images/resized/64/unsubscribe-email.png 64w,            https://www.ravsam.in/assets/images/resized/576/unsubscribe-email.png 576w,            https://www.ravsam.in/assets/images/resized/960/unsubscribe-email.png 960w,            https://www.ravsam.in/assets/images/resized/1400/unsubscribe-email.png 1400w,            https://www.ravsam.in/assets/images/blog-assets/unsubscribe-email.png 2091w" />
    
        <figcaption class="text-center text-muted mt-2 mb-4">Email with Unsubscribe link</figcaption>
    
</figure>

<p>At this point, click the Unsubscribe link and check whether your sheet gets updated.</p>

<p>Oo Yea! You can see that the value for the <code class="language-plaintext highlighter-rouge">subscribed</code> field changed to <strong>no</strong>.</p>

<figure class="mb-0 w-100 rounded">
    <img src="https://www.ravsam.in/assets/images/resized/20/unsubscribed.png" width="100%" class="img-fluid rounded blur-up lazyautosizes lazyload" sizes="auto" alt="Google Sheet with updated data about subscriber" style="" data-srcset="            https://www.ravsam.in/assets/images/resized/20/unsubscribed.png 20w,            https://www.ravsam.in/assets/images/resized/64/unsubscribed.png 64w,            https://www.ravsam.in/assets/images/resized/576/unsubscribed.png 576w,            https://www.ravsam.in/assets/images/resized/960/unsubscribed.png 960w,            https://www.ravsam.in/assets/images/resized/1400/unsubscribed.png 1400w,            https://www.ravsam.in/assets/images/blog-assets/unsubscribed.png 2091w" />
    
        <figcaption class="text-center text-muted mt-2 mb-4">Google Sheet with updated data about subscriber</figcaption>
    
</figure>

<p>Using this workflow, you can provide your subscribers with an option to opt out of your mailing list for newsletters or marketing emails.</p>]]></content><author><name>Ravgeet Dhillon</name></author><category term="marketing" /><category term="google-apps-script" /><category term="email-marketing" /><summary type="html"><![CDATA[Provide your subscribers with an option to opt-out of mailing lists by adding unsubscribe link using Google Apps Script.]]></summary><media:thumbnail xmlns:media="http://search.yahoo.com/mrss/" url="https://www.ravsam.in/assets/images/blogs/add-unsubscribe-link-in-emails-using-google-apps-script.png" /><media:content medium="image" url="https://www.ravsam.in/assets/images/blogs/add-unsubscribe-link-in-emails-using-google-apps-script.png" xmlns:media="http://search.yahoo.com/mrss/" /></entry><entry><title type="html">Disable Submit Button if Form has not Changed in a Nuxt/Vue App</title><link href="https://www.ravsam.in/blog/disable-submit-button-if-form-fields-have-not-changed-in-a-nuxt-vue-app/" rel="alternate" type="text/html" title="Disable Submit Button if Form has not Changed in a Nuxt/Vue App" /><published>2021-01-29T08:50:00+00:00</published><updated>2025-08-18T07:51:05+00:00</updated><id>https://www.ravsam.in/blog/disable-submit-button-if-form-fields-have-not-changed-in-a-nuxt-vue-app</id><content type="html" xml:base="https://www.ravsam.in/blog/disable-submit-button-if-form-fields-have-not-changed-in-a-nuxt-vue-app/"><![CDATA[<p>Forms are one of the most important aspects of any application. It is considered a good UX practice to keep the <strong>Save/Submit</strong> button disabled until the form contents have not changed. In this tutorial, you’ll take a look at how can you accomplish this behavior in a Nuxt/Vue app.</p>

<h6 id="contents">Contents</h6>

<ul>
  <li><a href="#creating-a-form-template">Creating a Form Template</a></li>
  <li><a href="#writing-vuex-code">Writing Vuex Code</a></li>
  <li><a href="#writing-computed-and-watch-properties">Writing Computed and Watch properties</a></li>
  <li><a href="#results">Results</a></li>
</ul>

<h2 id="creating-a-form-template">Creating a Form Template</h2>

<p>First, you need to create a simple form that will help you to understand the concepts of <strong>computed</strong> and <strong>watch</strong> properties. In your <strong>index.vue</strong> file in the <strong>pages</strong> directory, add the following form template:</p>

<div class="language-vue highlighter-rouge"><div class="highlight"><pre class="highlight"><code><span class="nt">&lt;</span><span class="k">template</span><span class="nt">&gt;</span>
  <span class="nt">&lt;form&gt;</span>
    <span class="nt">&lt;label&gt;</span>Name<span class="nt">&lt;/label&gt;</span>
    <span class="nt">&lt;input</span> <span class="na">v-model=</span><span class="s">'form.name'</span> <span class="nt">/&gt;</span>

    <span class="nt">&lt;label&gt;</span>Age<span class="nt">&lt;/label&gt;</span>
    <span class="nt">&lt;input</span> <span class="na">v-model=</span><span class="s">'form.age'</span> <span class="nt">/&gt;</span>

    <span class="nt">&lt;button</span> <span class="na">:disabled=</span><span class="s">"!changed"</span><span class="nt">&gt;</span>Save<span class="nt">&lt;/button&gt;</span>
  <span class="nt">&lt;form&gt;</span>
<span class="nt">&lt;/</span><span class="k">template</span><span class="nt">&gt;</span>
</code></pre></div></div>

<p>In the above template, you have bounded your <code class="language-plaintext highlighter-rouge">form</code> data model to form inputs using <code class="language-plaintext highlighter-rouge">v-model</code>. The <strong>Save</strong> button will be disabled if the form fields have not <code class="language-plaintext highlighter-rouge">changed</code>.</p>

<h2 id="writing-vuex-code">Writing Vuex Code</h2>

<p>In this example, you’ll use <strong>Vuex Store’s</strong> <em>state</em>, <em>actions</em>, and <em>mutations</em> to store state and fetch your form data. In your <strong>index.js</strong> file in the <strong>store</strong> directory, add the following code:</p>

<div class="language-js highlighter-rouge"><div class="highlight"><pre class="highlight"><code><span class="c1">// initialize the state variables</span>
<span class="k">export</span> <span class="kd">const</span> <span class="nx">state</span> <span class="o">=</span> <span class="p">()</span> <span class="o">=&gt;</span> <span class="p">({</span>
  <span class="na">form</span><span class="p">:</span> <span class="p">{}</span>
<span class="p">})</span>

<span class="k">export</span> <span class="kd">const</span> <span class="nx">actions</span> <span class="o">=</span> <span class="p">{</span>
  <span class="c1">// action to setup form data</span>
  <span class="c1">// you can also do an api call as well</span>
  <span class="nf">init</span><span class="p">({</span> <span class="nx">commit</span> <span class="p">})</span> <span class="p">{</span>
    <span class="kd">const</span> <span class="nx">data</span> <span class="o">=</span> <span class="p">{</span>
      <span class="na">name</span><span class="p">:</span> <span class="dl">'</span><span class="s1">Ravgeet</span><span class="dl">'</span><span class="p">,</span>
      <span class="na">age</span><span class="p">:</span> <span class="dl">'</span><span class="s1">21</span><span class="dl">'</span><span class="p">,</span>
    <span class="p">}</span>

    <span class="c1">// add a commit mutuation for changing the state</span>
    <span class="nf">commit</span><span class="p">(</span><span class="dl">'</span><span class="s1">setFormData</span><span class="dl">'</span><span class="p">,</span> <span class="nx">data</span><span class="p">)</span>
  <span class="p">}</span>
<span class="p">}</span>

<span class="k">export</span> <span class="kd">const</span> <span class="nx">mutations</span> <span class="o">=</span> <span class="p">{</span>
  <span class="c1">// mutation to change the state</span>
  <span class="nf">setFormData</span><span class="p">(</span><span class="nx">state</span><span class="p">,</span> <span class="nx">data</span><span class="p">)</span> <span class="p">{</span>
    <span class="nx">state</span><span class="p">.</span><span class="nx">form</span> <span class="o">=</span> <span class="nx">data</span>
  <span class="p">}</span>
<span class="p">}</span>
</code></pre></div></div>

<h2 id="writing-computed-and-watch-properties">Writing Computed and Watch properties</h2>

<p>At this point, your template and store are set. Next, you need to implement your application logic in your template’s script. In the <strong>pages/index.vue</strong> file, add the following code below the template:</p>

<div class="language-vue highlighter-rouge"><div class="highlight"><pre class="highlight"><code><span class="nt">&lt;</span><span class="k">script</span><span class="nt">&gt;</span>
<span class="k">import</span> <span class="p">{</span> <span class="nx">cloneDeep</span><span class="p">,</span> <span class="nx">isEqual</span> <span class="p">}</span> <span class="k">from</span> <span class="dl">'</span><span class="s1">lodash</span><span class="dl">'</span>

<span class="k">export</span> <span class="k">default</span> <span class="p">{</span>
  <span class="nf">data</span><span class="p">()</span> <span class="p">{</span>
    <span class="k">return</span> <span class="p">{</span>
      <span class="na">changed</span><span class="p">:</span> <span class="kc">false</span><span class="p">,</span> <span class="c1">// useful for storing form change state</span>
      <span class="na">form</span><span class="p">:</span> <span class="p">{},</span> <span class="c1">// data variable to store current form data binding</span>
    <span class="p">}</span>
  <span class="p">},</span>

  <span class="na">computed</span><span class="p">:</span> <span class="p">{</span>
    <span class="c1">// store the original form data</span>
    <span class="nf">originalForm</span><span class="p">()</span> <span class="p">{</span>
      <span class="k">return</span> <span class="k">this</span><span class="p">.</span><span class="nx">$store</span><span class="p">.</span><span class="nx">state</span><span class="p">.</span><span class="nx">form</span>
    <span class="p">}</span>
  <span class="p">},</span>
  
  <span class="na">watch</span><span class="p">:</span> <span class="p">{</span>
    <span class="c1">// by watching the original form data</span>
    <span class="c1">// create a clone of original form data</span>
    <span class="c1">// and assign it to the form data variable</span>
    <span class="nf">originalForm</span><span class="p">()</span> <span class="p">{</span>
      <span class="k">this</span><span class="p">.</span><span class="nx">form</span> <span class="o">=</span> <span class="nf">cloneDeep</span><span class="p">(</span><span class="k">this</span><span class="p">.</span><span class="nx">originalForm</span><span class="p">)</span>
    <span class="p">},</span>

    <span class="c1">// watch the changes on the form data variable</span>
    <span class="na">form</span><span class="p">:</span> <span class="p">{</span>
      <span class="nf">handler</span><span class="p">()</span> <span class="p">{</span>
        <span class="c1">// using lodash to compare original form data and current form data</span>
        <span class="k">this</span><span class="p">.</span><span class="nx">changed</span> <span class="o">=</span> <span class="o">!</span><span class="nf">isEqual</span><span class="p">(</span><span class="k">this</span><span class="p">.</span><span class="nx">form</span><span class="p">,</span> <span class="k">this</span><span class="p">.</span><span class="nx">originalForm</span><span class="p">)</span>
      <span class="p">},</span>
      <span class="c1">// useful to watch deeply nested properties on a data variable</span>
      <span class="na">deep</span><span class="p">:</span> <span class="kc">true</span><span class="p">,</span>
    <span class="p">},</span>
  <span class="p">},</span>

  <span class="nf">created</span><span class="p">()</span> <span class="p">{</span>
    <span class="c1">// dispatch an action to fill the store with data</span>
    <span class="k">this</span><span class="p">.</span><span class="nx">$store</span><span class="p">.</span><span class="nf">dispatch</span><span class="p">(</span><span class="dl">'</span><span class="s1">init</span><span class="dl">'</span><span class="p">)</span>
  <span class="p">}</span>
<span class="p">}</span>
<span class="nt">&lt;/</span><span class="k">script</span><span class="nt">&gt;</span>
</code></pre></div></div>

<p>In your terminal, run the following command to install <strong>lodash</strong>:</p>

<div class="language-bash highlighter-rouge"><div class="highlight"><pre class="highlight"><code><span class="nv">$ </span>npm <span class="nb">install </span>lodash
</code></pre></div></div>

<p>In the above code:</p>

<ol>
  <li>When the component is created, the <code class="language-plaintext highlighter-rouge">init</code> action is dispatched using the <code class="language-plaintext highlighter-rouge">created</code> hook. This action causes a mutation in the store and fills the <code class="language-plaintext highlighter-rouge">form</code> state variable.</li>
  <li>The value of the computed property, <code class="language-plaintext highlighter-rouge">originalForm</code> is calculated as it is dependent upon the <code class="language-plaintext highlighter-rouge">form</code> state variable.</li>
  <li>As the value of <code class="language-plaintext highlighter-rouge">originalForm</code> is being watched using the <code class="language-plaintext highlighter-rouge">watch</code> hook, the code inside it is executed. A deep clone of <code class="language-plaintext highlighter-rouge">originalForm</code> is made and assigned to the <code class="language-plaintext highlighter-rouge">form</code> data variable.</li>
  <li>Since the value of <code class="language-plaintext highlighter-rouge">form</code> is being watched, you use a <code class="language-plaintext highlighter-rouge">handler</code> and <code class="language-plaintext highlighter-rouge">deep</code> property to run your business logic. You simply check whether the <code class="language-plaintext highlighter-rouge">form</code> and <code class="language-plaintext highlighter-rouge">originalForm</code> variables are equal using Lodash.</li>
</ol>

<p>At first, it looks like something very complex is going on but once you break down the things it makes sense.</p>

<h2 id="results">Results</h2>

<p>Navigate to your browser and check whether you have been able to achieve your purpose of disabling the form submit button if the form fields have not changed at all.</p>

<p><img src="/assets/images/blog-assets/nuxt-disable-save.gif" alt="Tutorial to display notification when user is offline in Nuxt/Vue" class="img-fluid mb-4 rounded" /></p>

<p><em>Voila</em>! You have successfully implemented your workflow. This adds to the UX of your application and saves the user from frustration especially in long forms.</p>]]></content><author><name>Ravgeet Dhillon</name></author><category term="development" /><category term="nuxt" /><category term="vue" /><category term="jamstack" /><category term="javascript" /><category term="web-development" /><summary type="html"><![CDATA[Keep a Form's Submit button disabled until the Form fields have not changed in a Nuxt/Vue app.]]></summary><media:thumbnail xmlns:media="http://search.yahoo.com/mrss/" url="https://www.ravsam.in/assets/images/blogs/disable-submit-button-if-form-fields-have-not-changed-in-a-nuxt-vue-app.png" /><media:content medium="image" url="https://www.ravsam.in/assets/images/blogs/disable-submit-button-if-form-fields-have-not-changed-in-a-nuxt-vue-app.png" xmlns:media="http://search.yahoo.com/mrss/" /></entry><entry><title type="html">Offline Toast Notification in Nuxt/Vue App</title><link href="https://www.ravsam.in/blog/offline-toast-notification-in-nuxt-vue-app/" rel="alternate" type="text/html" title="Offline Toast Notification in Nuxt/Vue App" /><published>2021-01-18T06:05:00+00:00</published><updated>2025-08-18T07:51:05+00:00</updated><id>https://www.ravsam.in/blog/offline-toast-notification-in-nuxt-vue-app</id><content type="html" xml:base="https://www.ravsam.in/blog/offline-toast-notification-in-nuxt-vue-app/"><![CDATA[<p>You must have often seen in apps telling you - <em>“You are offline. Check your network status.”</em>. It is not only convenient to do so but adds to a great UX.</p>

<p>In this tutorial, you’ll look at how can you display a toast notification in a Nuxt/Vue app whenever the user goes offline or online. This will also help you to understand how to use <strong>computed</strong> and <strong>watch</strong> properties together.</p>

<h6 id="contents">Contents</h6>

<ul>
  <li><a href="#prerequisites">Prerequisites</a></li>
  <li><a href="#using-nuxt-helper">Using $nuxt helper</a></li>
  <li><a href="#writing-code">Writing Code</a></li>
  <li><a href="#results">Results</a></li>
</ul>

<h2 id="prerequisites">Prerequisites</h2>

<p>Before getting started, make sure that you have correctly <a href="https://www.ravsam.in/blog/how-to-add-customize-bootstrap-in-nuxtjs">setup Nuxt and BootstrapVue</a>.</p>

<h2 id="using-nuxt-helper">Using $nuxt helper</h2>

<p>Nuxt provides a great way to access its helper class, <code class="language-plaintext highlighter-rouge">$nuxt</code>. To get the current network connection status, you can do two things:</p>

<div class="language-vue highlighter-rouge"><div class="highlight"><pre class="highlight"><code><span class="nt">&lt;</span><span class="k">template</span><span class="nt">&gt;</span>
  <span class="nt">&lt;p&gt;</span>$nuxt.isOffline<span class="nt">&lt;/p&gt;</span>
  <span class="nt">&lt;p&gt;</span>$nuxt.isOnline<span class="nt">&lt;/p&gt;</span>
<span class="nt">&lt;/</span><span class="k">template</span><span class="nt">&gt;</span>

<span class="nt">&lt;</span><span class="k">script</span><span class="nt">&gt;</span>
<span class="k">export</span> <span class="k">default</span> <span class="p">{</span>
  <span class="nf">created</span><span class="p">()</span> <span class="p">{</span>
    <span class="nx">console</span><span class="p">.</span><span class="nf">log</span><span class="p">(</span><span class="k">this</span><span class="p">.</span><span class="nx">$nuxt</span><span class="p">.</span><span class="nx">isOffline</span><span class="p">)</span>
    <span class="nx">console</span><span class="p">.</span><span class="nf">log</span><span class="p">(</span><span class="k">this</span><span class="p">.</span><span class="nx">$nuxt</span><span class="p">.</span><span class="nx">isOnline</span><span class="p">)</span>
  <span class="p">}</span>
<span class="p">}</span>
<span class="nt">&lt;/</span><span class="k">script</span><span class="nt">&gt;</span>
</code></pre></div></div>

<p>Yes, it is as simple as that.</p>

<p>Now in BootstrapVue, you can create <em>toasts</em> on-demand using <code class="language-plaintext highlighter-rouge">this.$bvToast.toast()</code> function. So you can implement the notification behavior using <strong>computed</strong> and <strong>watch</strong> properties provided by Vue.</p>

<h2 id="writing-code">Writing Code</h2>

<p>The best place to add the following piece of code is in your <strong>layouts/default.vue</strong> because doing so can help you to implement a universal kind of notification behavior.</p>

<div class="language-vue highlighter-rouge"><div class="highlight"><pre class="highlight"><code><span class="nt">&lt;</span><span class="k">template</span><span class="nt">&gt;</span>
  <span class="nt">&lt;Nuxt</span> <span class="nt">/&gt;</span>
<span class="nt">&lt;/</span><span class="k">template</span><span class="nt">&gt;</span>

<span class="nt">&lt;</span><span class="k">script</span><span class="nt">&gt;</span>
<span class="k">export</span> <span class="k">default</span> <span class="p">{</span>
  <span class="na">computed</span><span class="p">:</span> <span class="p">{</span>
    <span class="nf">connectionStatus</span><span class="p">()</span> <span class="p">{</span>
      <span class="k">return</span> <span class="k">this</span><span class="p">.</span><span class="nx">$nuxt</span><span class="p">.</span><span class="nx">isOffline</span>
    <span class="p">},</span>
  <span class="p">},</span>
  <span class="na">watch</span><span class="p">:</span> <span class="p">{</span>
    <span class="nf">connectionStatus</span><span class="p">(</span><span class="nx">offline</span><span class="p">)</span> <span class="p">{</span>
      <span class="k">if </span><span class="p">(</span><span class="nx">offline</span><span class="p">)</span> <span class="p">{</span>

        <span class="c1">// hide the online toast if it exists</span>
        <span class="k">this</span><span class="p">.</span><span class="nx">$bvToast</span><span class="p">.</span><span class="nf">hide</span><span class="p">(</span><span class="dl">'</span><span class="s1">online</span><span class="dl">'</span><span class="p">)</span>

        <span class="c1">// create a new toast for offline notification</span>
        <span class="c1">// that doesn't hide on its own</span>
        <span class="k">this</span><span class="p">.</span><span class="nx">$bvToast</span><span class="p">.</span><span class="nf">toast</span><span class="p">(</span><span class="dl">'</span><span class="s1">You are now offline</span><span class="dl">'</span><span class="p">,</span> <span class="p">{</span>
          <span class="na">id</span><span class="p">:</span> <span class="dl">'</span><span class="s1">offline</span><span class="dl">'</span><span class="p">,</span>
          <span class="na">toaster</span><span class="p">:</span> <span class="dl">'</span><span class="s1">b-toaster-bottom-right</span><span class="dl">'</span><span class="p">,</span>
          <span class="na">noCloseButton</span><span class="p">:</span> <span class="kc">true</span><span class="p">,</span>
          <span class="na">solid</span><span class="p">:</span> <span class="kc">true</span><span class="p">,</span>
          <span class="na">noAutoHide</span><span class="p">:</span> <span class="kc">true</span><span class="p">,</span>
          <span class="na">variant</span><span class="p">:</span> <span class="dl">'</span><span class="s1">danger</span><span class="dl">'</span><span class="p">,</span>
        <span class="p">})</span>
      <span class="p">}</span> <span class="k">else</span> <span class="p">{</span>

        <span class="c1">// hide the offline toast if it exists</span>
        <span class="k">this</span><span class="p">.</span><span class="nx">$bvToast</span><span class="p">.</span><span class="nf">hide</span><span class="p">(</span><span class="dl">'</span><span class="s1">offline</span><span class="dl">'</span><span class="p">)</span>

        <span class="c1">// create a new toast for online notification</span>
        <span class="c1">// that auto hides after a given time</span>
        <span class="k">this</span><span class="p">.</span><span class="nx">$bvToast</span><span class="p">.</span><span class="nf">toast</span><span class="p">(</span><span class="dl">'</span><span class="s1">You are now online</span><span class="dl">'</span><span class="p">,</span> <span class="p">{</span>
          <span class="na">id</span><span class="p">:</span> <span class="dl">'</span><span class="s1">online</span><span class="dl">'</span><span class="p">,</span>
          <span class="na">toaster</span><span class="p">:</span> <span class="dl">'</span><span class="s1">b-toaster-bottom-right</span><span class="dl">'</span><span class="p">,</span>
          <span class="na">noCloseButton</span><span class="p">:</span> <span class="kc">true</span><span class="p">,</span>
          <span class="na">solid</span><span class="p">:</span> <span class="kc">true</span><span class="p">,</span>
          <span class="na">autoHideDelay</span><span class="p">:</span> <span class="mi">5000</span><span class="p">,</span>
          <span class="na">variant</span><span class="p">:</span> <span class="dl">'</span><span class="s1">success</span><span class="dl">'</span><span class="p">,</span>
        <span class="p">})</span>
      <span class="p">}</span>
    <span class="p">},</span>
  <span class="p">},</span>
<span class="p">}</span>
<span class="nt">&lt;/</span><span class="k">script</span><span class="nt">&gt;</span>
</code></pre></div></div>

<p>In the above code, you first create a <code class="language-plaintext highlighter-rouge">computed</code> property, <code class="language-plaintext highlighter-rouge">connectionStatus</code>. In <code class="language-plaintext highlighter-rouge">connectionStatus</code>, you return the value of <code class="language-plaintext highlighter-rouge">this.$nuxt.isOffline</code>. Now in Vue, whenever a property, a computed is dependent upon changes, the computed property also changes. So whenever <code class="language-plaintext highlighter-rouge">this.$nuxt.isOffline</code> changes, <code class="language-plaintext highlighter-rouge">connectionStatus</code> gets a new value.</p>

<p>Next, you <code class="language-plaintext highlighter-rouge">watch</code> the changes in the value of <code class="language-plaintext highlighter-rouge">connectionStatus</code> and perform actions based on its new value, <code class="language-plaintext highlighter-rouge">offline</code>. In this case, you check whether the changed value of <code class="language-plaintext highlighter-rouge">connectionStatus</code> is <code class="language-plaintext highlighter-rouge">true</code>, you display your toast notification using BootstrapVue functions.</p>

<h2 id="results">Results</h2>

<p>To test the functionality of your app, go to your browser and check whether the above code works or not. Open the <em>Network</em> tab in <em>Developer Tools</em>, and toggle the network connection status.</p>

<p>Hurray! Toast notifications are working perfectly fine.</p>

<p><img src="/assets/images/blog-assets/nuxt-connection-status.gif" alt="Toast notification when user is offline in Nuxt/Vue" class="img-fluid mb-4 rounded" /></p>

<p>So using the combined magic of <strong>computed</strong> and <strong>watch</strong> properties, you can create outstanding workflows and take your Nuxt/Vue app to next level.</p>]]></content><author><name>Ravgeet Dhillon</name></author><category term="development" /><category term="nuxt" /><category term="vue" /><category term="jamstack" /><category term="javascript" /><category term="web-development" /><summary type="html"><![CDATA[Display a Toast notification in Nuxt/Vue app whenever the user goes offline or online.]]></summary><media:thumbnail xmlns:media="http://search.yahoo.com/mrss/" url="https://www.ravsam.in/assets/images/blogs/offline-toast-notification-in-nuxt-vue-app.png" /><media:content medium="image" url="https://www.ravsam.in/assets/images/blogs/offline-toast-notification-in-nuxt-vue-app.png" xmlns:media="http://search.yahoo.com/mrss/" /></entry><entry><title type="html">Dynamic Home Route in a Flutter App</title><link href="https://www.ravsam.in/blog/dynamic-home-route-in-flutter-app/" rel="alternate" type="text/html" title="Dynamic Home Route in a Flutter App" /><published>2021-01-09T08:50:00+00:00</published><updated>2025-08-18T07:51:05+00:00</updated><id>https://www.ravsam.in/blog/dynamic-home-route-in-flutter-app</id><content type="html" xml:base="https://www.ravsam.in/blog/dynamic-home-route-in-flutter-app/"><![CDATA[<p>In any production app, the user is directed to a route based on some authentication logic whenever the app is opened. For example, in your Flutter App, you have at least two routes, <strong>Login</strong> and <strong>Dashboard</strong>. The problem is how can you decide which route should a user be redirected to?</p>

<p>In this tutorial, you’ll check the value of a locally stored boolean variable to dynamically decide the home route. You can use any method for writing your authentication logic, like checking the validity of the API token, but for the sake of simplicity, you’ll explore a simple logic.</p>

<figure class="mb-0 w-100 rounded">
    <img src="https://www.ravsam.in/assets/images/resized/20/flutter-dynamic-home-route.png" width="100%" class="img-fluid rounded blur-up lazyautosizes lazyload" sizes="auto" alt="Flutter Dynamic Home Route" style="" data-srcset="            https://www.ravsam.in/assets/images/resized/20/flutter-dynamic-home-route.png 20w,            https://www.ravsam.in/assets/images/resized/64/flutter-dynamic-home-route.png 64w,            https://www.ravsam.in/assets/images/resized/576/flutter-dynamic-home-route.png 576w,            https://www.ravsam.in/assets/images/resized/960/flutter-dynamic-home-route.png 960w,            https://www.ravsam.in/assets/images/resized/1400/flutter-dynamic-home-route.png 1400w,            https://www.ravsam.in/assets/images/blog-assets/flutter-dynamic-home-route.png 1559w" />
    
        <figcaption class="text-center text-muted mt-2 mb-4">Flutter Dynamic Home Route Flowchart</figcaption>
    
</figure>

<h6 id="contents">Contents</h6>

<ul>
  <li><a href="#prerequisites">Prerequisites</a></li>
  <li><a href="#installing-dependencies">Installing Dependencies</a></li>
  <li><a href="#writing-code">Writing Code</a></li>
  <li><a href="#results">Results</a></li>
</ul>

<h2 id="prerequisites">Prerequisites</h2>

<p>Before proceeding, make sure to set up a Flutter app with at least two different screens.</p>

<h2 id="installing-dependencies">Installing Dependencies</h2>

<p>For this tutorial, add the following dependencies in your <strong>pubspec.yaml</strong>:</p>

<div class="language-yaml highlighter-rouge"><div class="highlight"><pre class="highlight"><code><span class="na">dependencies</span><span class="pi">:</span>
  <span class="na">shared_preferences</span><span class="pi">:</span> <span class="s">^0.5.12+4</span>
  <span class="na">async</span><span class="pi">:</span> <span class="s">^2.4.2</span>
</code></pre></div></div>

<blockquote class="alert alert-warning">
  <p>Make sure to add the latest version of the dependencies from <a href="https://pub.dev">pub.dev</a>.</p>
</blockquote>

<p>After adding these dependencies, it is now time to install them. In your terminal, execute the following command:</p>

<div class="language-bash highlighter-rouge"><div class="highlight"><pre class="highlight"><code>flutter pub get
</code></pre></div></div>

<p><a href="https://pub.dev/packages/shared_preferences">Shared Preferences</a> is a Flutter plugin for reading and writing key-value pairs to the local storage. <a href="https://pub.dev/packages/async">Async</a> contains the utility functions and classes related to the <em>dart:async</em> library.</p>

<h2 id="writing-code">Writing Code</h2>

<p>In the <strong>lib/main.dart</strong>, add the following code:</p>

<div class="language-dart highlighter-rouge"><div class="highlight"><pre class="highlight"><code><span class="kn">import</span> <span class="s">'package:flutter/material.dart'</span><span class="o">;</span>
<span class="kn">import</span> <span class="s">'package:shared_preferences/shared_preferences.dart'</span><span class="o">;</span>

<span class="kt">void</span> <span class="nf">main</span><span class="p">()</span> <span class="kd">async</span> <span class="p">{</span>

  <span class="c1">// handle exceptions caused by making main async</span>
  <span class="n">WidgetsFlutterBinding</span><span class="o">.</span><span class="na">ensureInitialized</span><span class="p">();</span>

  <span class="c1">// init a shared preferences variable</span>
  <span class="n">SharedPreferences</span> <span class="n">prefs</span> <span class="o">=</span> <span class="k">await</span> <span class="n">SharedPreferences</span><span class="o">.</span><span class="na">getInstance</span><span class="p">();</span>
  
  <span class="c1">// get the locally stored boolean variable</span>
  <span class="kt">bool</span> <span class="n">isLoggedIn</span> <span class="o">=</span> <span class="n">prefs</span><span class="o">.</span><span class="na">getBoolean</span><span class="p">(</span><span class="s">'is_logged_in'</span><span class="p">);</span>
  
  <span class="c1">// define the initial route based on whether the user is logged in or not</span>
  <span class="kt">String</span> <span class="n">initialRoute</span> <span class="o">=</span> <span class="n">isLoggedIn</span> <span class="o">?</span> <span class="s">'/'</span> <span class="o">:</span> <span class="s">'login'</span><span class="p">;</span>

  <span class="c1">// create a flutter material app as usual</span>
  <span class="n">Widget</span> <span class="n">app</span> <span class="o">=</span> <span class="n">MaterialApp</span><span class="p">(</span>
    <span class="p">...</span>
    <span class="nl">initialRoute:</span> <span class="n">initialRoute</span><span class="p">,</span>
  <span class="p">);</span>

  <span class="c1">// mount and run the flutter app</span>
  <span class="n">runApp</span><span class="p">(</span><span class="n">app</span><span class="p">);</span>
<span class="p">}</span>
</code></pre></div></div>

<p>In the above code, you are getting the value of the <code class="language-plaintext highlighter-rouge">is_logged_in</code> boolean variable, and based on it decide the value of the <code class="language-plaintext highlighter-rouge">initialRoute</code> and pass it to the <code class="language-plaintext highlighter-rouge">MaterialApp</code> widget.</p>

<p>One important thing in the above code is the use of the <em>async-await</em> pattern. You can also use <code class="language-plaintext highlighter-rouge">then</code> but it makes the code a little messy and that’s what you should try to avoid here. Making your <code class="language-plaintext highlighter-rouge">main()</code> function asynchronous can cause some exceptions, so to solve this, you need to add <code class="language-plaintext highlighter-rouge">WidgetsFlutterBinding.ensureInitialized()</code>.</p>

<h2 id="results">Results</h2>

<p>That’s it. You have successfully written a code that allows you to redirect the user to the <strong>Dashboard</strong> page if they are logged in, otherwise to the <strong>Login</strong> page.</p>]]></content><author><name>Ravgeet Dhillon</name></author><category term="development" /><category term="flutter" /><category term="mobile-app" /><summary type="html"><![CDATA[Dynamically decide the home page shown to a user in a Flutter App based on some authentication logic.]]></summary><media:thumbnail xmlns:media="http://search.yahoo.com/mrss/" url="https://www.ravsam.in/assets/images/blogs/dynamic-home-route-in-flutter-app.png" /><media:content medium="image" url="https://www.ravsam.in/assets/images/blogs/dynamic-home-route-in-flutter-app.png" xmlns:media="http://search.yahoo.com/mrss/" /></entry><entry><title type="html">Add and Customize Bootstrap in Nuxt.js</title><link href="https://www.ravsam.in/blog/how-to-add-customize-bootstrap-in-nuxtjs/" rel="alternate" type="text/html" title="Add and Customize Bootstrap in Nuxt.js" /><published>2020-12-20T07:37:00+00:00</published><updated>2025-08-18T07:51:05+00:00</updated><id>https://www.ravsam.in/blog/how-to-add-customize-bootstrap-in-nuxtjs</id><content type="html" xml:base="https://www.ravsam.in/blog/how-to-add-customize-bootstrap-in-nuxtjs/"><![CDATA[<p>Configuring a framework is always tricky especially when you are just starting. Today, you’ll learn to add and customize Bootstrap in your Nuxt.js project. Once you have gone through this guide, you’ll get an overall idea of how to make things work in Nuxt.js. By learning how to set up Bootstrap, you can install <em>Popper.js</em> and <em>JQuery</em> as well which are peer dependencies for Bootstrap.</p>

<h6 id="contents">Contents</h6>

<ul>
  <li><a href="#installing-bootstrap">Installing Bootstrap</a></li>
  <li><a href="#creating-a-custom-scss">Creating a Custom SCSS</a></li>
  <li><a href="#importing-bootstrap-vue">Importing Bootstrap Vue</a></li>
  <li><a href="#configuring-nuxtjs-config">Configuring Nuxt.js Config</a></li>
</ul>

<h2 id="installing-bootstrap">Installing Bootstrap</h2>

<p>Before starting, you need to install the required NPM packages. You’ll need to install <a href="https://getbootstrap.com">bootstrap</a> and optionally <a href="https://bootstrap-vue.org">bootstrap-vue</a> if you want to use Bootstrap Vue components.</p>

<p>Also, you need to customize the Bootstrap by adding custom <em>SCSS</em> files, you need to install some <em>dev dependencies</em> as well. In this case, you’ll need to install <em>sass-loader</em> and <em>node-sass</em>.</p>

<p>Visit your project directory, open your terminal and execute the following commands:</p>

<div class="language-bash highlighter-rouge"><div class="highlight"><pre class="highlight"><code>npm <span class="nb">install </span>bootstrap bootstrap-vue
npm <span class="nb">install </span>sass-loader node-sass <span class="nt">--save-dev</span> 
</code></pre></div></div>

<h2 id="creating-a-custom-scss">Creating a Custom SCSS</h2>

<p>Next, create a <strong>custom.scss</strong> file in the <strong>assets/scss</strong> directory. In this file, you need to import Bootstrap’s <strong>bootstrap.scss</strong>. Add the following styling to change the default color system of Bootstrap.</p>

<div class="language-scss highlighter-rouge"><div class="highlight"><pre class="highlight"><code><span class="nv">$theme-colors</span><span class="p">:</span> <span class="p">(</span>
  <span class="s1">'primary'</span><span class="o">:</span> <span class="mh">#145bea</span><span class="o">,</span>
  <span class="s1">'secondary'</span><span class="o">:</span> <span class="mh">#833bec</span><span class="o">,</span>
  <span class="s1">'success'</span><span class="o">:</span> <span class="mh">#1ce1ac</span><span class="o">,</span>
  <span class="s1">'info'</span><span class="o">:</span> <span class="mh">#ff7d50</span><span class="o">,</span>
  <span class="s1">'warning'</span><span class="o">:</span> <span class="mh">#ffbe0b</span><span class="o">,</span>
  <span class="s1">'danger'</span><span class="o">:</span> <span class="mh">#ff007f</span><span class="o">,</span>
  <span class="s1">'light'</span><span class="o">:</span> <span class="mh">#c0ccda</span><span class="o">,</span>
  <span class="s1">'dark'</span><span class="o">:</span> <span class="mh">#001738</span><span class="o">,</span>
<span class="p">);</span>

<span class="k">@import</span> <span class="s1">'~/node_modules/bootstrap/scss/bootstrap.scss'</span><span class="p">;</span>
</code></pre></div></div>

<blockquote class="alert alert-info">
  <p>Instead of importing the entire <strong>bootstrap.scss</strong>, you can import individual <em>scss</em> files but as the project grows you may need to use all the modules. It is of course a good idea to only import what is needed. So instead of worrying about increased module size, you can use <a href="https://purgecss.com/guides/nuxt.html">PurgeCSS</a> plugin for Nuxt.js to remove unused CSS from your project when you build it for production.</p>
</blockquote>

<h2 id="importing-bootstrap-vue">Importing Bootstrap Vue</h2>

<p>Next, you need to configure Bootstrap-Vue in your project. You need to create a <em>plugin</em> and install it via <code class="language-plaintext highlighter-rouge">Vue.use()</code> to access Vue components globally in your project.</p>

<p>Create a <strong>bootstrap.js</strong> file in the <strong>plugins</strong> directory and add the following code to it:</p>

<div class="language-js highlighter-rouge"><div class="highlight"><pre class="highlight"><code><span class="k">import</span> <span class="nx">Vue</span> <span class="k">from</span> <span class="dl">'</span><span class="s1">vue</span><span class="dl">'</span>
<span class="k">import</span> <span class="p">{</span> <span class="nx">BootstrapVue</span><span class="p">,</span> <span class="nx">IconsPlugin</span> <span class="p">}</span> <span class="k">from</span> <span class="dl">'</span><span class="s1">bootstrap-vue</span><span class="dl">'</span>
<span class="nx">Vue</span><span class="p">.</span><span class="nf">use</span><span class="p">(</span><span class="nx">BootstrapVue</span><span class="p">)</span>
<span class="nx">Vue</span><span class="p">.</span><span class="nf">use</span><span class="p">(</span><span class="nx">IconsPlugin</span><span class="p">)</span>
</code></pre></div></div>

<blockquote class="alert alert-info">
  <p>Importing <strong>IconsPlugin</strong> is optional. You can skip it in case you prefer to use FontAwesome icons or any other icon library.</p>
</blockquote>

<h2 id="configuring-nuxtjs-config">Configuring Nuxt.js Config</h2>

<p>The final step is to configure some settings in <strong>nuxt.config.js</strong>. Change your config to look like this:</p>

<div class="language-js highlighter-rouge"><div class="highlight"><pre class="highlight"><code><span class="k">export</span> <span class="k">default</span> <span class="p">{</span>
  
  <span class="p">...</span>

  <span class="c1">// add your custom sass file</span>
  <span class="na">css</span><span class="p">:</span> <span class="p">[</span><span class="dl">'</span><span class="s1">@/assets/scss/custom.scss</span><span class="dl">'</span><span class="p">,</span> <span class="p">...],</span>

  <span class="c1">// add your plugin</span>
  <span class="na">plugins</span><span class="p">:</span> <span class="p">[</span><span class="dl">'</span><span class="s1">~/plugins/bootstrap.js</span><span class="dl">'</span><span class="p">,</span> <span class="p">...],</span>

  <span class="c1">// add bootstrap-vue module for nuxt</span>
  <span class="na">modules</span><span class="p">:</span> <span class="p">[</span><span class="dl">'</span><span class="s1">bootstrap-vue/nuxt</span><span class="dl">'</span><span class="p">,</span> <span class="p">...],</span>

  <span class="c1">// specify module rules for css and scss</span>
  <span class="na">module</span><span class="p">:</span> <span class="p">{</span>
    <span class="na">rules</span><span class="p">:</span> <span class="p">[</span>
      <span class="p">{</span>
        <span class="na">test</span><span class="p">:</span> <span class="sr">/</span><span class="se">\.</span><span class="sr">s</span><span class="se">[</span><span class="sr">ac</span><span class="se">]</span><span class="sr">ss$/i</span><span class="p">,</span>
        <span class="na">use</span><span class="p">:</span> <span class="p">[</span><span class="dl">'</span><span class="s1">style-loader</span><span class="dl">'</span><span class="p">,</span> <span class="dl">'</span><span class="s1">css-loader</span><span class="dl">'</span><span class="p">,</span> <span class="dl">'</span><span class="s1">sass-loader</span><span class="dl">'</span><span class="p">],</span>
      <span class="p">},</span>
    <span class="p">],</span>
  <span class="p">},</span>
  
  <span class="c1">// use these settings to use custom css</span>
  <span class="na">bootstrapVue</span><span class="p">:</span> <span class="p">{</span>
    <span class="na">bootstrapCSS</span><span class="p">:</span> <span class="kc">false</span><span class="p">,</span>
    <span class="na">icons</span><span class="p">:</span> <span class="kc">true</span><span class="p">,</span>
  <span class="p">},</span>

  <span class="p">...</span>
<span class="p">}</span>
</code></pre></div></div>

<p>That’s it. You have set up your Nuxt.js project to use customized Bootstrap settings. You can override any Bootstrap defaults and customize the look and feel of your project to your advantage.</p>]]></content><author><name>Ravgeet Dhillon</name></author><category term="design" /><category term="nuxt" /><category term="bootstrap" /><category term="javascript" /><category term="web-design" /><summary type="html"><![CDATA[Learn to improve the look and feel of a Nuxt.js project by configuring the default Bootstrap behavior.]]></summary><media:thumbnail xmlns:media="http://search.yahoo.com/mrss/" url="https://www.ravsam.in/assets/images/blogs/how-to-add-customize-bootstrap-in-nuxtjs.png" /><media:content medium="image" url="https://www.ravsam.in/assets/images/blogs/how-to-add-customize-bootstrap-in-nuxtjs.png" xmlns:media="http://search.yahoo.com/mrss/" /></entry><entry><title type="html">Two-minute read newsletter to help Google Summer of Code aspirants</title><link href="https://www.ravsam.in/blog/newsletter-for-google-summer-of-code-students/" rel="alternate" type="text/html" title="Two-minute read newsletter to help Google Summer of Code aspirants" /><published>2020-12-10T08:30:00+00:00</published><updated>2025-08-18T07:51:05+00:00</updated><id>https://www.ravsam.in/blog/newsletter-for-google-summer-of-code-students</id><content type="html" xml:base="https://www.ravsam.in/blog/newsletter-for-google-summer-of-code-students/"><![CDATA[<p>On October 26, 2020, Google announced <a href="https://summerofcode.withgoogle.com/">Google Summer of Code 2021</a>. 🎉</p>

<p>Being a GSoCer with <a href="https://gnome.org">GNOME Foundation</a> and now a part of their Web Team, I get a lot of requests related to GSoC preparation, how to get started, how to approach GSoC mentors, and many related queries, especially during this part of the year.</p>

<p>So, we have decided to start a newsletter, <strong>Insight</strong>, where we will be sending short-form posts every 2nd day to help the aspirants prepare for the Google Summer of Code 2021.</p>

<p>We will bring Organization mentors and former Summer of Code students to share their views and experiences with this program and how Google Summer of Code has helped them become who they are. There will be a Q&amp;A session with each of our guests in which you can clear your doubts and prepare yourself for the adventure. We will try to provide you access to top-quality content and guidance throughout the GSoC season.</p>

<p>If you are a student or a mentor, you can sign up for our <a href="https://www.ravsam.in/newsletter/sign-up/">Google Summer of Code newsletter</a> which we will best be starting up very soon. We have already received 200+ signups in the last 24 hours and expect more in the coming days. See you soon!</p>]]></content><author><name>Ravgeet Dhillon</name></author><category term="businesses-and-startups" /><category term="gsoc" /><category term="newsletter" /><category term="google" /><summary type="html"><![CDATA[Learn from the experiences of former GSoC students and Organization Mentors daily in our newsletter.]]></summary><media:thumbnail xmlns:media="http://search.yahoo.com/mrss/" url="https://www.ravsam.in/assets/images/blogs/newsletter-to-help-google-summer-of-code-students.png" /><media:content medium="image" url="https://www.ravsam.in/assets/images/blogs/newsletter-to-help-google-summer-of-code-students.png" xmlns:media="http://search.yahoo.com/mrss/" /></entry><entry><title type="html">Send an Email notification when Github Action fails</title><link href="https://www.ravsam.in/blog/send-email-notification-when-github-action-fails/" rel="alternate" type="text/html" title="Send an Email notification when Github Action fails" /><published>2020-12-03T09:40:00+00:00</published><updated>2025-08-18T07:51:05+00:00</updated><id>https://www.ravsam.in/blog/send-email-notification-when-github-action-fails</id><content type="html" xml:base="https://www.ravsam.in/blog/send-email-notification-when-github-action-fails/"><![CDATA[<p>We recently published a blog on <a href="https://www.ravsam.in/blog/send-slack-notification-when-github-actions-fails/">how to send a slack notification when a github action fails</a>. We got a great response from the community and some of the community members asked about how they can send an email notification when a Github Action fails.</p>

<p>Github has this feature natively that sends an email when a Github Action fails. It works efficiently when you are working on an individual project. However, when working in a team, you often want to notify more than one team member about the possible failure of the workflow.</p>

<p>In this blog, you’ll see how you can build a workflow that allows you to achieve this purpose.</p>

<h6 id="contents">Contents</h6>

<ul>
  <li><a href="#creating-a-sample-workflow">Creating a Sample Workflow</a></li>
  <li><a href="#adding-send-email-action">Adding Send Email Action</a></li>
  <li><a href="#results">Results</a></li>
</ul>

<h2 id="creating-a-sample-workflow">Creating a Sample Workflow</h2>

<p>Let’s write a simple Github Actions workflow that prints the infamous <em>Hello World</em>. Create a new file <strong>build.yml</strong> in <strong>.github/workflows</strong> directory and add the following code to it:</p>

<div class="language-yml highlighter-rouge"><div class="highlight"><pre class="highlight"><code><span class="na">name</span><span class="pi">:</span> <span class="s">Build</span>

<span class="na">on</span><span class="pi">:</span>
  <span class="na">push</span><span class="pi">:</span>
    <span class="na">branches</span><span class="pi">:</span> <span class="s">main</span>

<span class="na">jobs</span><span class="pi">:</span>
  <span class="na">build</span><span class="pi">:</span>
    <span class="na">runs-on</span><span class="pi">:</span> <span class="s">ubuntu-latest</span>
    <span class="na">steps</span><span class="pi">:</span>
      <span class="pi">-</span> <span class="na">uses</span><span class="pi">:</span> <span class="s">actions/checkout@v2</span>

      <span class="pi">-</span> <span class="na">name</span><span class="pi">:</span> <span class="s">Hello World</span>
        <span class="na">run</span><span class="pi">:</span> <span class="s">echo Hello, world!</span>
</code></pre></div></div>

<p>Commit and push your code to Github and run the above Github Action.</p>

<figure class="mb-0 w-100 rounded">
    <img src="https://www.ravsam.in/assets/images/resized/20/github-action-success.png" width="100%" class="img-fluid rounded blur-up lazyautosizes lazyload" sizes="auto" alt="Github Action executed successfully" style="" data-srcset="            https://www.ravsam.in/assets/images/resized/20/github-action-success.png 20w,            https://www.ravsam.in/assets/images/resized/64/github-action-success.png 64w,            https://www.ravsam.in/assets/images/resized/576/github-action-success.png 576w,            https://www.ravsam.in/assets/images/resized/960/github-action-success.png 960w,            https://www.ravsam.in/assets/images/resized/1400/github-action-success.png 1400w,            https://www.ravsam.in/assets/images/blog-assets/github-action-success.png 2091w" />
    
        <figcaption class="text-center text-muted mt-2 mb-4">Github Action completed with success</figcaption>
    
</figure>

<h2 id="adding-send-email-action">Adding Send Email Action</h2>

<p><a href="https://github.com/dawidd6/action-send-mail">Dawid Dziurla</a> has published a Github action that allows you to configure a lot of aspects related to sending the emails. In <strong>build.yml</strong>, add the following step to your workflow:</p>

<div class="language-yml highlighter-rouge"><div class="highlight"><pre class="highlight"><code><span class="pi">-</span> <span class="na">name</span><span class="pi">:</span> <span class="s">Send mail</span>
  <span class="na">if</span><span class="pi">:</span> <span class="s">always()</span>
  <span class="na">uses</span><span class="pi">:</span> <span class="s">dawidd6/action-send-mail@v2</span>
  <span class="na">with</span><span class="pi">:</span>
    <span class="c1"># mail server settings</span>
    <span class="na">server_address</span><span class="pi">:</span> <span class="s">smtp.gmail.com</span>
    <span class="na">server_port</span><span class="pi">:</span> <span class="m">465</span>
    <span class="c1"># user credentials</span>
    <span class="na">username</span><span class="pi">:</span> <span class="s">${{ secrets.EMAIL_USERNAME }}</span>
    <span class="na">password</span><span class="pi">:</span> <span class="s">${{ secrets.EMAIL_PASSWORD }}</span>
    <span class="c1"># email subject</span>
    <span class="na">subject</span><span class="pi">:</span> <span class="s">${{ github.job }} job of ${{ github.repository }} has ${{ job.status }}</span>
    <span class="c1"># email body as text</span>
    <span class="na">body</span><span class="pi">:</span> <span class="s">${{ github.job }} job in worflow ${{ github.workflow }} of ${{ github.repository }} has ${{ job.status }}</span>
    <span class="c1"># comma-separated string, send email to</span>
    <span class="na">to</span><span class="pi">:</span> <span class="s">johndoe@gmail.com,doejohn@gmail.com</span>
    <span class="c1"># from email name</span>
    <span class="na">from</span><span class="pi">:</span> <span class="s">John Doe</span>
</code></pre></div></div>

<blockquote class="alert alert-info">
  <p>You can use <code class="language-plaintext highlighter-rouge">echo "${{ toJson(github) }}"</code> to get more workflow context variables.</p>
</blockquote>

<p>The <code class="language-plaintext highlighter-rouge">if: always()</code> directive tells the Github Actions to always run this step regardless of whether the preceding steps have been executed successfully or not. You use the workflow’s context variables to build your email <em>subject</em> and <em>body</em>. Don’t forget to add your <em>username</em> and <em>password</em> as Github Action secrets.</p>

<blockquote class="alert alert-danger">
  <p>Make sure to use the <strong>App-Specific</strong> password for the above action. Learn how to <a href="https://support.google.com/mail/answer/185833?hl=en-GB">create an app-specific password for GMail</a>.</p>
</blockquote>

<h2 id="results">Results</h2>

<p>Before testing the action in use, deliberately fail the action. All you need to do is update the <em>Hello World</em> step’s run command to <code class="language-plaintext highlighter-rouge">echo Hello, world! &amp;&amp; exit 1</code>. This sets an <em>exit</em> status of <em>1</em> which tells the Github Actions that some error has occurred.</p>

<p>Commit and push your code to Github and see what happens. You can see that the <em>Send mail</em> step was executed even though the previous step failed.</p>

<figure class="mb-0 w-100 rounded">
    <img src="https://www.ravsam.in/assets/images/resized/20/failed-github-action.png" width="100%" class="img-fluid rounded blur-up lazyautosizes lazyload" sizes="auto" alt="Github Actions workflow failed deliberately" style="" data-srcset="            https://www.ravsam.in/assets/images/resized/20/failed-github-action.png 20w,            https://www.ravsam.in/assets/images/resized/64/failed-github-action.png 64w,            https://www.ravsam.in/assets/images/resized/576/failed-github-action.png 576w,            https://www.ravsam.in/assets/images/resized/960/failed-github-action.png 960w,            https://www.ravsam.in/assets/images/resized/1400/failed-github-action.png 1400w,            https://www.ravsam.in/assets/images/blog-assets/failed-github-action.png 2091w" />
    
        <figcaption class="text-center text-muted mt-2 mb-4">Github Actions workflow failed deliberately</figcaption>
    
</figure>

<p>Check your inbox for the email about the failure.</p>

<p>Sweet! You can see that the email notification was sent to the recipients specified in the <em>Send mail</em> step. The <em>subject</em> and <em>body</em> were also populated with the appropriate repository and workflow.</p>

<figure class="mb-0 w-100 rounded">
    <img src="https://www.ravsam.in/assets/images/resized/20/email-notification.png" width="100%" class="img-fluid rounded blur-up lazyautosizes lazyload" sizes="auto" alt="Email Notification sent about failed Github Action" style="" data-srcset="            https://www.ravsam.in/assets/images/resized/20/email-notification.png 20w,            https://www.ravsam.in/assets/images/resized/64/email-notification.png 64w,            https://www.ravsam.in/assets/images/resized/576/email-notification.png 576w,            https://www.ravsam.in/assets/images/resized/960/email-notification.png 960w,            https://www.ravsam.in/assets/images/resized/1400/email-notification.png 1400w,            https://www.ravsam.in/assets/images/blog-assets/email-notification.png 2091w" />
    
        <figcaption class="text-center text-muted mt-2 mb-4">Email Notification about the failed Github Action</figcaption>
    
</figure>

<p>Github Actions is a great CI/CD tool. By using the right actions, you can build workflows that can help in boosting team productivity at any workspace.</p>]]></content><author><name>Ravgeet Dhillon</name></author><category term="automation" /><category term="email" /><category term="github-actions" /><category term="automation" /><summary type="html"><![CDATA[Send a custom email notification to multiple recipients when a Github Actions workflow fails or succeeds.]]></summary><media:thumbnail xmlns:media="http://search.yahoo.com/mrss/" url="https://www.ravsam.in/assets/images/blogs/send-email-notification-when-github-action-fails.png" /><media:content medium="image" url="https://www.ravsam.in/assets/images/blogs/send-email-notification-when-github-action-fails.png" xmlns:media="http://search.yahoo.com/mrss/" /></entry><entry><title type="html">Deploy a Website on Netlify using Github Actions</title><link href="https://www.ravsam.in/blog/deploy-a-website-on-netlify-through-github-actions/" rel="alternate" type="text/html" title="Deploy a Website on Netlify using Github Actions" /><published>2020-11-25T12:10:00+00:00</published><updated>2025-08-18T07:51:05+00:00</updated><id>https://www.ravsam.in/blog/deploy-a-website-on-netlify-through-github-actions</id><content type="html" xml:base="https://www.ravsam.in/blog/deploy-a-website-on-netlify-through-github-actions/"><![CDATA[<p>Although you can connect your GitHub branch directly to Netlify and deploy your website using a build command, sometimes you may want to use Github Actions for building your website and then deploy on Netlify. One of the strongest reason to do is that you get 2000 free build minutes in Github Actions as compared to 300 free build minutes in Netlify. If you are updating your website frequently, you may soon run out of these build minutes (<em>Of course, you can buy the <a href="https://netlify.com/pricing">Pro pack on Netlify</a></em>).</p>

<p>In this article, you will:</p>
<ul>
  <li>Build your website on Github Actions</li>
  <li>Push the <em>build</em> directory to the <code class="language-plaintext highlighter-rouge">website-build</code> branch</li>
  <li>Configure Netlify to use the <code class="language-plaintext highlighter-rouge">website-build</code> branch to deploy your website</li>
</ul>

<h6 id="contents">Contents</h6>

<ul>
  <li><a href="#creating-a-demo-website">Creating a Demo Website</a></li>
  <li><a href="#creating-a-build-branch">Creating a Build Branch</a></li>
  <li><a href="#building-website-using-github-actions">Building Website using Github Actions</a></li>
  <li><a href="#configuring-netlify">Configuring Netlify</a></li>
  <li><a href="#results">Results</a></li>
</ul>

<h2 id="creating-a-demo-website">Creating a Demo Website</h2>

<p>You’ll be using <a href="https://jekyllrb.com">Jekyll</a> to create a website for this demo. You can use any framework to build your website because, in the end, you will just create a build directory that you will push to another branch on your Github repository.</p>

<div class="language-bash highlighter-rouge"><div class="highlight"><pre class="highlight"><code><span class="c"># create a boilerplate jekyll website</span>
jekyll new my-awesome-site

<span class="c"># change the directory</span>
<span class="nb">cd </span>my-awesome-site

<span class="c"># git add all the unstaged files</span>
git add <span class="nb">.</span>

<span class="c"># give a good commit message</span>
git commit <span class="nt">-m</span> <span class="s2">"feat: first website commit"</span>

<span class="c"># push to the origin</span>
git push origin master
</code></pre></div></div>

<figure class="mb-0 w-100 rounded">
    <img src="https://www.ravsam.in/assets/images/resized/20/first-commit-jekyll.png" width="100%" class="img-fluid rounded blur-up lazyautosizes lazyload" sizes="auto" alt="Setting up master branch on Github" style="" data-srcset="            https://www.ravsam.in/assets/images/resized/20/first-commit-jekyll.png 20w,            https://www.ravsam.in/assets/images/resized/64/first-commit-jekyll.png 64w,            https://www.ravsam.in/assets/images/resized/576/first-commit-jekyll.png 576w,            https://www.ravsam.in/assets/images/resized/960/first-commit-jekyll.png 960w,            https://www.ravsam.in/assets/images/resized/1400/first-commit-jekyll.png 1400w,            https://www.ravsam.in/assets/images/blog-assets/first-commit-jekyll.png 1408w" />
    
        <figcaption class="text-center text-muted mt-2 mb-4">Setting up master branch on Github</figcaption>
    
</figure>

<p>Alright. Now you have your website code in your Github Repo.</p>

<h2 id="creating-a-build-branch">Creating a Build Branch</h2>

<p>Since you are going to push your website <strong>build</strong> to the <code class="language-plaintext highlighter-rouge">website-build</code> branch, first you need to create a new branch. In your terminal, run the following commands:</p>

<div class="language-bash highlighter-rouge"><div class="highlight"><pre class="highlight"><code><span class="c"># create a new branch</span>
git checkout <span class="nt">--orphan</span> website-build

<span class="c"># remove all files from the staging area</span>
git <span class="nb">rm</span> <span class="nt">-rf</span> <span class="nb">.</span>

<span class="c"># create an empty commit to initialize branch</span>
git commit <span class="nt">--allow-empty</span> <span class="nt">-m</span> <span class="s2">"root commit"</span>

<span class="c"># push branch to origin</span>
git push origin website-build
</code></pre></div></div>

<figure class="mb-0 w-100 rounded">
    <img src="https://www.ravsam.in/assets/images/resized/20/website-build-branch-empty.png" width="100%" class="img-fluid rounded blur-up lazyautosizes lazyload" sizes="auto" alt="Setting up website-build branch on Github" style="" data-srcset="            https://www.ravsam.in/assets/images/resized/20/website-build-branch-empty.png 20w,            https://www.ravsam.in/assets/images/resized/64/website-build-branch-empty.png 64w,            https://www.ravsam.in/assets/images/resized/576/website-build-branch-empty.png 576w,            https://www.ravsam.in/assets/images/resized/960/website-build-branch-empty.png 960w,            https://www.ravsam.in/assets/images/resized/1400/website-build-branch-empty.png 1400w,            https://www.ravsam.in/assets/images/blog-assets/website-build-branch-empty.png 1408w" />
    
        <figcaption class="text-center text-muted mt-2 mb-4">Setting up website-build branch on Github</figcaption>
    
</figure>

<h2 id="building-website-using-github-actions">Building Website using Github Actions</h2>

<p>Now that your branch and website are set up, the next step is to write a Github Action. In your terminal, run the following commands:</p>

<div class="language-bash highlighter-rouge"><div class="highlight"><pre class="highlight"><code><span class="c"># switch back to master branch</span>
git checkout master

<span class="c"># create a directory for github actions</span>
<span class="nb">mkdir</span> <span class="nt">-p</span> .github/workflows

<span class="c"># create a workflow file for github actions</span>
<span class="nb">touch</span> .github/workflows/netlify.yml
</code></pre></div></div>

<p>Add the following script in <strong>netlify.yml</strong>:</p>

<div class="language-yaml highlighter-rouge"><div class="highlight"><pre class="highlight"><code><span class="na">name</span><span class="pi">:</span> <span class="s">Build</span>

<span class="na">on</span><span class="pi">:</span>
  <span class="na">push</span><span class="pi">:</span>
    <span class="na">branches</span><span class="pi">:</span>
      <span class="pi">-</span> <span class="s">master</span>

<span class="na">jobs</span><span class="pi">:</span>
  <span class="na">build</span><span class="pi">:</span>
    <span class="na">runs-on</span><span class="pi">:</span> <span class="s">ubuntu-latest</span>
    <span class="na">steps</span><span class="pi">:</span>
      <span class="pi">-</span> <span class="na">name</span><span class="pi">:</span> <span class="s">Checkout repository</span>
        <span class="na">uses</span><span class="pi">:</span> <span class="s">actions/checkout@v2</span>
        <span class="na">with</span><span class="pi">:</span>
          <span class="na">ref</span><span class="pi">:</span> <span class="s">master</span>

      <span class="pi">-</span> <span class="na">name</span><span class="pi">:</span> <span class="s">Set up Ruby</span>
        <span class="na">uses</span><span class="pi">:</span> <span class="s">actions/setup-ruby@v1</span>
        <span class="na">with</span><span class="pi">:</span>
          <span class="na">ruby-version</span><span class="pi">:</span> <span class="m">2.7</span>

      <span class="pi">-</span> <span class="na">name</span><span class="pi">:</span> <span class="s">Install Dependencies</span>
        <span class="na">run</span><span class="pi">:</span> <span class="pi">|</span>
          <span class="s">gem install bundler</span>
          <span class="s">bundle install</span>

      <span class="pi">-</span> <span class="na">name</span><span class="pi">:</span> <span class="s">Create Build</span>
        <span class="na">run</span><span class="pi">:</span> <span class="s">bundle exec jekyll build -d public</span>

      <span class="pi">-</span> <span class="na">name</span><span class="pi">:</span> <span class="s">Upload artifacts</span>
        <span class="na">uses</span><span class="pi">:</span> <span class="s">actions/upload-artifact@v1</span>
        <span class="na">with</span><span class="pi">:</span>
          <span class="na">name</span><span class="pi">:</span> <span class="s">public</span>
          <span class="na">path</span><span class="pi">:</span> <span class="s">public</span>

  <span class="na">commit-build</span><span class="pi">:</span>
    <span class="na">needs</span><span class="pi">:</span> <span class="s">build</span>
    <span class="na">runs-on</span><span class="pi">:</span> <span class="s">ubuntu-latest</span>
    <span class="na">steps</span><span class="pi">:</span>
      <span class="pi">-</span> <span class="na">name</span><span class="pi">:</span> <span class="s">Clone the repoitory</span>
        <span class="na">uses</span><span class="pi">:</span> <span class="s">actions/checkout@v2</span>
        <span class="na">with</span><span class="pi">:</span>
          <span class="na">ref</span><span class="pi">:</span> <span class="s">website-build</span>

      <span class="pi">-</span> <span class="na">name</span><span class="pi">:</span> <span class="s">Configure Git</span>
        <span class="na">run</span><span class="pi">:</span> <span class="pi">|</span>
          <span class="s">git config --global user.email ${GITHUB_ACTOR}@gmail.com</span>
          <span class="s">git config --global user.name ${GITHUB_ACTOR}</span>

      <span class="pi">-</span> <span class="na">name</span><span class="pi">:</span> <span class="s">Download website build</span>
        <span class="na">uses</span><span class="pi">:</span> <span class="s">actions/download-artifact@v1</span>
        <span class="na">with</span><span class="pi">:</span>
          <span class="na">name</span><span class="pi">:</span> <span class="s">public</span>
          <span class="na">path</span><span class="pi">:</span> <span class="s">public</span>

      <span class="pi">-</span> <span class="na">name</span><span class="pi">:</span> <span class="s">Commit and Push</span>
        <span class="na">run</span><span class="pi">:</span> <span class="pi">|</span>
          <span class="s">if [ $(git status --porcelain=v1 2&gt;/dev/null | wc -l) != "0" ] ; then</span>
            <span class="s">git add -f public</span>
            <span class="s">git commit -m "gh-actions deployed a new website build"</span>
            <span class="s">git push --force https://${GITHUB_ACTOR}:$@github.com/${GITHUB_REPOSITORY}.git HEAD:website-build</span>
          <span class="s">fi</span>
</code></pre></div></div>

<p>The above action does two jobs.</p>

<p>In the <em>build</em> job, you check out your current repository, set up Ruby since you are using Jekyll, install dependencies, build the website, and add upload the <em>public</em> directory as an artifact.</p>

<p>In the <em>commit-build</em> job, you wait for the <em>build</em> job to finish, then check out the <code class="language-plaintext highlighter-rouge">website-build</code> branch, configure Git settings, download your build artifact, and finally push the <em>public</em> directory if any changes are found.</p>

<p>Next, execute the following commands in your terminal to push this Github Action to the upstream repository.</p>

<div class="language-bash highlighter-rouge"><div class="highlight"><pre class="highlight"><code><span class="c"># add the new files</span>
git add <span class="nb">.</span>

<span class="c"># create a new commit with a descriptive message</span>
git commit <span class="nt">-m</span> <span class="s2">"feat: added netlify build workflow"</span>

<span class="c"># push github actions workflow file to the origin</span>
git push origin master
</code></pre></div></div>

<p>Once the <em>git</em> operation is complete, visit the <em>Actions</em> tab on Github.</p>

<figure class="mb-0 w-100 rounded">
    <img src="https://www.ravsam.in/assets/images/resized/20/github-actions-1.png" width="100%" class="img-fluid rounded blur-up lazyautosizes lazyload" sizes="auto" alt="Website build created successfully" style="" data-srcset="            https://www.ravsam.in/assets/images/resized/20/github-actions-1.png 20w,            https://www.ravsam.in/assets/images/resized/64/github-actions-1.png 64w,            https://www.ravsam.in/assets/images/resized/576/github-actions-1.png 576w,            https://www.ravsam.in/assets/images/resized/960/github-actions-1.png 960w,            https://www.ravsam.in/assets/images/resized/1400/github-actions-1.png 1400w,            https://www.ravsam.in/assets/images/blog-assets/github-actions-1.png 1408w" />
    
        <figcaption class="text-center text-muted mt-2 mb-4">Website build created successfully</figcaption>
    
</figure>

<figure class="mb-0 w-100 rounded">
    <img src="https://www.ravsam.in/assets/images/resized/20/github-actions-2.png" width="100%" class="img-fluid rounded blur-up lazyautosizes lazyload" sizes="auto" alt="Website build pushed to website-build branch successfully" style="" data-srcset="            https://www.ravsam.in/assets/images/resized/20/github-actions-2.png 20w,            https://www.ravsam.in/assets/images/resized/64/github-actions-2.png 64w,            https://www.ravsam.in/assets/images/resized/576/github-actions-2.png 576w,            https://www.ravsam.in/assets/images/resized/960/github-actions-2.png 960w,            https://www.ravsam.in/assets/images/resized/1400/github-actions-2.png 1400w,            https://www.ravsam.in/assets/images/blog-assets/github-actions-2.png 1408w" />
    
        <figcaption class="text-center text-muted mt-2 mb-4">Website build pushed to website-build branch successfully</figcaption>
    
</figure>

<figure class="mb-0 w-100 rounded">
    <img src="https://www.ravsam.in/assets/images/resized/20/github-branch-website.png" width="100%" class="img-fluid rounded blur-up lazyautosizes lazyload" sizes="auto" alt="Contents of website-build branch" style="" data-srcset="            https://www.ravsam.in/assets/images/resized/20/github-branch-website.png 20w,            https://www.ravsam.in/assets/images/resized/64/github-branch-website.png 64w,            https://www.ravsam.in/assets/images/resized/576/github-branch-website.png 576w,            https://www.ravsam.in/assets/images/resized/960/github-branch-website.png 960w,            https://www.ravsam.in/assets/images/resized/1400/github-branch-website.png 1400w,            https://www.ravsam.in/assets/images/blog-assets/github-branch-website.png 1408w" />
    
        <figcaption class="text-center text-muted mt-2 mb-4">Contents of website-build branch</figcaption>
    
</figure>

<h2 id="configuring-netlify">Configuring Netlify</h2>

<p>The final thing you need to do is to configure Netlify. You need to change two things to make sure everything runs smoothly.</p>

<p>First, change your <em>Branch to Deploy</em> to <code class="language-plaintext highlighter-rouge">website-build</code>. Second, update your <em>Publish Directory</em> to <code class="language-plaintext highlighter-rouge">artifacts</code>. Now, whenever a push will be made to the <code class="language-plaintext highlighter-rouge">website-build</code> branch, Netlify will automatically deploy your website from the <code class="language-plaintext highlighter-rouge">website-build</code> branch.</p>

<figure class="mb-0 w-100 rounded">
    <img src="https://www.ravsam.in/assets/images/resized/20/netlify-settings-jekyll.png" width="100%" class="img-fluid rounded blur-up lazyautosizes lazyload" sizes="auto" alt="Netlify settings to deploy website" style="" data-srcset="            https://www.ravsam.in/assets/images/resized/20/netlify-settings-jekyll.png 20w,            https://www.ravsam.in/assets/images/resized/64/netlify-settings-jekyll.png 64w,            https://www.ravsam.in/assets/images/resized/576/netlify-settings-jekyll.png 576w,            https://www.ravsam.in/assets/images/resized/960/netlify-settings-jekyll.png 960w,            https://www.ravsam.in/assets/images/resized/1400/netlify-settings-jekyll.png 1400w,            https://www.ravsam.in/assets/images/blog-assets/netlify-settings-jekyll.png 1408w" />
    
        <figcaption class="text-center text-muted mt-2 mb-4">Netlify settings to deploy website</figcaption>
    
</figure>

<h2 id="results">Results</h2>

<figure class="mb-0 w-100 rounded">
    <img src="https://www.ravsam.in/assets/images/resized/20/website-deployed-netlify.png" width="100%" class="img-fluid rounded blur-up lazyautosizes lazyload" sizes="auto" alt="Website deployed successfully on Netlify" style="" data-srcset="            https://www.ravsam.in/assets/images/resized/20/website-deployed-netlify.png 20w,            https://www.ravsam.in/assets/images/resized/64/website-deployed-netlify.png 64w,            https://www.ravsam.in/assets/images/resized/576/website-deployed-netlify.png 576w,            https://www.ravsam.in/assets/images/resized/960/website-deployed-netlify.png 960w,            https://www.ravsam.in/assets/images/resized/1400/website-deployed-netlify.png 1400w,            https://www.ravsam.in/assets/images/blog-assets/website-deployed-netlify.png 1408w" />
    
        <figcaption class="text-center text-muted mt-2 mb-4">Hooray! Website deployed on Netlify</figcaption>
    
</figure>

<p>So that was easy. Using this workflow, you can also deploy your websites on Github Pages. There are a lot of developers complaining about issues with Jekyll plugins that are not supported by Github Pages. You can use Github Actions and commit your build to another branch and configure Github Pages to use that branch for deploying your website.</p>]]></content><author><name>Ravgeet Dhillon</name></author><category term="automation" /><category term="github-actions" /><category term="netlify" /><category term="automation" /><summary type="html"><![CDATA[Take advantage of Github Actions custom workflow script and more build minutes to deploy a website to Netlify.]]></summary><media:thumbnail xmlns:media="http://search.yahoo.com/mrss/" url="https://www.ravsam.in/assets/images/blogs/deploy-a-website-on-netlify-through-github-actions.png" /><media:content medium="image" url="https://www.ravsam.in/assets/images/blogs/deploy-a-website-on-netlify-through-github-actions.png" xmlns:media="http://search.yahoo.com/mrss/" /></entry><entry><title type="html">5 Netlify Plugins for a Great Web Experience</title><link href="https://www.ravsam.in/blog/5-netlify-plugins-to-ensure-a-great-web-experience/" rel="alternate" type="text/html" title="5 Netlify Plugins for a Great Web Experience" /><published>2020-11-17T08:05:00+00:00</published><updated>2025-08-18T07:51:05+00:00</updated><id>https://www.ravsam.in/blog/5-netlify-plugins-to-ensure-a-great-web-experience</id><content type="html" xml:base="https://www.ravsam.in/blog/5-netlify-plugins-to-ensure-a-great-web-experience/"><![CDATA[<p>A great web experience is a must for retaining viewers and turn them into potential leads. The key to achieving a great web experience is making sure that your website is optimized and tested thoroughly. Testing a small website manually can be easy but a large website that is controlled by a team through a CMS requires automated tools. These days most website owners are migrating towards <strong>Jamstack</strong>. Netlify is one of the best platforms to host Jamstack websites.</p>

<p>In this blog, you’ll learn about some of the best Netlify plugins that you can use to offer a great web experience to your website visitors.</p>

<h6 id="contents">Contents</h6>

<ul>
  <li><a href="#1-checklinks">1. Checklinks</a></li>
  <li><a href="#2-deployment-hours">2. Deployment Hours</a></li>
  <li><a href="#3-html-validate">3. HTML Validate</a></li>
  <li><a href="#4-lighthouse">4. Lighthouse</a></li>
  <li><a href="#5-minify-html">5. Minify HTML</a></li>
</ul>

<h2 id="1-checklinks">1. <a href="https://github.com/munter/netlify-plugin-checklinks">Checklinks</a></h2>

<p>Broken links on your website can result in embarrassment and a huge dropout rate. You can manually check for broken links on your website but it is better if you can automate this process. <strong>Checklinks</strong> helps to keep all the assets references correct and avoid <em>404 links</em> to the internal pages, as well as the external pages your website links to. It can also report on inefficient redirect chains and potential mixed content warnings.</p>

<h2 id="2-deployment-hours">2. <a href="https://github.com/neverendingqs/netlify-deployment-hours-plugin">Deployment Hours</a></h2>

<p>Sometimes, in the middle of the night, one of your team members can trigger a new deployment which can by <em>chance</em> break the website. What next? You receive a call and you have to fix the bug at the time you were about to sleep. So to block deployments that happen outside of the specified deployment hours range, you can use the <strong>Deployment Hours</strong> Netlify plugin.</p>

<h2 id="3-html-validate">3. <a href="https://github.com/oliverroick/netlify-plugin-html-validate">HTML Validate</a></h2>

<p><strong>HTML Validate</strong> is a Netlify plugin allows you to validate your HTML website build. It is extremely important to test the validity of the HTML because not only it can break your website’s design structure but also affect the SEO as the search engine crawlers like <strong>GoogleBot</strong> won’t be able to parse your website correctly. For example,</p>

<div class="language-html highlighter-rouge"><div class="highlight"><pre class="highlight"><code><span class="nt">&lt;p&gt;</span>
  <span class="nt">&lt;button&gt;</span>Click me!<span class="nt">&lt;/button&gt;</span>
  <span class="nt">&lt;div</span> <span class="na">id=</span><span class="s">"show-me"</span><span class="nt">&gt;</span>
    Lorem ipsum
  <span class="nt">&lt;/div&gt;</span>
<span class="nt">&lt;/p&gt;</span>
</code></pre></div></div>

<p>The validation of the above HTML will produce the following error in the terminal:</p>

<pre><code class="language-txt">1:1  error  Element &lt;p&gt; is implicitly closed by adjacent &lt;div&gt;  no-implicit-close
2:2  error  Button is missing type attribute                    button-type
6:4  error  Unexpected close-tag, expected opening tag          close-order
</code></pre>

<h2 id="4-lighthouse">4. <a href="https://github.com/netlify-labs/netlify-plugin-lighthouse">Lighthouse</a></h2>

<p><strong>Lighthouse</strong> is a Netlify plugin using which you can run an automated audit of your website after every build. You can set threshold values for each of the categories tested by Lighthouse that include performance, accessibility, best practices, SEO, and PWA if required. A new website build is only deployed if all the threshold values are met.</p>

<figure class="mb-0 w-100 rounded">
    <img src="https://www.ravsam.in/assets/images/resized/20/ravsam-website-performance.png" width="100%" class="img-fluid rounded blur-up lazyautosizes lazyload" sizes="auto" alt="RavSam website performance measured by Lighthouse" style="" data-srcset="            https://www.ravsam.in/assets/images/resized/20/ravsam-website-performance.png 20w,            https://www.ravsam.in/assets/images/resized/64/ravsam-website-performance.png 64w,            https://www.ravsam.in/assets/images/resized/576/ravsam-website-performance.png 576w,            https://www.ravsam.in/assets/images/blog-assets/ravsam-website-performance.png 841w" />
    
        <figcaption class="text-center text-muted mt-2 mb-4">Our website performance measured by Lighthouse</figcaption>
    
</figure>

<h2 id="5-minify-html">5. <a href="https://github.com/philhawksworth/netlify-plugin-minify-html">Minify HTML</a></h2>

<p>When the website is built using a Static Site Generator like <a href="https://jekyllrb.com/">Jekyll</a>, or <a href="https://gohugo.io/">Hugo</a>, lots of whitespaces can creep into the HTML generated after the build. This whitespace means that the user has to download more bytes and you also waste your bandwidth. By minifying the HTML generated by your build, you can remove the redundant bytes from your website. This plugin minifies all HTML files in your publish directory before Netlify deploys them to its global CDN.</p>]]></content><author><name>Ravgeet Dhillon</name></author><category term="development" /><category term="netlify" /><category term="jamstack" /><category term="web-development" /><category term="testing" /><summary type="html"><![CDATA[Test and optimize your website for a great web experience before a new deployment using Netlify plugins.]]></summary><media:thumbnail xmlns:media="http://search.yahoo.com/mrss/" url="https://www.ravsam.in/assets/images/blogs/5-netlify-plugins-to-ensure-a-great-web-experience.png" /><media:content medium="image" url="https://www.ravsam.in/assets/images/blogs/5-netlify-plugins-to-ensure-a-great-web-experience.png" xmlns:media="http://search.yahoo.com/mrss/" /></entry><entry><title type="html">Great Tools for Running a Tech Startup</title><link href="https://www.ravsam.in/blog/great-tools-for-running-a-tech-company/" rel="alternate" type="text/html" title="Great Tools for Running a Tech Startup" /><published>2020-11-09T07:25:00+00:00</published><updated>2025-08-18T07:51:05+00:00</updated><id>https://www.ravsam.in/blog/great-tools-for-running-a-tech-company</id><content type="html" xml:base="https://www.ravsam.in/blog/great-tools-for-running-a-tech-company/"><![CDATA[<p>To run a successful tech company, you need to use the right tools to bring success to yourself and your customers. We often get asked by our customers and developers about the tools we use at RavSam.</p>

<p>In this blog, you’ll learn about some of the best tools to increase team productivity within the organization.</p>

<h6 id="contents">Contents</h6>

<ul>
  <li><a href="#1-send-with-us">1. Send with Us</a></li>
  <li><a href="#2-loom">2. Loom</a></li>
  <li><a href="#3-typeform">3. Typeform</a></li>
  <li><a href="#4-zapier">4. Zapier</a></li>
  <li><a href="#5-intercom">5. Intercom</a></li>
  <li><a href="#6-slack">6. Slack</a></li>
  <li><a href="#7-google-apps-script">7. Google Apps Script</a></li>
  <li><a href="#8-promo">8. Promo</a></li>
  <li><a href="#conclusion">Conclusion</a></li>
</ul>

<h2 id="1-send-with-us">1. Send with Us</h2>

<figure class="mb-0 rounded">
    <img src="https://www.ravsam.in/assets/images/resized/20/sendwithus-preview.png" width="" class="img-fluid rounded mb-4 rounded blur-up lazyautosizes lazyload" sizes="auto" alt="Preview of Send with Us" style="" data-srcset="            https://www.ravsam.in/assets/images/resized/20/sendwithus-preview.png 20w,            https://www.ravsam.in/assets/images/resized/64/sendwithus-preview.png 64w,            https://www.ravsam.in/assets/images/resized/576/sendwithus-preview.png 576w,            https://www.ravsam.in/assets/images/resized/960/sendwithus-preview.png 960w,            https://www.ravsam.in/assets/images/resized/1400/sendwithus-preview.png 1400w,            https://www.ravsam.in/assets/images/blog-assets/sendwithus-preview.png 2560w" />
    
</figure>

<p>Every company does email marketing. It is a great way to reach out to your customers and leads. But how do you ensure that your email template is responsive and optimized for all screens? <strong>Send with Us</strong> is a great service by <a href="https://www.dyspatch.io">Dyspatch.io</a>. It allows you to build email design, templates, and AMP emails as well.</p>

<p>Check out <a href="https://www.dyspatch.io/sendwithus/">Send with Us</a>.</p>

<h2 id="2-loom">2. Loom</h2>

<figure class="mb-0 rounded">
    <img src="https://www.ravsam.in/assets/images/resized/20/loom-preview.png" width="" class="img-fluid rounded mb-4 rounded blur-up lazyautosizes lazyload" sizes="auto" alt="Preview of Loom" style="" data-srcset="            https://www.ravsam.in/assets/images/resized/20/loom-preview.png 20w,            https://www.ravsam.in/assets/images/resized/64/loom-preview.png 64w,            https://www.ravsam.in/assets/images/resized/576/loom-preview.png 576w,            https://www.ravsam.in/assets/images/resized/960/loom-preview.png 960w,            https://www.ravsam.in/assets/images/resized/1400/loom-preview.png 1400w,            https://www.ravsam.in/assets/images/blog-assets/loom-preview.png 2560w" />
    
</figure>

<p><strong>Loom</strong> is a great product that allows you to record video messages on your screen, camera, or both at the same time. It can be hugely beneficial when you have to send a report to a customer. You can record yourself explaining the report metrics which allows the customer to understand them better.</p>

<p>Check out <a href="https://www.loom.com/">Loom</a></p>

<h2 id="3-typeform">3. Typeform</h2>

<figure class="mb-0 rounded">
    <img src="https://www.ravsam.in/assets/images/resized/20/typeform-preview.png" width="" class="img-fluid rounded mb-4 rounded blur-up lazyautosizes lazyload" sizes="auto" alt="Preview of Typeform" style="" data-srcset="            https://www.ravsam.in/assets/images/resized/20/typeform-preview.png 20w,            https://www.ravsam.in/assets/images/resized/64/typeform-preview.png 64w,            https://www.ravsam.in/assets/images/resized/576/typeform-preview.png 576w,            https://www.ravsam.in/assets/images/resized/960/typeform-preview.png 960w,            https://www.ravsam.in/assets/images/resized/1400/typeform-preview.png 1400w,            https://www.ravsam.in/assets/images/blog-assets/typeform-preview.png 2560w" />
    
</figure>

<p><strong>Typeform</strong> is one of the best services in the world for building forms and surveys in no time. Good-looking forms keep the audience engaged. You get more thoughtful responses and higher completion rates. The best part is that even a non-developer team member can easily create forms on their own.</p>

<p>Check out <a href="https://www.typeform.com/">Typeform</a>.</p>

<h2 id="4-zapier">4. Zapier</h2>

<figure class="mb-0 rounded">
    <img src="https://www.ravsam.in/assets/images/resized/20/zapier-preview.png" width="" class="img-fluid rounded mb-4 rounded blur-up lazyautosizes lazyload" sizes="auto" alt="Preview of Zapier" style="" data-srcset="            https://www.ravsam.in/assets/images/resized/20/zapier-preview.png 20w,            https://www.ravsam.in/assets/images/resized/64/zapier-preview.png 64w,            https://www.ravsam.in/assets/images/resized/576/zapier-preview.png 576w,            https://www.ravsam.in/assets/images/resized/960/zapier-preview.png 960w,            https://www.ravsam.in/assets/images/resized/1400/zapier-preview.png 1400w,            https://www.ravsam.in/assets/images/blog-assets/zapier-preview.png 2560w" />
    
</figure>

<p><strong>Zapier</strong> allows you to connect apps and create automation workflows by sending data from one endpoint to the other. It allows you to create a <strong>Zap</strong> in the form of a trigger, condition, and action.</p>

<p>Check out <a href="https://www.zapier.com/">Zapier</a>.</p>

<h2 id="5-intercom">5. Intercom</h2>

<figure class="mb-0 rounded">
    <img src="https://www.ravsam.in/assets/images/resized/20/intercom-preview.png" width="" class="img-fluid rounded mb-4 rounded blur-up lazyautosizes lazyload" sizes="auto" alt="Preview of Intercom" style="" data-srcset="            https://www.ravsam.in/assets/images/resized/20/intercom-preview.png 20w,            https://www.ravsam.in/assets/images/resized/64/intercom-preview.png 64w,            https://www.ravsam.in/assets/images/resized/576/intercom-preview.png 576w,            https://www.ravsam.in/assets/images/resized/960/intercom-preview.png 960w,            https://www.ravsam.in/assets/images/resized/1400/intercom-preview.png 1400w,            https://www.ravsam.in/assets/images/blog-assets/intercom-preview.png 2560w" />
    
</figure>

<p>Intercom is more than just a chat widget. It’s a full customer service suite that can be integrated into any digital product you want. It aims to give customers a conversational experience they’ll remember and come back for.</p>

<p>Check out <a href="https://www.intercom.com/">Intercom</a>.</p>

<h2 id="6-slack">6. Slack</h2>

<figure class="mb-0 rounded">
    <img src="https://www.ravsam.in/assets/images/resized/20/slack-preview.png" width="" class="img-fluid rounded mb-4 rounded blur-up lazyautosizes lazyload" sizes="auto" alt="Preview of Slack" style="" data-srcset="            https://www.ravsam.in/assets/images/resized/20/slack-preview.png 20w,            https://www.ravsam.in/assets/images/resized/64/slack-preview.png 64w,            https://www.ravsam.in/assets/images/resized/576/slack-preview.png 576w,            https://www.ravsam.in/assets/images/resized/960/slack-preview.png 960w,            https://www.ravsam.in/assets/images/resized/1400/slack-preview.png 1400w,            https://www.ravsam.in/assets/images/blog-assets/slack-preview.png 2560w" />
    
</figure>

<p>There is no life without <strong>Slack</strong>. It is not only great for internal organizational communication, but also for building <strong>bots</strong>, which can be used to automate processes and do a lot of other cool stuff.</p>

<p>Check out <a href="https://www.slack.com/">Slack</a>.</p>

<h2 id="7-google-apps-script">7. Google Apps Script</h2>

<figure class="mb-0 rounded">
    <img src="https://www.ravsam.in/assets/images/resized/20/gas-preview.png" width="" class="img-fluid rounded mb-4 rounded blur-up lazyautosizes lazyload" sizes="auto" alt="Preview of Google Apps Script" style="" data-srcset="            https://www.ravsam.in/assets/images/resized/20/gas-preview.png 20w,            https://www.ravsam.in/assets/images/resized/64/gas-preview.png 64w,            https://www.ravsam.in/assets/images/resized/576/gas-preview.png 576w,            https://www.ravsam.in/assets/images/resized/960/gas-preview.png 960w,            https://www.ravsam.in/assets/images/resized/1400/gas-preview.png 1400w,            https://www.ravsam.in/assets/images/blog-assets/gas-preview.png 2560w" />
    
</figure>

<p><strong>Google Apps Script</strong> is a Javascript-based development platform that allows you to connect apps that integrate with Google Workspace(formerly G-Suite). As a developer, you don’t have to deal with access keys and tokens as <em>authentication</em> is baked right into the platform. We use Google Apps Scripts extensively to automate customer-related and internal processes at RavSam.</p>

<p>Check out <a href="https://www.google.com/script/start/">Google Apps Script</a>.</p>

<h2 id="8-promo">8. Promo</h2>

<p><strong>Promo</strong> is an online video maker that gives you everything you need to make high-performing videos that will boost your business. It comes with ready to use templates for any kinds of business types and it fits all types of contents. With Promo, you can also make video advertisements freely and easily. Promo helps you to promote your business or products, improves brand awareness, widen your reach, and engage your customers.</p>

<p>Check out <a href="https://promo.com/for/video-ad-maker">Promo</a>.</p>

<h2 id="conclusion">Conclusion</h2>

<p>You can achieve even more profit by connecting these tools. For example, we can create a Slack bot that creates a Typeform and send it to your customers via Send with Us. Such workflows can be designed using Zapier or Google Apps Script.</p>]]></content><author><name>Ravgeet Dhillon</name></author><category term="businesses-and-startups" /><category term="tools" /><category term="saas" /><category term="startup" /><summary type="html"><![CDATA[Choose the right tools not only to increase productivity but also better customer relationships.]]></summary><media:thumbnail xmlns:media="http://search.yahoo.com/mrss/" url="https://www.ravsam.in/assets/images/blogs/great-tools-for-running-a-tech-startup.png" /><media:content medium="image" url="https://www.ravsam.in/assets/images/blogs/great-tools-for-running-a-tech-startup.png" xmlns:media="http://search.yahoo.com/mrss/" /></entry><entry><title type="html">Why Flutter Developer could be a $1 Millon job?</title><link href="https://www.ravsam.in/blog/flutter-developer-could-be-a-usd-1million-job/" rel="alternate" type="text/html" title="Why Flutter Developer could be a $1 Millon job?" /><published>2020-11-02T07:40:00+00:00</published><updated>2025-08-18T07:51:05+00:00</updated><id>https://www.ravsam.in/blog/flutter-developer-could-be-a-usd-1million-job</id><content type="html" xml:base="https://www.ravsam.in/blog/flutter-developer-could-be-a-usd-1million-job/"><![CDATA[<p><a href="https://www.flutter.dev">Flutter</a> is becoming a rage these days. Developers around the world are exploring this technology that has the potential to change the world of app development. There are many cross-platform development frameworks in the market, but no one matches the essence of Flutter. In this article, we will project our <a href="https://www.toptal.com/flutter/hybrid-power-flutter-advantages">future vision for the Flutter</a> and why being a Flutter Developer would be financially rewarding.</p>

<h6 id="contents">Contents</h6>

<ul>
  <li><a href="#knowing-flutter">Knowing Flutter</a></li>
  <li><a href="#skills-required-to-be-a-flutter-developer">Skills Required to be a Flutter Developer</a></li>
  <li><a href="#why-learn-flutter">Why Learn Flutter?</a></li>
  <li><a href="#whats-next">What’s next</a></li>
</ul>

<h2 id="knowing-flutter">Knowing Flutter</h2>

<p>Flutter is Google’s latest innovation for building beautiful, natively compiled apps for mobile, web, and desktop from a single codebase. It is a <strong>UI toolkit</strong> with fast development, expressive and flexible UI, and native performance. It comes with an extremely useful feature called <em>Hot Reloading</em> which renders the UI on the device in seconds helping in decreasing the development time.</p>

<h2 id="skills-required-to-be-a-flutter-developer">Skills Required to be a Flutter Developer</h2>

<p>To be a Flutter Developer, the first thing you need to learn is <a href="https://dart.dev/">Dart</a>. Dart is a <strong>programming language</strong> developed by Google. It is a beautiful language that supports Object-Oriented design patterns. It has borrowed some of the best features from other programming languages such as C++, Javascript, etc. If you are comfortable in any programming language, then you can easily understand Dart and start developing Flutter apps.</p>

<p>Once you are comfortable with Dart, the next step is to learn Flutter itself. <strong>Everything in Flutter is a Widget</strong>. It means that you can add any <em>widget</em> into another widget and build <em>widget trees</em>. These widgets trees are then rendered by the Flutter engine and painted on the screen. Once you get an idea of how to build the layouts using widgets, you will be surprised by how easy it is to build the apps using Flutter.</p>

<h2 id="why-learn-flutter">Why Learn Flutter?</h2>

<p>Now comes the main question, what is so special about Flutter that it could be a job with a salary of $1 Million per year? The answer is hidden in the Flutter itself, <strong>Write once, Build for anywhere</strong>.</p>

<p>Let us take an example of a company that has a brilliant product used by millions of users around the world. Their product is available as a Web App, Android app, iOS app, Windows app, Linux app, and macOS app as well. Currently, they have a Frontend Engineer who works on the Web App. In their mobile team, they have an Android developer, an iOS developer, and a tester who writes an automated test for both apps. Coming to their desktop app ecosystem, they have four more developers and one more tester working in a collaborative environment. All are very talented in what they do but implementing a new feature is very tedious as it has to be implemented in each of the apps. Also as the product functionality is increasing after every release, maintenance is becoming a problem. They pay a collective of $800k to the developers in their company, plus the overhead maintenance cost.</p>

<p>Now let us imagine what would happen if there was a technology using which you could write the code and tests only once, and then compile it into multiple builds for different environments. Instead of hiring multiple individuals, the company could get a Flutter developer on board who would be responsible to develop this cross-platform functionality. Since you have to write the code only once, you know exactly what to test as well.</p>

<h2 id="whats-next">What’s next</h2>

<p>The Web and Desktop apps designed in Flutter are still not up to the mark but the Google team is making Flutter better with each release. The community-backed plugin ecosystem is a huge advantage as it provides the developers a way to add functionality to their app which is not provided by the Flutter itself.</p>

<p>If you are a student, then definitely you should learn the Flutter. You can also become <a href="https://developers.google.com/community/experts">Google Developer Expert</a>. Once you are done with flutter, you can upskill yourself by learning the backend development or <strong>Firebase</strong>. In this way, you could be the next Full Stack Developer with Flutter as a specialty.</p>]]></content><author><name>Ravgeet Dhillon</name></author><category term="businesses-and-startups" /><category term="app-development" /><category term="flutter" /><category term="app-design" /><category term="jobs" /><summary type="html"><![CDATA[Read why a Flutter Developer could take home a salary of $1Mn per year.]]></summary><media:thumbnail xmlns:media="http://search.yahoo.com/mrss/" url="https://www.ravsam.in/assets/images/blogs/flutter-developer-could-be-a-usd-1million-job.png" /><media:content medium="image" url="https://www.ravsam.in/assets/images/blogs/flutter-developer-could-be-a-usd-1million-job.png" xmlns:media="http://search.yahoo.com/mrss/" /></entry><entry><title type="html">Create JSON Feed for a Jekyll Blog</title><link href="https://www.ravsam.in/blog/create-json-feed-for-jekyll-blog/" rel="alternate" type="text/html" title="Create JSON Feed for a Jekyll Blog" /><published>2020-10-25T12:00:00+00:00</published><updated>2025-08-18T07:51:05+00:00</updated><id>https://www.ravsam.in/blog/create-json-feed-for-jekyll-blog</id><content type="html" xml:base="https://www.ravsam.in/blog/create-json-feed-for-jekyll-blog/"><![CDATA[<p>The big difference between <em>JSON</em> feed and <em>XML</em> feed is the ability to read and write JSON. Parsing XML is not an easy task whereas when it comes to JSON, you have to write only a single line of code and use it any way you want. With the advent of JSON-based feed readers, it would be nice to have a JSON feed for your blog.</p>

<p>In this article, you’ll learn to use <strong>Jekyll</strong> and <strong>Liquid</strong> syntax to create a JSON feed for your blog.</p>

<h3 id="contents">Contents</h3>

<ul>
  <li><a href="#prerequisites">Prerequisites</a></li>
  <li><a href="#creating-a-feedjson-file">Creating a feed.json File</a></li>
  <li><a href="#writing-liquid-code">Writing Liquid Code</a></li>
  <li><a href="#adding-feed-url-to-head">Adding Feed URL to Head</a></li>
  <li><a href="#result">Result</a></li>
</ul>

<h2 id="prerequisites">Prerequisites</h2>

<p>Before proceeding, make sure that:</p>

<ul>
  <li>Your Jekyll blog is already set up.</li>
  <li>Your blogs live at the <code class="language-plaintext highlighter-rouge">_blogs</code> directory.</li>
</ul>

<h2 id="creating-a-feedjson-file">Creating a feed.json File</h2>

<p>First, create a <strong>feed.json</strong> file at the root of your website and add the following front matter to it:</p>

<div class="language-yml highlighter-rouge"><div class="highlight"><pre class="highlight"><code><span class="na">permalink</span><span class="pi">:</span> <span class="s">/blog/feed.json</span>
</code></pre></div></div>

<p>This will make your blog feed available at the <code class="language-plaintext highlighter-rouge">/blog/feed.json</code> path.</p>

<h2 id="writing-liquid-code">Writing Liquid Code</h2>

<p>In the <strong>feed.json file</strong>, add the following Jekyll code:</p>

<div class="language-json highlighter-rouge"><div class="highlight"><pre class="highlight"><code><span class="p">{</span><span class="w">
    </span><span class="nl">"version"</span><span class="p">:</span><span class="w"> </span><span class="s2">"https://jsonfeed.org/version/1.1"</span><span class="p">,</span><span class="w">
    </span><span class="nl">"title"</span><span class="p">:</span><span class="w"> </span><span class="p">{{</span><span class="w"> </span><span class="err">'JSON</span><span class="w"> </span><span class="err">Feed'</span><span class="w"> </span><span class="err">|</span><span class="w"> </span><span class="err">xml_escape</span><span class="w"> </span><span class="err">|</span><span class="w"> </span><span class="err">jsonify</span><span class="w"> </span><span class="p">}},</span><span class="w">
    </span><span class="nl">"description"</span><span class="p">:</span><span class="w"> </span><span class="p">{{</span><span class="w"> </span><span class="err">site.description</span><span class="w"> </span><span class="err">|</span><span class="w"> </span><span class="err">jsonify</span><span class="w"> </span><span class="p">}},</span><span class="w">
    </span><span class="nl">"favicon"</span><span class="p">:</span><span class="w"> </span><span class="p">{{</span><span class="w"> </span><span class="err">'/assets/images/logos/favicons/apple-touch-icon.png'</span><span class="w"> </span><span class="err">|</span><span class="w"> </span><span class="err">absolute_url</span><span class="w"> </span><span class="err">|</span><span class="w"> </span><span class="err">jsonify</span><span class="w"> </span><span class="p">}},</span><span class="w">
    </span><span class="nl">"language"</span><span class="p">:</span><span class="w"> </span><span class="s2">"en"</span><span class="p">,</span><span class="w">
    </span><span class="nl">"home_page_url"</span><span class="p">:</span><span class="w"> </span><span class="p">{{</span><span class="w"> </span><span class="err">'/'</span><span class="w"> </span><span class="err">|</span><span class="w"> </span><span class="err">absolute_url</span><span class="w"> </span><span class="err">|</span><span class="w"> </span><span class="err">jsonify</span><span class="w"> </span><span class="p">}},</span><span class="w">
    </span><span class="nl">"feed_url"</span><span class="p">:</span><span class="w"> </span><span class="p">{{</span><span class="w"> </span><span class="err">page.permalink</span><span class="w"> </span><span class="err">|</span><span class="w"> </span><span class="err">absolute_url</span><span class="w"> </span><span class="err">|</span><span class="w"> </span><span class="err">jsonify</span><span class="w"> </span><span class="p">}},</span><span class="w">
    </span><span class="nl">"user_comment"</span><span class="p">:</span><span class="w"> </span><span class="s2">"This feed allows you to read the blogs from this site in any feed reader that supports the JSON Feed format."</span><span class="p">,</span><span class="w">
    </span><span class="nl">"items"</span><span class="p">:</span><span class="w"> </span><span class="p">[{</span><span class="err">%</span><span class="w"> </span><span class="err">for</span><span class="w"> </span><span class="err">blog</span><span class="w"> </span><span class="err">in</span><span class="w"> </span><span class="err">site.blogs</span><span class="w"> </span><span class="err">reversed</span><span class="w"> </span><span class="err">%</span><span class="p">}</span><span class="w">
        </span><span class="p">{</span><span class="w">
            </span><span class="nl">"id"</span><span class="p">:</span><span class="w"> </span><span class="p">{{</span><span class="w"> </span><span class="err">blog.url</span><span class="w"> </span><span class="err">|</span><span class="w"> </span><span class="err">absolute_url</span><span class="w"> </span><span class="err">|</span><span class="w"> </span><span class="err">jsonify</span><span class="w"> </span><span class="p">}},</span><span class="w">
            </span><span class="nl">"url"</span><span class="p">:</span><span class="w"> </span><span class="p">{{</span><span class="w"> </span><span class="err">blog.url</span><span class="w"> </span><span class="err">|</span><span class="w"> </span><span class="err">absolute_url</span><span class="w"> </span><span class="err">|</span><span class="w"> </span><span class="err">jsonify</span><span class="w"> </span><span class="p">}},</span><span class="w">
            </span><span class="nl">"language"</span><span class="p">:</span><span class="w"> </span><span class="s2">"en"</span><span class="p">,</span><span class="w">
            </span><span class="nl">"title"</span><span class="p">:</span><span class="w"> </span><span class="p">{{</span><span class="w"> </span><span class="err">blog.title</span><span class="w"> </span><span class="err">|</span><span class="w"> </span><span class="err">jsonify</span><span class="w"> </span><span class="p">}},</span><span class="w">
            </span><span class="nl">"summary"</span><span class="p">:</span><span class="w"> </span><span class="p">{{</span><span class="w"> </span><span class="err">blog.description</span><span class="w"> </span><span class="err">|</span><span class="w"> </span><span class="err">jsonify</span><span class="w"> </span><span class="p">}},</span><span class="w">
            </span><span class="nl">"content_html"</span><span class="p">:</span><span class="w"> </span><span class="p">{{</span><span class="w"> </span><span class="err">blog.content</span><span class="w"> </span><span class="err">|</span><span class="w"> </span><span class="err">jsonify</span><span class="w"> </span><span class="p">}},</span><span class="w">
            </span><span class="nl">"date_published"</span><span class="p">:</span><span class="w"> </span><span class="p">{{</span><span class="w"> </span><span class="err">blog.date</span><span class="w"> </span><span class="err">|</span><span class="w"> </span><span class="err">date_to_xmlschema</span><span class="w"> </span><span class="err">|</span><span class="w"> </span><span class="err">jsonify</span><span class="w"> </span><span class="p">}},</span><span class="w">
            </span><span class="nl">"date_modified"</span><span class="p">:</span><span class="w"> </span><span class="p">{{</span><span class="w"> </span><span class="err">blog.last_modified_at</span><span class="w"> </span><span class="err">|</span><span class="w"> </span><span class="err">date_to_xmlschema</span><span class="w">  </span><span class="err">|</span><span class="w"> </span><span class="err">jsonify</span><span class="w"> </span><span class="p">}},</span><span class="w">
            </span><span class="nl">"image"</span><span class="p">:</span><span class="w"> </span><span class="s2">"{{ blog.image.path }}"</span><span class="p">,</span><span class="w">
            </span><span class="nl">"banner_image"</span><span class="p">:</span><span class="w"> </span><span class="s2">"{{ blog.image.path }}"</span><span class="p">,</span><span class="w">
            </span><span class="nl">"authors"</span><span class="p">:</span><span class="w"> </span><span class="p">[{{</span><span class="w"> </span><span class="err">blog.author</span><span class="w"> </span><span class="err">|</span><span class="w"> </span><span class="err">jsonify</span><span class="w"> </span><span class="p">}}],</span><span class="w">
            </span><span class="nl">"categories"</span><span class="p">:</span><span class="w"> </span><span class="p">{{</span><span class="w"> </span><span class="err">blog.categories</span><span class="w"> </span><span class="err">|</span><span class="w"> </span><span class="err">jsonify</span><span class="w"> </span><span class="p">}},</span><span class="w">
            </span><span class="nl">"tags"</span><span class="p">:</span><span class="w"> </span><span class="p">{{</span><span class="w"> </span><span class="err">blog.tags</span><span class="w"> </span><span class="err">|</span><span class="w"> </span><span class="err">jsonify</span><span class="w"> </span><span class="p">}}</span><span class="w">
        </span><span class="p">}</span><span class="w">
        </span><span class="p">{</span><span class="err">%</span><span class="w"> </span><span class="err">unless</span><span class="w"> </span><span class="err">forloop.last</span><span class="w"> </span><span class="err">%</span><span class="p">},{</span><span class="err">%</span><span class="w"> </span><span class="err">endunless</span><span class="w"> </span><span class="err">%</span><span class="p">}{</span><span class="err">%</span><span class="w"> </span><span class="err">endfor</span><span class="w"> </span><span class="err">%</span><span class="p">}</span><span class="w">
    </span><span class="p">]</span><span class="w">
</span><span class="p">}</span><span class="w">
</span></code></pre></div></div>

<p>The above feed uses the most recent version of <a href="https://jsonfeed.org/version/1.1">JSON Feed specifications</a>.</p>

<h2 id="adding-feed-url-to-head">Adding Feed URL to Head</h2>

<p>The final step is to add a <strong>reference</strong> to your JSON feed in the <em>head</em> tag of your website so that anyone looking for your blog feed can find it out from here.</p>

<div class="language-html highlighter-rouge"><div class="highlight"><pre class="highlight"><code><span class="nt">&lt;link</span> <span class="na">rel=</span><span class="s">"alternate"</span> <span class="na">type=</span><span class="s">"application/json"</span> <span class="na">title=</span><span class="s">"JSON Feed"</span> <span class="na">href=</span><span class="s">"https://www.ravsam.in/blog/feed.json"</span> <span class="nt">/&gt;</span>
</code></pre></div></div>

<h2 id="result">Result</h2>

<p>To check the JSON feed, run the following command in your terminal:</p>

<div class="language-bash highlighter-rouge"><div class="highlight"><pre class="highlight"><code>bundle <span class="nb">exec </span>jekyll serve
</code></pre></div></div>

<p>Then, check out your feed at <a href="http://localhost:4000/blog/feed.json">http://localhost:4000/blog/feed.json</a>.</p>

<p>You can see a JSON feed created for your blog. You can submit this blog feed to a <a href="https://json-feed-viewer.herokuapp.com/">JSON Feed Reader</a>.</p>

<figure class="mb-0 w-100 rounded">
    <img src="https://www.ravsam.in/assets/images/resized/20/json-feed.png" width="100%" class="img-fluid rounded blur-up lazyautosizes lazyload" sizes="auto" alt="JSON Feed for a Jekyll blog" style="" data-srcset="            https://www.ravsam.in/assets/images/resized/20/json-feed.png 20w,            https://www.ravsam.in/assets/images/resized/64/json-feed.png 64w,            https://www.ravsam.in/assets/images/resized/576/json-feed.png 576w,            https://www.ravsam.in/assets/images/resized/960/json-feed.png 960w,            https://www.ravsam.in/assets/images/resized/1400/json-feed.png 1400w,            https://www.ravsam.in/assets/images/blog-assets/json-feed.png 1408w" />
    
        <figcaption class="text-center text-muted mt-2 mb-4">JSON Feed for a Jekyll blog</figcaption>
    
</figure>

<p>We can also create JSON feeds for <strong>podcasts</strong>, <strong>microblogs</strong>, and submit them to content aggregators. As we move into the future, you’ll see more and more blogs migrating to the JSON feed as it is extremely easy to consume and set up.</p>]]></content><author><name>Ravgeet Dhillon</name></author><category term="development" /><category term="jekyll" /><category term="web-development" /><summary type="html"><![CDATA[Learn to add a JSON feed to a Jekyll blog and get your content in front of the world with the help of content aggregators.]]></summary><media:thumbnail xmlns:media="http://search.yahoo.com/mrss/" url="https://www.ravsam.in/assets/images/blogs/create-json-feed-for-jekyll-blog.png" /><media:content medium="image" url="https://www.ravsam.in/assets/images/blogs/create-json-feed-for-jekyll-blog.png" xmlns:media="http://search.yahoo.com/mrss/" /></entry><entry><title type="html">Top Flutter Plugins to Take your App to Next Level</title><link href="https://www.ravsam.in/blog/top-flutter-plugins-to-take-your-app-to-next-level/" rel="alternate" type="text/html" title="Top Flutter Plugins to Take your App to Next Level" /><published>2020-10-19T12:00:00+00:00</published><updated>2025-08-18T07:51:05+00:00</updated><id>https://www.ravsam.in/blog/top-flutter-plugins-to-take-your-app-to-next-level</id><content type="html" xml:base="https://www.ravsam.in/blog/top-flutter-plugins-to-take-your-app-to-next-level/"><![CDATA[<p>Flutter is one of the fastest-rising frameworks for developing cross-platform apps. At RavSam, you also use Flutter for <a href="https://www.ravsam.in/services/mobile-app-development/">developing mobile apps</a>. One of the biggest advantages of Flutter is its plugin ecosystem. There are tons of plugins available on <a href="https://pub.dev/">pub.dev</a> build by the community that can be integrated right on the go with your Flutter app.</p>

<p>In this article, you’ll take a look at some of those plugins which can be used almost in any Flutter app and enhance the <em>User Experience</em> to a great extent.</p>

<h6 id="contents">Contents</h6>

<ul>
  <li><a href="#1-share">1. Share</a></li>
  <li><a href="#2-geolocator">2. Geolocator</a></li>
  <li><a href="#3-url-launcher">3. URL Launcher</a></li>
  <li><a href="#4-shimmer">4. Shimmer</a></li>
  <li><a href="#5-connectivity">5. Connectivity</a></li>
</ul>

<h2 id="1-share">1. <a href="https://pub.dev/packages/share">Share</a></h2>

<figure class="mb-0 rounded">
    <img src="https://www.ravsam.in/assets/images/resized/20/share-widget.png" width="" class="img-fluid mb-3 rounded blur-up lazyautosizes lazyload" sizes="auto" alt="Share Widget in Flutter App" style="" data-srcset="            https://www.ravsam.in/assets/images/resized/20/share-widget.png 20w,            https://www.ravsam.in/assets/images/resized/64/share-widget.png 64w,            https://www.ravsam.in/assets/images/resized/576/share-widget.png 576w,            https://www.ravsam.in/assets/images/resized/960/share-widget.png 960w,            https://www.ravsam.in/assets/images/blog-assets/share-widget.png 1100w" />
    
</figure>

<p>Share is a plugin that you can use to share the app content via other apps using the platform’s <strong>share dialog</strong>. It works on both Android and iOS and can be used in a social media app. According to its developers, a backward-compatible <em>1.0.0</em> version will be released soon as the plugin has reached a stable API.</p>

<p><strong>Stats on Pub.dev</strong></p>

<table>
  <thead>
    <tr>
      <th>Likes</th>
      <th>Pub Points</th>
      <th>Popularity</th>
    </tr>
  </thead>
  <tbody>
    <tr>
      <td>691</td>
      <td>90</td>
      <td>99%</td>
    </tr>
  </tbody>
</table>

<h2 id="2-geolocator">2. <a href="https://pub.dev/packages/geolocator">Geolocator</a></h2>

<figure class="mb-0 rounded">
    <img src="https://www.ravsam.in/assets/images/resized/20/location.png" width="" class="img-fluid mb-3 rounded blur-up lazyautosizes lazyload" sizes="auto" alt="Tracking Location in Flutter App" style="" data-srcset="            https://www.ravsam.in/assets/images/resized/20/location.png 20w,            https://www.ravsam.in/assets/images/resized/64/location.png 64w,            https://www.ravsam.in/assets/images/resized/576/location.png 576w,            https://www.ravsam.in/assets/images/resized/960/location.png 960w,            https://www.ravsam.in/assets/images/blog-assets/location.png 1100w" />
    
</figure>

<p>Geolocator is one of the must-use plugins if you are building an app that shows content based on the location of the user. It provides an easy-to-implement API that can be used to access platform-specific location services. You can access the last known location, current location of the device, and even get continuous location updates. This plugin is of great use in Cab Booking apps, Food Delivery apps, and many more.</p>

<p><strong>Stats on Pub.dev</strong></p>

<table>
  <thead>
    <tr>
      <th>Likes</th>
      <th>Pub Points</th>
      <th>Popularity</th>
    </tr>
  </thead>
  <tbody>
    <tr>
      <td>929</td>
      <td>100</td>
      <td>99%</td>
    </tr>
  </tbody>
</table>

<h2 id="3-url-launcher">3. <a href="https://pub.dev/packages/url_launcher">URL Launcher</a></h2>

<figure class="mb-0 rounded">
    <img src="https://www.ravsam.in/assets/images/resized/20/url-launcher.png" width="" class="img-fluid mb-3 rounded blur-up lazyautosizes lazyload" sizes="auto" alt="URL Launcher Plugin to open links in Flutter App" style="" data-srcset="            https://www.ravsam.in/assets/images/resized/20/url-launcher.png 20w,            https://www.ravsam.in/assets/images/resized/64/url-launcher.png 64w,            https://www.ravsam.in/assets/images/resized/576/url-launcher.png 576w,            https://www.ravsam.in/assets/images/resized/960/url-launcher.png 960w,            https://www.ravsam.in/assets/images/blog-assets/url-launcher.png 1100w" />
    
</figure>

<p>URL Launcher is one of the most famous plugins which can be used on almost every production Flutter app. It is a plugin for launching different URL schemes like:</p>

<ul>
  <li><code class="language-plaintext highlighter-rouge">https://example.com</code></li>
  <li><code class="language-plaintext highlighter-rouge">mailto:foo@bar.com</code></li>
  <li><code class="language-plaintext highlighter-rouge">tel:9876543210</code>.</li>
</ul>

<p>It supports every platform that Flutter targets such as iOS, Android, Web, Windows, macOS, and Linux.</p>

<p><strong>Stats on Pub.dev</strong></p>

<table>
  <thead>
    <tr>
      <th>Likes</th>
      <th>Pub Points</th>
      <th>Popularity</th>
    </tr>
  </thead>
  <tbody>
    <tr>
      <td>1368</td>
      <td>110</td>
      <td>100%</td>
    </tr>
  </tbody>
</table>

<h2 id="4-shimmer">4. <a href="https://pub.dev/packages/shimmer">Shimmer</a></h2>

<figure class="mb-0 rounded">
    <img src="https://www.ravsam.in/assets/images/resized/20/shimmer.png" width="" class="img-fluid mb-3 rounded blur-up lazyautosizes lazyload" sizes="auto" alt="Shimmer Loading Effect in Flutter App" style="" data-srcset="            https://www.ravsam.in/assets/images/resized/20/shimmer.png 20w,            https://www.ravsam.in/assets/images/resized/64/shimmer.png 64w,            https://www.ravsam.in/assets/images/resized/576/shimmer.png 576w,            https://www.ravsam.in/assets/images/resized/960/shimmer.png 960w,            https://www.ravsam.in/assets/images/blog-assets/shimmer.png 1100w" />
    
</figure>

<p>Shimmer is a brilliant plugin to enhance the UI/UX of an app while the content is loading. It is visually appealing as it gives the user an indication that the content is being fetched from the Internet. This package provides a <em>widget</em> for adding a shimmer effect in the Flutter project.</p>

<p><strong>Stats on Pub.dev</strong></p>

<table>
  <thead>
    <tr>
      <th>Likes</th>
      <th>Pub Points</th>
      <th>Popularity</th>
    </tr>
  </thead>
  <tbody>
    <tr>
      <td>685</td>
      <td>110</td>
      <td>98%</td>
    </tr>
  </tbody>
</table>

<h2 id="5-connectivity">5. <a href="https://pub.dev/packages/connectivity">Connectivity</a></h2>

<figure class="mb-0 rounded">
    <img src="https://www.ravsam.in/assets/images/resized/20/no-connectivity.png" width="" class="img-fluid mb-3 rounded blur-up lazyautosizes lazyload" sizes="auto" alt="No Connectivity State in Flutter App" style="" data-srcset="            https://www.ravsam.in/assets/images/resized/20/no-connectivity.png 20w,            https://www.ravsam.in/assets/images/resized/64/no-connectivity.png 64w,            https://www.ravsam.in/assets/images/resized/576/no-connectivity.png 576w,            https://www.ravsam.in/assets/images/resized/960/no-connectivity.png 960w,            https://www.ravsam.in/assets/images/blog-assets/no-connectivity.png 1100w" />
    
</figure>

<p>There may be times when a user opens your app but is not connected to the WiFi or Mobile Internet connection. In circumstances like these, you can add this plugin to your Flutter app for discovering network connectivity and deciding the UI state accordingly. This plugin provides the developers with a great way to distinguish between Mobile and WiFi connections. According to its developers, a backward-compatible <em>1.0.0</em> version will be released soon as the plugin has reached a stable API.</p>

<p><strong>Stats on Pub.dev</strong></p>

<table>
  <thead>
    <tr>
      <th>Likes</th>
      <th>Pub Points</th>
      <th>Popularity</th>
    </tr>
  </thead>
  <tbody>
    <tr>
      <td>788</td>
      <td>95</td>
      <td>99%</td>
    </tr>
  </tbody>
</table>]]></content><author><name>Ravgeet Dhillon</name></author><category term="development" /><category term="flutter" /><category term="plugins" /><category term="app-development" /><category term="app-design" /><summary type="html"><![CDATA[Use these Flutter plugins in any Flutter app and enhance the User Experience to a great extent.]]></summary><media:thumbnail xmlns:media="http://search.yahoo.com/mrss/" url="https://www.ravsam.in/assets/images/blogs/top-flutter-plugins-to-take-your-app-to-next-level.png" /><media:content medium="image" url="https://www.ravsam.in/assets/images/blogs/top-flutter-plugins-to-take-your-app-to-next-level.png" xmlns:media="http://search.yahoo.com/mrss/" /></entry><entry><title type="html">Use Humans.txt to Credit your Team for a Project</title><link href="https://www.ravsam.in/blog/use-humans-txt-to-credit-your-team-for-project/" rel="alternate" type="text/html" title="Use Humans.txt to Credit your Team for a Project" /><published>2020-10-13T12:30:00+00:00</published><updated>2025-08-18T07:51:05+00:00</updated><id>https://www.ravsam.in/blog/use-humans-txt-to-credit-your-team-for-project</id><content type="html" xml:base="https://www.ravsam.in/blog/use-humans-txt-to-credit-your-team-for-project/"><![CDATA[<p>We all love to take credit for the work that we are proud of and there is nothing wrong with that. Whenever we work on a project, we put our team/company name in the <strong>footer of the website</strong>, or the <strong>about section</strong>. However, this doesn’t take into consideration the members of the team who worked on the project. These members can be <em>Designers</em>, <em>Developers</em>, <em>Marketers</em>, <em>QAs</em>, etc.</p>

<p>To attribute the team behind the project, there is a thing called <a href="http://humanstxt.org/"><strong>humans.txt</strong></a></p>

<h6 id="contents">Contents</h6>

<ul>
  <li><a href="#what-is-humanstxt">What is humans.txt?</a></li>
  <li><a href="#humanstxt-example">Humans.txt Example</a></li>
  <li><a href="#should-we-always-add-humanstxt">Should we always add humans.txt?</a></li>
  <li><a href="#who-to-mention-on-humanstxt">Who to mention on humans.txt?</a></li>
  <li><a href="#where-should-i-add-humanstxt">Where should I add humans.txt?</a></li>
</ul>

<h2 id="what-is-humanstxt">What is humans.txt?</h2>

<p>Humans.txt is a great initiative for listing the individuals who worked on a project. It’s an initiative for knowing the people behind a website. Basically, it is just a <strong>.txt</strong> file that contains information about individuals and their <em>roles</em> in a particular project.</p>

<h2 id="humanstxt-example">Humans.txt Example</h2>

<div class="language-plaintext highlighter-rouge"><div class="highlight"><pre class="highlight"><code>/* TEAM */
    Project Lead: John Smith
    Contact: johnsmith [at] gmail.com
    Twitter: @johnsmith
    From: New York, USA

    UI Designer: Tim Jacob
    Contact: timjacob [at] gmail.com
    Twitter: @timjacob
    From: New York, USA

    Project Lead: Jennifer Jaine
    Contact: jenniferjaine [at] gmail.com
    Twitter: @jenniferjaine
    From: Toronto, Cananda

/* SITE */
    Last update: 2020/10/05
    Language: English
    Doctype: HTML5
    IDE: VSCode
    Technologies: Jekyll, Python
</code></pre></div></div>

<h2 id="should-we-always-add-humanstxt">Should we always add humans.txt?</h2>

<p>Humans.txt is <strong>completely optional</strong>. It is <em>not</em> related to SEO. But it is a way to tell the world about the individuals who worked hard on a particular website project.</p>

<h2 id="who-to-mention-on-humanstxt">Who to mention on humans.txt?</h2>

<p>You can mention anyone on the humans.txt. You can attribute your designers, developers, SEOs, Project Manager, .etc. For an Open Source project, you can add all the contributors in the humans.txt by automating it through CI/CD.</p>

<h2 id="where-should-i-add-humanstxt">Where should I add humans.txt?</h2>

<p>Humans.txt lives at the <strong>root of the website</strong>. Then, you can add a <code class="language-plaintext highlighter-rouge">&lt;link&gt;</code> tag in the <code class="language-plaintext highlighter-rouge">&lt;head&gt;</code> of your website.</p>

<div class="language-html highlighter-rouge"><div class="highlight"><pre class="highlight"><code><span class="nt">&lt;link</span> <span class="na">type=</span><span class="s">"text/plain"</span> <span class="na">rel=</span><span class="s">"author"</span> <span class="na">href=</span><span class="s">"http://example.com/humans.txt"</span><span class="nt">&gt;</span>
</code></pre></div></div>

<p>I hope that you will use the humans.txt in your projects and attribute your team to the work they do.</p>]]></content><author><name>Ravgeet Dhillon</name></author><category term="businesses-and-startups" /><category term="web-development" /><category term="web-design" /><summary type="html"><![CDATA[A text document that contains information about the individuals who worked on the project.]]></summary><media:thumbnail xmlns:media="http://search.yahoo.com/mrss/" url="https://www.ravsam.in/assets/images/blogs/use-humans-txt-to-credit-your-team-for-project.png" /><media:content medium="image" url="https://www.ravsam.in/assets/images/blogs/use-humans-txt-to-credit-your-team-for-project.png" xmlns:media="http://search.yahoo.com/mrss/" /></entry><entry><title type="html">Custom Log Monitoring service using Google Apps Script</title><link href="https://www.ravsam.in/blog/custom-log-monitoring-service-using-google-apps-script/" rel="alternate" type="text/html" title="Custom Log Monitoring service using Google Apps Script" /><published>2020-09-25T13:00:00+00:00</published><updated>2025-08-18T07:51:05+00:00</updated><id>https://www.ravsam.in/blog/custom-log-monitoring-service-using-google-apps-script</id><content type="html" xml:base="https://www.ravsam.in/blog/custom-log-monitoring-service-using-google-apps-script/"><![CDATA[<p>In this blog, you’ll learn to set up your own custom, serverless logging system using Google Apps Script and Google Docs. You’ll use a Google Apps Script to handle the HTTP requests and other business logic and store the logs in Google Docs.</p>

<h6 id="contents">Contents</h6>

<ul>
  <li><a href="#creating-a-google-doc">Creating a Google Doc</a></li>
  <li><a href="#writing-code">Writing Code</a></li>
  <li><a href="#handling-http-requests">Handling HTTP Requests</a></li>
  <li><a href="#results">Results</a></li>
</ul>

<h2 id="creating-a-google-doc">Creating a Google Doc</h2>

<p>First of all, create a <a href="https://docs.google.com/document/u/0/">new Google Doc</a> in which you’ll store your logs. Get its ID that you’ll be using in your Google Apps Script project code.</p>

<h2 id="writing-code">Writing Code</h2>

<p>First, create a <a href="https://script.google.com/home">new Google Apps Script Project</a>. Once you have created a new project, create a <strong>Main.gs</strong> file and add the following code to it:</p>

<div class="language-js highlighter-rouge"><div class="highlight"><pre class="highlight"><code><span class="kd">function</span> <span class="nf">logEvent</span><span class="p">(</span><span class="nx">eventString</span><span class="p">,</span> <span class="nx">eventType</span><span class="o">=</span><span class="dl">'</span><span class="s1">info</span><span class="dl">'</span><span class="p">)</span> <span class="p">{</span>

  <span class="c1">// get google docs to store the logs</span>
  <span class="kd">const</span> <span class="nx">body</span> <span class="o">=</span> <span class="nx">DocumentApp</span><span class="p">.</span><span class="nf">openById</span><span class="p">(</span><span class="dl">'</span><span class="s1">google-docs-id</span><span class="dl">'</span><span class="p">).</span><span class="nf">getBody</span><span class="p">()</span>
  
  <span class="c1">// get current time</span>
  <span class="kd">const</span> <span class="nx">time</span> <span class="o">=</span> <span class="k">new</span> <span class="nc">Date</span><span class="p">().</span><span class="nf">toUTCString</span><span class="p">()</span>
  
  <span class="c1">// create a log string</span>
  <span class="kd">const</span> <span class="nx">log</span> <span class="o">=</span> <span class="nx">time</span> <span class="o">+</span> <span class="dl">'</span><span class="s1"> - </span><span class="dl">'</span> <span class="o">+</span> <span class="nx">eventString</span>
  
  <span class="c1">// add log string to the google docs</span>
  <span class="nx">body</span><span class="p">.</span><span class="nf">appendParagraph</span><span class="p">(</span><span class="nx">log</span><span class="p">)</span>
<span class="p">}</span>
</code></pre></div></div>

<p>In the above code, you have created a <code class="language-plaintext highlighter-rouge">logEvent(eventString, eventType='info')</code> function which takes in two parameters <code class="language-plaintext highlighter-rouge">eventString</code>, and <code class="language-plaintext highlighter-rouge">eventType</code>. In this function, you get the <code class="language-plaintext highlighter-rouge">body</code> of a Google Doc in which you want to store your logs. After that, you create a new <em>string</em> that contains the current time and the event string and append this <code class="language-plaintext highlighter-rouge">log</code> to the body of your Google Doc. At this point, you can try to run your function manually to see if anything happens at all.</p>

<p>It would be great if you can <strong>color code your logs</strong> to identify the type of event just by looking at them. Modify the <code class="language-plaintext highlighter-rouge">logEvent</code> function as in the following code:</p>

<div class="language-js highlighter-rouge"><div class="highlight"><pre class="highlight"><code><span class="kd">function</span> <span class="nf">logEvent</span><span class="p">(</span><span class="nx">eventString</span><span class="p">,</span> <span class="nx">eventType</span><span class="o">=</span><span class="dl">'</span><span class="s1">info</span><span class="dl">'</span><span class="p">)</span> <span class="p">{</span>

  <span class="c1">// get google docs to store the logs</span>
  <span class="kd">const</span> <span class="nx">body</span> <span class="o">=</span> <span class="nx">DocumentApp</span><span class="p">.</span><span class="nf">openById</span><span class="p">(</span><span class="dl">'</span><span class="s1">google-docs-id</span><span class="dl">'</span><span class="p">).</span><span class="nf">getBody</span><span class="p">()</span>
  
  <span class="c1">// get current time</span>
  <span class="kd">const</span> <span class="nx">time</span> <span class="o">=</span> <span class="k">new</span> <span class="nc">Date</span><span class="p">().</span><span class="nf">toUTCString</span><span class="p">()</span>
  
  <span class="c1">// create a log string</span>
  <span class="kd">const</span> <span class="nx">log</span> <span class="o">=</span> <span class="nx">time</span> <span class="o">+</span> <span class="dl">'</span><span class="s1"> - </span><span class="dl">'</span> <span class="o">+</span> <span class="nx">eventString</span>
  
  <span class="c1">// add log string to the google docs</span>
  <span class="kd">const</span> <span class="nx">par</span> <span class="o">=</span> <span class="nx">body</span><span class="p">.</span><span class="nf">appendParagraph</span><span class="p">(</span><span class="nx">log</span><span class="p">)</span>
  
  <span class="c1">// create a style object and add font size property</span>
  <span class="kd">let</span> <span class="nx">style</span> <span class="o">=</span> <span class="p">{}</span>
  <span class="nx">style</span><span class="p">[</span><span class="nx">DocumentApp</span><span class="p">.</span><span class="nx">Attribute</span><span class="p">.</span><span class="nx">FONT_SIZE</span><span class="p">]</span> <span class="o">=</span> <span class="mi">12</span>
  
  <span class="c1">// based on the event type and font color property</span>
  <span class="k">switch</span><span class="p">(</span><span class="nx">eventType</span><span class="p">)</span> <span class="p">{</span>
    <span class="k">case</span> <span class="dl">'</span><span class="s1">info</span><span class="dl">'</span><span class="p">:</span>
      <span class="nx">style</span><span class="p">[</span><span class="nx">DocumentApp</span><span class="p">.</span><span class="nx">Attribute</span><span class="p">.</span><span class="nx">FOREGROUND_COLOR</span><span class="p">]</span> <span class="o">=</span> <span class="dl">'</span><span class="s1">#0000ff</span><span class="dl">'</span>
      <span class="k">break</span>
    <span class="k">case</span> <span class="dl">'</span><span class="s1">success</span><span class="dl">'</span><span class="p">:</span>
      <span class="nx">style</span><span class="p">[</span><span class="nx">DocumentApp</span><span class="p">.</span><span class="nx">Attribute</span><span class="p">.</span><span class="nx">FOREGROUND_COLOR</span><span class="p">]</span> <span class="o">=</span> <span class="dl">'</span><span class="s1">#06ad00</span><span class="dl">'</span>
      <span class="k">break</span>
    <span class="k">case</span> <span class="dl">'</span><span class="s1">warning</span><span class="dl">'</span><span class="p">:</span>
      <span class="nx">style</span><span class="p">[</span><span class="nx">DocumentApp</span><span class="p">.</span><span class="nx">Attribute</span><span class="p">.</span><span class="nx">FOREGROUND_COLOR</span><span class="p">]</span> <span class="o">=</span> <span class="dl">'</span><span class="s1">#e67e00</span><span class="dl">'</span>
      <span class="k">break</span>
    <span class="k">case</span> <span class="dl">'</span><span class="s1">error</span><span class="dl">'</span><span class="p">:</span>
      <span class="nx">style</span><span class="p">[</span><span class="nx">DocumentApp</span><span class="p">.</span><span class="nx">Attribute</span><span class="p">.</span><span class="nx">FOREGROUND_COLOR</span><span class="p">]</span> <span class="o">=</span> <span class="dl">'</span><span class="s1">#ff0000</span><span class="dl">'</span>
      <span class="k">break</span>
    <span class="k">default</span><span class="p">:</span>
      <span class="nx">style</span><span class="p">[</span><span class="nx">DocumentApp</span><span class="p">.</span><span class="nx">Attribute</span><span class="p">.</span><span class="nx">FOREGROUND_COLOR</span><span class="p">]</span> <span class="o">=</span> <span class="dl">'</span><span class="s1">#000000</span><span class="dl">'</span>
      <span class="k">break</span>
  <span class="p">}</span>

  <span class="c1">// apply the custom style the log string</span>
  <span class="nx">par</span><span class="p">.</span><span class="nf">setAttributes</span><span class="p">(</span><span class="nx">style</span><span class="p">)</span>
<span class="p">}</span>
</code></pre></div></div>

<p>In the above code, based on the value of <code class="language-plaintext highlighter-rouge">eventType</code>, you apply the styling to your <code class="language-plaintext highlighter-rouge">log</code> string. By default, each new <em>event</em> is associated with the <strong>info</strong> type.</p>

<h2 id="handling-http-requests">Handling HTTP Requests</h2>

<p>You are done with the core code of your script. The last step is to handle <em>HTTP</em> requests which you can make from any type of app like React Web App or a Flutter App.</p>

<p>Add the following code to the <code class="language-plaintext highlighter-rouge">Main.js</code> file:</p>

<div class="language-js highlighter-rouge"><div class="highlight"><pre class="highlight"><code><span class="c1">// handles the get request to the server</span>
<span class="kd">function</span> <span class="nf">doPost</span><span class="p">(</span><span class="nx">e</span><span class="p">)</span> <span class="p">{</span>
  <span class="k">try</span> <span class="p">{</span>
    <span class="c1">// get query parameters</span>
    <span class="kd">const</span> <span class="nx">eventString</span> <span class="o">=</span> <span class="nx">e</span><span class="p">.</span><span class="nx">parameter</span><span class="p">[</span><span class="dl">'</span><span class="s1">event_name</span><span class="dl">'</span><span class="p">]</span>
    <span class="kd">const</span> <span class="nx">eventType</span> <span class="o">=</span> <span class="nx">e</span><span class="p">.</span><span class="nx">parameter</span><span class="p">[</span><span class="dl">'</span><span class="s1">event_type</span><span class="dl">'</span><span class="p">]</span>

    <span class="c1">// log the event</span>
    <span class="nf">logEvent</span><span class="p">(</span><span class="nx">eventString</span><span class="p">,</span> <span class="nx">eventType</span><span class="p">)</span>

    <span class="c1">// return json success result</span>
    <span class="k">return</span> <span class="nx">ContentService</span>
          <span class="p">.</span><span class="nf">createTextOutput</span><span class="p">(</span><span class="nx">JSON</span><span class="p">.</span><span class="nf">stringify</span><span class="p">({</span><span class="dl">'</span><span class="s1">result</span><span class="dl">'</span><span class="p">:</span> <span class="dl">'</span><span class="s1">success</span><span class="dl">'</span><span class="p">}))</span>
          <span class="p">.</span><span class="nf">setMimeType</span><span class="p">(</span><span class="nx">ContentService</span><span class="p">.</span><span class="nx">MimeType</span><span class="p">.</span><span class="nx">JSON</span><span class="p">)</span>
    <span class="p">}</span>
  <span class="p">}</span>
  <span class="k">catch </span><span class="p">(</span><span class="nx">e</span><span class="p">)</span> <span class="p">{</span>
    <span class="c1">// return json failure result</span>
    <span class="k">return</span> <span class="nx">ContentService</span>
          <span class="p">.</span><span class="nf">createTextOutput</span><span class="p">(</span><span class="nx">JSON</span><span class="p">.</span><span class="nf">stringify</span><span class="p">({</span><span class="dl">'</span><span class="s1">result</span><span class="dl">'</span><span class="p">:</span> <span class="dl">'</span><span class="s1">failure</span><span class="dl">'</span><span class="p">}))</span>
          <span class="p">.</span><span class="nf">setMimeType</span><span class="p">(</span><span class="nx">ContentService</span><span class="p">.</span><span class="nx">MimeType</span><span class="p">.</span><span class="nx">JSON</span><span class="p">)</span>
    <span class="p">}</span>
  <span class="p">}</span>
<span class="p">}</span>
</code></pre></div></div>

<p>The above code handles the <em>POST</em> request made to the Google Apps Script. Based on the script execution, a <em>JSON</em> response is sent back to the <em>requesting app</em>.</p>

<p>Once this is done, you can deploy the script as a <em>Web App</em> and use the Web App <em>URL</em> in your <em>requesting app</em>.</p>

<h2 id="results">Results</h2>

<p>Let’s see how well this custom serverless logging system works.</p>

<p><img src="https://www.ravsam.in/assets/images/blog-assets/serverless-logs.gif" alt="Logs Creation in Google Docs" class="img-fluid shadow-sm mb-4 rounded" /></p>

<p>Awesome! Those color codings make the logs user-friendly. This kind of custom logging system can help you to debug your apps in production mode as well. You can also configure email or slack notification functionality for a particular kind of event so that your team gets notified of any irregularities in your apps.</p>]]></content><author><name>Ravgeet Dhillon</name></author><category term="development" /><category term="google-apps-script" /><category term="web-development" /><category term="automation" /><summary type="html"><![CDATA[Set up your own custom, serverless logging system using Google Apps Script and Google Docs.]]></summary><media:thumbnail xmlns:media="http://search.yahoo.com/mrss/" url="https://www.ravsam.in/assets/images/blogs/custom-log-monitoring-service-using-google-apps-script.png" /><media:content medium="image" url="https://www.ravsam.in/assets/images/blogs/custom-log-monitoring-service-using-google-apps-script.png" xmlns:media="http://search.yahoo.com/mrss/" /></entry><entry><title type="html">Send Slack Notifications when Github Action fails</title><link href="https://www.ravsam.in/blog/send-slack-notification-when-github-actions-fails/" rel="alternate" type="text/html" title="Send Slack Notifications when Github Action fails" /><published>2020-09-13T07:50:00+00:00</published><updated>2025-08-18T07:51:05+00:00</updated><id>https://www.ravsam.in/blog/send-slack-notification-when-github-actions-fails</id><content type="html" xml:base="https://www.ravsam.in/blog/send-slack-notification-when-github-actions-fails/"><![CDATA[<p>If you and your team use Github, then you must be using Github Actions as well. Whenever a Github Action fails, Github automatically sends you an email regarding the event. It works only if you are working on an individual project. However, when you are working in a team, you need a better way to monitor your Github Actions. You need to know the status of your Github Actions specifically when they fail so that your engineering team can act upon them as quickly as possible.</p>

<p>In this blog, you’ll learn to send a notification to your Slack channel whenever your Github Action fails. To solve this issue, you’ll use the <a href="https://github.com/ravsamhq/notify-slack-action">notify-slack-action</a> published by us.</p>

<h6 id="contents">Contents</h6>

<ul>
  <li><a href="#getting-a-webhook-url">Getting a Webhook URL</a></li>
  <li><a href="#using-notify-slack-action">Using notify-slack-action</a></li>
  <li><a href="#results">Results</a></li>
</ul>

<h2 id="getting-a-webhook-url">Getting a Webhook URL</h2>

<p>To send notifications to your Slack channel, you need to create a <strong>Slack App</strong>. You can follow this <a href="/blog/collect-form-responses-using-google-apps-script/">easy tutorial</a> that includes tips to create your own Slack App and get a webhook URL. Once you have a webhook URL, you need to add it to the Github Actions secrets with the name - <em>ACTION_MONITORING_SLACK</em></p>

<h2 id="using-notify-slack-action">Using notify-slack-action</h2>

<p>Let’s assume that you already have a Github Action that fails often and you need to monitor it. Add the following step as the last step in your Github Action workflow:</p>

<div class="language-yml highlighter-rouge"><div class="highlight"><pre class="highlight"><code><span class="pi">-</span> <span class="na">name</span><span class="pi">:</span> <span class="s">Report Status</span>
  <span class="na">if</span><span class="pi">:</span> <span class="s">always()</span>
  <span class="na">uses</span><span class="pi">:</span> <span class="s">ravsamhq/notify-slack-action@v1</span>
  <span class="na">with</span><span class="pi">:</span>
    <span class="na">status</span><span class="pi">:</span> <span class="s">${{ job.status }}</span>
    <span class="na">notify_when</span><span class="pi">:</span> <span class="s1">'</span><span class="s">failure'</span>
  <span class="na">env</span><span class="pi">:</span>
    <span class="na">SLACK_WEBHOOK_URL</span><span class="pi">:</span> <span class="s">${{ secrets.ACTION_MONITORING_SLACK }}</span>
</code></pre></div></div>

<p>Besides the inputs given above, you can provide plenty of <em>inputs</em> to the <strong>notify-slack-action</strong> and make your notification more informative.</p>

<div class="language-yml highlighter-rouge"><div class="highlight"><pre class="highlight"><code><span class="na">status</span><span class="pi">:</span> <span class="s">${{ job.status }}</span> <span class="c1"># required</span>
<span class="na">notify_when</span><span class="pi">:</span> <span class="s1">'</span><span class="s">failure'</span>
<span class="na">notification_title</span><span class="pi">:</span> <span class="s1">'</span><span class="s">{workflow}</span><span class="nv"> </span><span class="s">has</span><span class="nv"> </span><span class="s">{status_message}'</span>
<span class="na">message_format</span><span class="pi">:</span> <span class="s1">'</span><span class="s">{emoji}</span><span class="nv"> </span><span class="s">*{workflow}*</span><span class="nv"> </span><span class="s">{status_message}</span><span class="nv"> </span><span class="s">in</span><span class="nv"> </span><span class="s">&lt;{repo_url}|{repo}&gt;'</span>
<span class="na">footer</span><span class="pi">:</span> <span class="s1">'</span><span class="s">Linked</span><span class="nv"> </span><span class="s">to</span><span class="nv"> </span><span class="s">Repo</span><span class="nv"> </span><span class="s">&lt;{repo_url}|{repo}&gt;'</span>
<span class="na">notify_when</span><span class="pi">:</span> <span class="s1">'</span><span class="s">failure'</span>
<span class="na">mention_users</span><span class="pi">:</span> <span class="s1">'</span><span class="s">U0160UUNH8S,U0080UUAA9N'</span>
<span class="na">mention_users_when</span><span class="pi">:</span> <span class="s1">'</span><span class="s">failure,warnings'</span>
<span class="na">mention_groups</span><span class="pi">:</span> <span class="s1">'</span><span class="s">SAZ94GDB8'</span>
<span class="na">mention_groups_when</span><span class="pi">:</span> <span class="s1">'</span><span class="s">failure,warnings'</span>
</code></pre></div></div>

<p>You can find and read more about the action at <a href="https://github.com/marketplace/actions/notify-slack-action">Github Marketplace</a>.</p>

<p>This is all you need to monitor your Github Actions workflow. If you want to monitor each run of your Github Action workflow even when it succeeds, you can simply change the <code class="language-plaintext highlighter-rouge">notify_when</code> parameter value to <em>success,failure,warnings</em>.</p>

<h2 id="results">Results</h2>

<p>Open your Github Action and fail it deliberately to test your Github Actions monitoring.</p>

<figure class="mb-0 w-100 rounded">
    <img src="https://www.ravsam.in/assets/images/resized/20/github-action-failed.png" width="100%" class="img-fluid rounded blur-up lazyautosizes lazyload" sizes="auto" alt="Failed Github Actions run" style="" data-srcset="            https://www.ravsam.in/assets/images/resized/20/github-action-failed.png 20w,            https://www.ravsam.in/assets/images/resized/64/github-action-failed.png 64w,            https://www.ravsam.in/assets/images/resized/576/github-action-failed.png 576w,            https://www.ravsam.in/assets/images/resized/960/github-action-failed.png 960w,            https://www.ravsam.in/assets/images/resized/1400/github-action-failed.png 1400w,            https://www.ravsam.in/assets/images/blog-assets/github-action-failed.png 1408w" />
    
        <figcaption class="text-center text-muted mt-2 mb-4">Failure in Github Action</figcaption>
    
</figure>

<figure class="mb-0 w-100 rounded">
    <img src="https://www.ravsam.in/assets/images/resized/20/slack-failure-notification.png" width="100%" class="img-fluid rounded blur-up lazyautosizes lazyload" sizes="auto" alt="Failure notification in Slack" style="" data-srcset="            https://www.ravsam.in/assets/images/resized/20/slack-failure-notification.png 20w,            https://www.ravsam.in/assets/images/resized/64/slack-failure-notification.png 64w,            https://www.ravsam.in/assets/images/resized/576/slack-failure-notification.png 576w,            https://www.ravsam.in/assets/images/resized/960/slack-failure-notification.png 960w,            https://www.ravsam.in/assets/images/resized/1400/slack-failure-notification.png 1400w,            https://www.ravsam.in/assets/images/blog-assets/slack-failure-notification.png 1408w" />
    
        <figcaption class="text-center text-muted mt-2 mb-4">Failure notification recieved in Slack</figcaption>
    
</figure>

<p>Alright! You can see that a notification message was sent to the Slack channel stating the <em>commit</em> and <em>repository</em> it failed in.</p>

<p>This is extremely useful when you have multiple projects using Github Actions and you want to keep a check on your Github Actions workflow. I strongly feel that this action will increase the productivity of any team at any workspace.</p>]]></content><author><name>Ravgeet Dhillon</name></author><category term="automation" /><category term="slack-bot" /><category term="github-actions" /><category term="automation" /><summary type="html"><![CDATA[Monitor your Github Actions status by sending success or failure notifications to your Slack channel.]]></summary><media:thumbnail xmlns:media="http://search.yahoo.com/mrss/" url="https://www.ravsam.in/assets/images/blogs/send-slack-notification-when-github-actions-fails.png" /><media:content medium="image" url="https://www.ravsam.in/assets/images/blogs/send-slack-notification-when-github-actions-fails.png" xmlns:media="http://search.yahoo.com/mrss/" /></entry><entry><title type="html">Track Email Opens with Google Apps Script</title><link href="https://www.ravsam.in/blog/track-email-opens-with-google-apps-script/" rel="alternate" type="text/html" title="Track Email Opens with Google Apps Script" /><published>2020-09-01T08:20:00+00:00</published><updated>2025-08-18T07:51:05+00:00</updated><id>https://www.ravsam.in/blog/track-email-opens-with-google-apps-script</id><content type="html" xml:base="https://www.ravsam.in/blog/track-email-opens-with-google-apps-script/"><![CDATA[<p>In the last blog, we talked about how to <a href="http://www.ravsam.in/blog/setup-email-marketing-using-google-apps-script/">setup Email Marketing using Google Apps Script</a>. In this blog, you’ll learn to track whether your emails are opened by the recipients or not. This can be implemented using <strong>Google Apps Script</strong> and <strong>a tracking pixel</strong>. Tracking the email opening is important to measure the success of your email marketing campaign but you have to make sure that you maintain the privacy of the recipients in every way possible.</p>

<h6 id="contents">Contents</h6>

<ul>
  <li><a href="#prerequisites">Prerequisites</a></li>
  <li><a href="#adding-status-column">Adding Status Column</a></li>
  <li><a href="#writing-email-tracking-code">Writing Email Tracking Code</a></li>
  <li><a href="#deploying-as-web-app">Deploying as Web App</a></li>
  <li><a href="#adding-tracking-pixel-in-email">Adding Tracking Pixel in Email</a></li>
  <li><a href="#results">Results</a></li>
</ul>

<h2 id="prerequisites">Prerequisites</h2>

<p>Before getting started, follow all the steps discussed in <a href="http://www.ravsam.in/blog/setup-email-marketing-using-google-apps-script/">setup Email Marketing using Google Apps Script</a>.</p>

<h2 id="adding-status-column">Adding Status Column</h2>

<p>Once you have set up the Google Sheet, add a <code class="language-plaintext highlighter-rouge">status</code> column to it. This column will be used to track the email openings.</p>

<figure class="mb-0 w-100 rounded">
    <img src="https://www.ravsam.in/assets/images/resized/20/sheet.png" width="100%" class="img-fluid rounded blur-up lazyautosizes lazyload" sizes="auto" alt="Enter the user details in Google Sheet" style="" data-srcset="            https://www.ravsam.in/assets/images/resized/20/sheet.png 20w,            https://www.ravsam.in/assets/images/resized/64/sheet.png 64w,            https://www.ravsam.in/assets/images/resized/576/sheet.png 576w,            https://www.ravsam.in/assets/images/resized/960/sheet.png 960w,            https://www.ravsam.in/assets/images/resized/1400/sheet.png 1400w,            https://www.ravsam.in/assets/images/blog-assets/sheet.png 1408w" />
    
        <figcaption class="text-center text-muted mt-2 mb-4">Enter the user details in Google Sheet</figcaption>
    
</figure>

<h2 id="writing-email-tracking-code">Writing Email Tracking Code</h2>

<p>Now is the time to add some code to the script from the previous blog.</p>

<p>You will add an <code class="language-plaintext highlighter-rouge">&lt;img&gt;</code> tag in your HTML file and specify its <code class="language-plaintext highlighter-rouge">width="0"</code> and <code class="language-plaintext highlighter-rouge">height="0"</code>. You’ll add your script URL along with some query parameters in the <code class="language-plaintext highlighter-rouge">src</code> attribute. This kind of image is known as <strong>tracking pixel</strong>.</p>

<p>When the recipient will open the email, a <strong>GET</strong> request will be sent to the URL specified in the src attribute. You’ll handle this <em>GET</em> request in your Google Apps Script and update the Google Sheet based on the query parameters.</p>

<p>In the <strong>Main.gs</strong>, add <code class="language-plaintext highlighter-rouge">template.email = email</code> after <code class="language-plaintext highlighter-rouge">template.name = name</code> line in the <code class="language-plaintext highlighter-rouge">sendEmails</code> function:</p>

<div class="language-js highlighter-rouge"><div class="highlight"><pre class="highlight"><code><span class="kd">function</span> <span class="nf">sendEmails</span><span class="p">(</span><span class="nx">mail_template</span><span class="o">=</span><span class="dl">'</span><span class="s1">content</span><span class="dl">'</span><span class="p">,</span>
                    <span class="nx">subject</span><span class="o">=</span><span class="dl">'</span><span class="s1">Testing my Email Marketing</span><span class="dl">'</span><span class="p">)</span> <span class="p">{</span>
  
  <span class="c1">// get the active spreadsheet and data in it</span>
  <span class="kd">const</span> <span class="nx">id</span> <span class="o">=</span> <span class="nx">SpreadsheetApp</span><span class="p">.</span><span class="nf">getActiveSpreadsheet</span><span class="p">().</span><span class="nf">getId</span><span class="p">()</span>
  <span class="kd">const</span> <span class="nx">sheet</span> <span class="o">=</span> <span class="nx">SpreadsheetApp</span><span class="p">.</span><span class="nf">openById</span><span class="p">(</span><span class="nx">id</span><span class="p">).</span><span class="nf">getActiveSheet</span><span class="p">()</span>
  <span class="kd">const</span> <span class="nx">data</span> <span class="o">=</span> <span class="nx">sheet</span><span class="p">.</span><span class="nf">getDataRange</span><span class="p">().</span><span class="nf">getValues</span><span class="p">()</span>
  
  <span class="c1">// iterate through the data, starting at index 1</span>
  <span class="k">for </span><span class="p">(</span><span class="kd">let</span> <span class="nx">i</span> <span class="o">=</span> <span class="mi">1</span><span class="p">;</span> <span class="nx">i</span> <span class="o">&lt;</span> <span class="nx">data</span><span class="p">.</span><span class="nx">length</span><span class="p">;</span> <span class="nx">i</span><span class="o">++</span><span class="p">)</span> <span class="p">{</span>
    <span class="kd">const</span> <span class="nx">row</span> <span class="o">=</span> <span class="nx">data</span><span class="p">[</span><span class="nx">i</span><span class="p">]</span>
    <span class="kd">const</span> <span class="nx">email</span> <span class="o">=</span> <span class="nx">row</span><span class="p">[</span><span class="mi">0</span><span class="p">]</span>
    <span class="kd">const</span> <span class="nx">name</span> <span class="o">=</span> <span class="nx">row</span><span class="p">[</span><span class="mi">1</span><span class="p">]</span>
    
    <span class="c1">// check if you can send an email</span>
    <span class="k">if </span><span class="p">(</span><span class="nx">MailApp</span><span class="p">.</span><span class="nf">getRemainingDailyQuota</span><span class="p">()</span> <span class="o">&gt;</span> <span class="mi">0</span><span class="p">)</span> <span class="p">{</span>
        
      <span class="c1">// populate the template</span>
      <span class="kd">let</span> <span class="nx">template</span> <span class="o">=</span> <span class="nx">HtmlService</span><span class="p">.</span><span class="nf">createTemplateFromFile</span><span class="p">(</span><span class="nx">mail_template</span><span class="p">)</span>
      <span class="nx">template</span><span class="p">.</span><span class="nx">name</span> <span class="o">=</span> <span class="nx">name</span>
      <span class="nx">template</span><span class="p">.</span><span class="nx">email</span> <span class="o">=</span> <span class="nx">email</span> <span class="c1">// add this line</span>
      <span class="kd">const</span> <span class="nx">message</span> <span class="o">=</span> <span class="nx">template</span><span class="p">.</span><span class="nf">evaluate</span><span class="p">().</span><span class="nf">getContent</span><span class="p">()</span>
      
      <span class="nx">GmailApp</span><span class="p">.</span><span class="nf">sendEmail</span><span class="p">(</span>
        <span class="nx">email</span><span class="p">,</span> <span class="nx">subject</span><span class="p">,</span> <span class="dl">''</span><span class="p">,</span>
        <span class="p">{</span><span class="na">htmlBody</span><span class="p">:</span> <span class="nx">message</span><span class="p">,</span> <span class="na">name</span><span class="p">:</span> <span class="dl">'</span><span class="s1">RavSam Team</span><span class="dl">'</span><span class="p">}</span>
      <span class="p">)</span>
    <span class="p">}</span>
  <span class="p">}</span>
<span class="p">}</span>
</code></pre></div></div>

<p>Then, add code for tracking the email opening:</p>

<div class="language-js highlighter-rouge"><div class="highlight"><pre class="highlight"><code><span class="c1">// handles the get request to the server</span>
<span class="kd">function</span> <span class="nf">doGet</span><span class="p">(</span><span class="nx">e</span><span class="p">)</span> <span class="p">{</span>
  <span class="kd">const</span> <span class="nx">method</span> <span class="o">=</span> <span class="nx">e</span><span class="p">.</span><span class="nx">parameter</span><span class="p">[</span><span class="dl">'</span><span class="s1">method</span><span class="dl">'</span><span class="p">]</span>
  <span class="k">switch </span><span class="p">(</span><span class="nx">method</span><span class="p">)</span> <span class="p">{</span>
    <span class="k">case</span> <span class="dl">'</span><span class="s1">track</span><span class="dl">'</span><span class="p">:</span>
      <span class="kd">const</span> <span class="nx">email</span> <span class="o">=</span> <span class="nx">e</span><span class="p">.</span><span class="nx">parameter</span><span class="p">[</span><span class="dl">'</span><span class="s1">email</span><span class="dl">'</span><span class="p">]</span>
      <span class="nf">updateEmailStatus</span><span class="p">(</span><span class="nx">email</span><span class="p">)</span>
    <span class="k">default</span><span class="p">:</span>
      <span class="k">break</span>
  <span class="p">}</span>
<span class="p">}</span>
</code></pre></div></div>

<p>The above code handles the <em>GET</em> request. If the value of the query parameter <code class="language-plaintext highlighter-rouge">method</code> is <strong>track</strong>, then you get the value of the query parameter <code class="language-plaintext highlighter-rouge">email</code>, and pass it to the <code class="language-plaintext highlighter-rouge">updateEmailStatus</code> function.</p>

<p>Next, add the <code class="language-plaintext highlighter-rouge">updateEmailStatus</code> function to your script file:</p>

<div class="language-js highlighter-rouge"><div class="highlight"><pre class="highlight"><code><span class="kd">function</span> <span class="nf">updateEmailStatus</span><span class="p">(</span><span class="nx">emailToTrack</span><span class="p">)</span> <span class="p">{</span>
  
  <span class="c1">// get the active spreadsheet and data in it</span>
  <span class="kd">const</span> <span class="nx">id</span> <span class="o">=</span> <span class="nx">SpreadsheetApp</span><span class="p">.</span><span class="nf">getActiveSpreadsheet</span><span class="p">().</span><span class="nf">getId</span><span class="p">()</span>
  <span class="kd">const</span> <span class="nx">sheet</span> <span class="o">=</span> <span class="nx">SpreadsheetApp</span><span class="p">.</span><span class="nf">openById</span><span class="p">(</span><span class="nx">id</span><span class="p">).</span><span class="nf">getActiveSheet</span><span class="p">()</span>
  <span class="kd">const</span> <span class="nx">data</span> <span class="o">=</span> <span class="nx">sheet</span><span class="p">.</span><span class="nf">getDataRange</span><span class="p">().</span><span class="nf">getValues</span><span class="p">()</span>
  
  <span class="c1">// get headers</span>
  <span class="kd">const</span> <span class="nx">headers</span> <span class="o">=</span> <span class="nx">data</span><span class="p">[</span><span class="mi">0</span><span class="p">]</span>
  <span class="kd">const</span> <span class="nx">emailOpened</span> <span class="o">=</span> <span class="nx">headers</span><span class="p">.</span><span class="nf">indexOf</span><span class="p">(</span><span class="dl">'</span><span class="s1">status</span><span class="dl">'</span><span class="p">)</span> <span class="o">+</span> <span class="mi">1</span>

  <span class="c1">// iterate through the data, starting at index 1</span>
  <span class="k">for </span><span class="p">(</span><span class="kd">let</span> <span class="nx">i</span> <span class="o">=</span> <span class="mi">1</span><span class="p">;</span> <span class="nx">i</span> <span class="o">&lt;</span> <span class="nx">data</span><span class="p">.</span><span class="nx">length</span><span class="p">;</span> <span class="nx">i</span><span class="o">++</span><span class="p">)</span> <span class="p">{</span>
    <span class="kd">const</span> <span class="nx">row</span> <span class="o">=</span> <span class="nx">data</span><span class="p">[</span><span class="nx">i</span><span class="p">]</span>
    <span class="kd">const</span> <span class="nx">email</span> <span class="o">=</span> <span class="nx">row</span><span class="p">[</span><span class="mi">0</span><span class="p">]</span>
    
    <span class="k">if </span><span class="p">(</span><span class="nx">emailToTrack</span> <span class="o">===</span> <span class="nx">email</span><span class="p">)</span> <span class="p">{</span>      
      <span class="c1">// update the value in sheet</span>
      <span class="nx">sheet</span><span class="p">.</span><span class="nf">getRange</span><span class="p">(</span><span class="nx">i</span><span class="o">+</span><span class="mi">1</span><span class="p">,</span> <span class="nx">emailOpened</span><span class="p">).</span><span class="nf">setValue</span><span class="p">(</span><span class="dl">'</span><span class="s1">opened</span><span class="dl">'</span><span class="p">)</span>
      <span class="k">break</span>
    <span class="p">}</span>
  <span class="p">}</span>
<span class="p">}</span>
</code></pre></div></div>

<p>The comments in the code explain it well. You just loop over the data in the Google Sheet and compare the emails with the <code class="language-plaintext highlighter-rouge">emailToTrack</code> variable. Once you have found the match, the <code class="language-plaintext highlighter-rouge">status</code> column corresponding to the <code class="language-plaintext highlighter-rouge">email</code> is set to <strong>opened</strong>.</p>

<h2 id="deploying-as-web-app">Deploying as Web App</h2>

<p>To handle the <em>GET</em> request, you need to deploy your script as a Web app. To deploy as a Web app, go to <em>Publish</em> &gt; <em>Deploy as web app…</em>. Set <em>Who has access to the app:</em> to <em>Anyone, even anonymous</em> and click <strong>Update</strong>.</p>

<figure class="mb-0 w-100 rounded">
    <img src="https://www.ravsam.in/assets/images/resized/20/web-app-url.png" width="100%" class="img-fluid rounded blur-up lazyautosizes lazyload" sizes="auto" alt="Setup the Google Apps Script Authorization" style="" data-srcset="            https://www.ravsam.in/assets/images/resized/20/web-app-url.png 20w,            https://www.ravsam.in/assets/images/resized/64/web-app-url.png 64w,            https://www.ravsam.in/assets/images/resized/576/web-app-url.png 576w,            https://www.ravsam.in/assets/images/resized/960/web-app-url.png 960w,            https://www.ravsam.in/assets/images/resized/1400/web-app-url.png 1400w,            https://www.ravsam.in/assets/images/blog-assets/web-app-url.png 1408w" />
    
        <figcaption class="text-center text-muted mt-2 mb-4">Authorize the Google Apps Script to send an email on your behalf</figcaption>
    
</figure>

<h2 id="adding-tracking-pixel-in-email">Adding Tracking Pixel in Email</h2>

<p>In the <strong>content.html</strong>, add a tracking pixel:</p>

<div class="language-html highlighter-rouge"><div class="highlight"><pre class="highlight"><code><span class="cp">&lt;!DOCTYPE html&gt;</span>
<span class="nt">&lt;html&gt;</span>
  <span class="nt">&lt;head&gt;</span>
    <span class="nt">&lt;base</span> <span class="na">target=</span><span class="s">"_top"</span><span class="nt">&gt;</span>
  <span class="nt">&lt;/head&gt;</span>
  <span class="nt">&lt;body&gt;</span>
    <span class="c">&lt;!-- add this img tag --&gt;</span>
    <span class="nt">&lt;img</span> <span class="na">src=</span><span class="s">"https://script.google.com/macros/s/AKfycbxyhzk8JpzP1S-vXp6UVAOtQzN9qKqHLaKxiHr2cxxxxxxxxxxx/exec?method=track&amp;email=&lt;?= email ?&gt;"</span> <span class="na">width=</span><span class="s">"0"</span> <span class="na">height=</span><span class="s">"0"</span><span class="nt">&gt;</span> 
    
    Hi <span class="cp">&lt;?= name ?&gt;</span>. you are testing your beta features for email marketing.
  <span class="nt">&lt;/body&gt;</span>
<span class="nt">&lt;/html&gt;</span>
</code></pre></div></div>

<p>The <code class="language-plaintext highlighter-rouge">&lt;?= name ?&gt;</code> and <code class="language-plaintext highlighter-rouge">&lt;?= email ?&gt;</code> are called template variables and they will be populated by the <code class="language-plaintext highlighter-rouge">sendEmails</code> function.</p>

<blockquote class="alert alert-info">
  <p>Make sure to raplace the image <code class="language-plaintext highlighter-rouge">src</code> URL by your script URL.</p>
</blockquote>

<h2 id="results">Results</h2>

<p>Alright, you have done all the necessary setup to start a successful email marketing campaign which can be tracked as well. Execute the <code class="language-plaintext highlighter-rouge">sendEmails</code> function and check your inbox on behalf of users.</p>

<p>Next, check whether you were successful in implementing tracking email openings or not. Let’s open the inbox and then check whether the Google Sheet was updated or not.</p>

<p><img src="https://www.ravsam.in/assets/images/blog-assets/email-tracking.gif" alt="Tracking Pixel in GMail with Google Apps Script" class="img-fluid shadow" /></p>

<p>Woah! You can see that the Google Sheet was automatically updated when the recipient opened the email. This is the power of Google Apps Script. It is not widely used but many things can be implemented with them.</p>]]></content><author><name>Ravgeet Dhillon</name></author><category term="marketing" /><category term="google-apps-script" /><category term="automation" /><category term="email-marketing" /><summary type="html"><![CDATA[Track email opens by using Google Apps Script and measure the success of your Email Marketing campaign.]]></summary><media:thumbnail xmlns:media="http://search.yahoo.com/mrss/" url="https://www.ravsam.in/assets/images/blogs/how-to-track-email-opens-with-google-apps-script.png" /><media:content medium="image" url="https://www.ravsam.in/assets/images/blogs/how-to-track-email-opens-with-google-apps-script.png" xmlns:media="http://search.yahoo.com/mrss/" /></entry><entry><title type="html">Setup Email Marketing using Google Apps Script</title><link href="https://www.ravsam.in/blog/setup-email-marketing-using-google-apps-script/" rel="alternate" type="text/html" title="Setup Email Marketing using Google Apps Script" /><published>2020-08-27T07:30:00+00:00</published><updated>2025-08-18T07:51:05+00:00</updated><id>https://www.ravsam.in/blog/setup-email-marketing-using-google-apps-script</id><content type="html" xml:base="https://www.ravsam.in/blog/setup-email-marketing-using-google-apps-script/"><![CDATA[<p>Recently, we have been writing a lot of stuff related to Web Design and Development, like <a href="/blog/collect-form-responses-using-google-apps-script/">collecting form responses</a>, that can be implemented using <strong>Google Apps Script</strong> and Serverless Architecture.</p>

<p>In this blog, you will learn about <strong>email marketing</strong>. You will set up custom email marketing purely using Google Apps Script. The advantage is you can take control of your email marketing campaign and create your own automated workflows.</p>

<h6 id="contents">Contents</h6>

<ul>
  <li><a href="#creating-a-spreadsheet">Creating a Spreadsheet</a></li>
  <li><a href="#creating-a-google-apps-project">Creating a Google Apps Project</a></li>
  <li><a href="#writing-code">Writing Code</a></li>
  <li><a href="#4-running-the-script">4. Running the Script</a></li>
  <li><a href="#results">Results</a></li>
</ul>

<h2 id="creating-a-spreadsheet">Creating a Spreadsheet</h2>

<p>First of all, you need a Google Sheet where you can store all of your email addresses to whom you want to send the emails. So, first <a href="https://docs.google.com/spreadsheets/">create a new spreadsheet</a>.</p>

<figure class="mb-0 w-100 rounded">
    <img src="https://www.ravsam.in/assets/images/resized/20/setup-sheets.png" width="100%" class="img-fluid rounded blur-up lazyautosizes lazyload" sizes="auto" alt="Enter the user details in Google Sheet" style="" data-srcset="            https://www.ravsam.in/assets/images/resized/20/setup-sheets.png 20w,            https://www.ravsam.in/assets/images/resized/64/setup-sheets.png 64w,            https://www.ravsam.in/assets/images/resized/576/setup-sheets.png 576w,            https://www.ravsam.in/assets/images/resized/960/setup-sheets.png 960w,            https://www.ravsam.in/assets/images/resized/1400/setup-sheets.png 1400w,            https://www.ravsam.in/assets/images/blog-assets/setup-sheets.png 1408w" />
    
        <figcaption class="text-center text-muted mt-2 mb-4">Enter the user details in Google Sheet</figcaption>
    
</figure>

<h2 id="creating-a-google-apps-project">Creating a Google Apps Project</h2>

<p>Next, you need to connect your Google Sheet to a Google Apps Script. From <em>Tools</em>, select the <em>Script Editor</em>.</p>

<figure class="mb-0 w-100 rounded">
    <img src="https://www.ravsam.in/assets/images/resized/20/setup-script-editor.png" width="100%" class="img-fluid rounded blur-up lazyautosizes lazyload" sizes="auto" alt="Connect Google Sheet to Google Apps Script project" style="" data-srcset="            https://www.ravsam.in/assets/images/resized/20/setup-script-editor.png 20w,            https://www.ravsam.in/assets/images/resized/64/setup-script-editor.png 64w,            https://www.ravsam.in/assets/images/resized/576/setup-script-editor.png 576w,            https://www.ravsam.in/assets/images/resized/960/setup-script-editor.png 960w,            https://www.ravsam.in/assets/images/resized/1400/setup-script-editor.png 1400w,            https://www.ravsam.in/assets/images/blog-assets/setup-script-editor.png 1408w" />
    
        <figcaption class="text-center text-muted mt-2 mb-4">Connect Google Sheet to Google Apps Script project</figcaption>
    
</figure>

<h2 id="writing-code">Writing Code</h2>

<p>Finally, it is time to write some code.</p>

<p>a.) <strong>Main.gs</strong></p>

<p>Add the following code to this file:</p>

<div class="language-js highlighter-rouge"><div class="highlight"><pre class="highlight"><code><span class="kd">function</span> <span class="nf">sendEmails</span><span class="p">(</span><span class="nx">mail_template</span><span class="o">=</span><span class="dl">'</span><span class="s1">content</span><span class="dl">'</span><span class="p">,</span>
                    <span class="nx">subject</span><span class="o">=</span><span class="dl">'</span><span class="s1">Testing my Email Marketing</span><span class="dl">'</span><span class="p">)</span> <span class="p">{</span>
  
  <span class="c1">// get the active spreadsheet and data in it</span>
  <span class="kd">const</span> <span class="nx">id</span> <span class="o">=</span> <span class="nx">SpreadsheetApp</span><span class="p">.</span><span class="nf">getActiveSpreadsheet</span><span class="p">().</span><span class="nf">getId</span><span class="p">()</span>
  <span class="kd">const</span> <span class="nx">sheet</span> <span class="o">=</span> <span class="nx">SpreadsheetApp</span><span class="p">.</span><span class="nf">openById</span><span class="p">(</span><span class="nx">id</span><span class="p">).</span><span class="nf">getActiveSheet</span><span class="p">()</span>
  <span class="kd">const</span> <span class="nx">data</span> <span class="o">=</span> <span class="nx">sheet</span><span class="p">.</span><span class="nf">getDataRange</span><span class="p">().</span><span class="nf">getValues</span><span class="p">()</span>
  
  <span class="c1">// iterate through the data, starting at index 1</span>
  <span class="k">for </span><span class="p">(</span><span class="kd">let</span> <span class="nx">i</span> <span class="o">=</span> <span class="mi">1</span><span class="p">;</span> <span class="nx">i</span> <span class="o">&lt;</span> <span class="nx">data</span><span class="p">.</span><span class="nx">length</span><span class="p">;</span> <span class="nx">i</span><span class="o">++</span><span class="p">)</span> <span class="p">{</span>
    <span class="kd">const</span> <span class="nx">row</span> <span class="o">=</span> <span class="nx">data</span><span class="p">[</span><span class="nx">i</span><span class="p">]</span>
    <span class="kd">const</span> <span class="nx">email</span> <span class="o">=</span> <span class="nx">row</span><span class="p">[</span><span class="mi">0</span><span class="p">]</span>
    <span class="kd">const</span> <span class="nx">name</span> <span class="o">=</span> <span class="nx">row</span><span class="p">[</span><span class="mi">1</span><span class="p">]</span>
    
    <span class="c1">// check if you can send an email</span>
    <span class="k">if </span><span class="p">(</span><span class="nx">MailApp</span><span class="p">.</span><span class="nf">getRemainingDailyQuota</span><span class="p">()</span> <span class="o">&gt;</span> <span class="mi">0</span><span class="p">)</span> <span class="p">{</span>
        
      <span class="c1">// populate the template</span>
      <span class="kd">let</span> <span class="nx">template</span> <span class="o">=</span> <span class="nx">HtmlService</span><span class="p">.</span><span class="nf">createTemplateFromFile</span><span class="p">(</span><span class="nx">mail_template</span><span class="p">)</span>
      <span class="nx">template</span><span class="p">.</span><span class="nx">name</span> <span class="o">=</span> <span class="nx">name</span>
      <span class="kd">const</span> <span class="nx">message</span> <span class="o">=</span> <span class="nx">template</span><span class="p">.</span><span class="nf">evaluate</span><span class="p">().</span><span class="nf">getContent</span><span class="p">()</span>
      
      <span class="nx">GmailApp</span><span class="p">.</span><span class="nf">sendEmail</span><span class="p">(</span>
        <span class="nx">email</span><span class="p">,</span> <span class="nx">subject</span><span class="p">,</span> <span class="dl">''</span><span class="p">,</span>
        <span class="p">{</span><span class="na">htmlBody</span><span class="p">:</span> <span class="nx">message</span><span class="p">,</span> <span class="na">name</span><span class="p">:</span> <span class="dl">'</span><span class="s1">RavSam Team</span><span class="dl">'</span><span class="p">}</span>
      <span class="p">)</span>
    <span class="p">}</span>
  <span class="p">}</span>
<span class="p">}</span>
</code></pre></div></div>

<p>The comments have been included in the file for a proper description of the above function.</p>

<blockquote class="alert alert-danger">
  <p>Always use <em>GmailApp.sendEmail</em> instead of <em>MailApp.sendEmail</em>. It is a more stable and reliant function.</p>
</blockquote>

<p>b.) <strong>content.html</strong></p>

<p>Since the <strong>Main.gs</strong> uses an HTML file and populates it, you need to create an HTML template file. Add the following code to <strong>content.html</strong>:</p>

<div class="language-html highlighter-rouge"><div class="highlight"><pre class="highlight"><code><span class="cp">&lt;!DOCTYPE html&gt;</span>
<span class="nt">&lt;html&gt;</span>
  <span class="nt">&lt;head&gt;</span>
    <span class="nt">&lt;base</span> <span class="na">target=</span><span class="s">"_top"</span><span class="nt">&gt;</span>
  <span class="nt">&lt;/head&gt;</span>
  <span class="nt">&lt;body&gt;</span>
    Hi <span class="cp">&lt;?= name ?&gt;</span>. You are testing your beta features for email marketing.
  <span class="nt">&lt;/body&gt;</span>
<span class="nt">&lt;/html&gt;</span>
</code></pre></div></div>

<p>The <code class="language-plaintext highlighter-rouge">&lt;?= name ?&gt;</code> template variable gets auto-filled by the email marketing script.</p>

<h2 id="4-running-the-script">4. Running the Script</h2>

<p>You have done all the necessary setup to start a successful email marketing campaign. Before you execute your code, you need to grant permissions to your script:</p>

<figure class="mb-0 w-100 rounded">
    <img src="https://www.ravsam.in/assets/images/resized/20/provide-authorization.png" width="100%" class="img-fluid rounded blur-up lazyautosizes lazyload" sizes="auto" alt="Setup the Google Apps Script Authorization" style="" data-srcset="            https://www.ravsam.in/assets/images/resized/20/provide-authorization.png 20w,            https://www.ravsam.in/assets/images/resized/64/provide-authorization.png 64w,            https://www.ravsam.in/assets/images/resized/576/provide-authorization.png 576w,            https://www.ravsam.in/assets/images/resized/960/provide-authorization.png 960w,            https://www.ravsam.in/assets/images/resized/1400/provide-authorization.png 1400w,            https://www.ravsam.in/assets/images/blog-assets/provide-authorization.png 1408w" />
    
        <figcaption class="text-center text-muted mt-2 mb-4">Authorize the Google Apps Script to send an email on your behalf</figcaption>
    
</figure>

<h2 id="results">Results</h2>

<p>Let’s check the inbox to see if any email is received. Awesome! You can see that the email was delivered successfully to the user’s inbox.</p>

<figure class="mb-0 w-100 rounded">
    <img src="https://www.ravsam.in/assets/images/resized/20/email-received.png" width="100%" class="img-fluid rounded blur-up lazyautosizes lazyload" sizes="auto" alt="Email Delivered successfully to the inbox" style="" data-srcset="            https://www.ravsam.in/assets/images/resized/20/email-received.png 20w,            https://www.ravsam.in/assets/images/resized/64/email-received.png 64w,            https://www.ravsam.in/assets/images/resized/576/email-received.png 576w,            https://www.ravsam.in/assets/images/resized/960/email-received.png 960w,            https://www.ravsam.in/assets/images/resized/1400/email-received.png 1400w,            https://www.ravsam.in/assets/images/blog-assets/email-received.png 1408w" />
    
        <figcaption class="text-center text-muted mt-2 mb-4">Email Delivered successfully to the inbox</figcaption>
    
</figure>

<p>You can create more beautiful and custom HTML templates and manage your email marketing campaigns around them. In the next blog, you will learn to <a href="https://www.ravsam.in/blog/track-email-opens-with-google-apps-script/"><strong>track whether a user opens your emails or not</strong></a>.</p>]]></content><author><name>Ravgeet Dhillon</name></author><category term="marketing" /><category term="google-apps-script" /><category term="automation" /><category term="email-marketing" /><summary type="html"><![CDATA[Set up Email Marketing using Google Apps Script without setting any dedicated servers.]]></summary><media:thumbnail xmlns:media="http://search.yahoo.com/mrss/" url="https://www.ravsam.in/assets/images/blogs/how-to-setup-email-marketing-using-google-apps-script.png" /><media:content medium="image" url="https://www.ravsam.in/assets/images/blogs/how-to-setup-email-marketing-using-google-apps-script.png" xmlns:media="http://search.yahoo.com/mrss/" /></entry><entry><title type="html">Backup Google Apps Script using Github Actions</title><link href="https://www.ravsam.in/blog/backup-google-apps-script-using-github-actions/" rel="alternate" type="text/html" title="Backup Google Apps Script using Github Actions" /><published>2020-08-15T08:30:00+00:00</published><updated>2025-08-18T07:51:05+00:00</updated><id>https://www.ravsam.in/blog/backup-google-apps-script-using-github-actions</id><content type="html" xml:base="https://www.ravsam.in/blog/backup-google-apps-script-using-github-actions/"><![CDATA[<p>Google Apps Scripts are amazing. Without setting any servers, you can do a lot of things like <a href="https://www.ravsam.in/blog/collect-form-responses-using-google-apps-script/">collecting form responses</a>, email marketing campaigns, etc. But as a developer, you like your code to be on Version Control System like Github. In this blog, you will learn to set up Github Actions to automatically backup your Google Apps Scripts to Github.</p>

<h6 id="contents">Contents</h6>

<ul>
  <li><a href="#prerequisites">Prerequisites</a></li>
  <li><a href="#installing-clasp">Installing Clasp</a></li>
  <li><a href="#creating-a-new-repository">Creating a New Repository</a></li>
  <li><a href="#adding-important-files">Adding Important Files</a></li>
  <li><a href="#setting-up-github-actions">Setting up Github Actions</a></li>
  <li><a href="#adding-github-actions-secrets">Adding Github Actions Secrets</a></li>
  <li><a href="#results">Results</a></li>
</ul>

<h2 id="prerequisites">Prerequisites</h2>

<p>Before getting started, make sure that you have set up the following:</p>

<ul>
  <li>A Google Apps Script Project</li>
  <li>A Github Account</li>
</ul>

<h2 id="installing-clasp">Installing Clasp</h2>

<p><a href="https://github.com/google/clasp">Clasp</a> is a Google tool to develop Apps Script projects locally. It is short for <strong>Command-Line Apps Script Projects</strong>. You can follow this <a href="https://github.com/google/clasp#readme">amazing guide</a> by Google to get your login credentials, which you will be using later while setting up Github Actions.</p>

<p>Once you have successfully logged in, use the following command to get the content of the credentials file.</p>

<div class="language-bash highlighter-rouge"><div class="highlight"><pre class="highlight"><code><span class="nb">cat</span> ~/.clasprc.json
</code></pre></div></div>

<h2 id="creating-a-new-repository">Creating a New Repository</h2>

<p>Depending upon your requirement, create a new public/private repository in <a href="https://repo.new">Github</a>. Once you have created a new repository, add a <strong>.gitignore</strong> file with the following content:</p>

<div class="language-plaintext highlighter-rouge"><div class="highlight"><pre class="highlight"><code>.*.json
</code></pre></div></div>

<p>This prevents your credential file to be committed to the repository.</p>

<h2 id="adding-important-files">Adding Important Files</h2>

<p>Now it’s time to add some new files to the repository.</p>

<p>a.) <strong>setup.sh</strong></p>

<p>This script will prevent you from logging in again by using your already logged in credentials from Github Actions secrets, which you will be setting up later. Add the following bash code to the file:</p>

<div class="language-bash highlighter-rouge"><div class="highlight"><pre class="highlight"><code><span class="c">#!/bin/sh</span>

<span class="nv">LOGIN</span><span class="o">=</span><span class="si">$(</span><span class="nb">cat</span> <span class="o">&lt;&lt;-</span><span class="no">END</span><span class="sh">
    {
        "token": {
            "access_token": "</span><span class="nv">$ACCESS_TOKEN</span><span class="sh">",
            "refresh_token": "</span><span class="nv">$REFRESH_TOKEN</span><span class="sh">",
            "scope": "https://www.googleapis.com/auth/cloud-platform https://www.googleapis.com/auth/drive.file https://www.googleapis.com/auth/service.management https://www.googleapis.com/auth/script.deployments https://www.googleapis.com/auth/logging.read https://www.googleapis.com/auth/script.webapp.deploy https://www.googleapis.com/auth/userinfo.profile openid https://www.googleapis.com/auth/userinfo.email https://www.googleapis.com/auth/script.projects https://www.googleapis.com/auth/drive.metadata.readonly",
            "token_type": "Bearer",
            "id_token": "</span><span class="nv">$ID_TOKEN</span><span class="sh">",
            "expiry_date": 1595752666211
        },
        "oauth2ClientSettings": {
            "clientId": "</span><span class="nv">$CLIENT_ID</span><span class="sh">",
            "clientSecret": "</span><span class="nv">$CLIENT_SECRET</span><span class="sh">",
            "redirectUri": "http://localhost"
        },
        "isLocalCreds": false
    }
</span><span class="no">END
</span><span class="si">)</span>

<span class="nb">echo</span> <span class="nv">$LOGIN</span> <span class="o">&gt;</span> ~/.clasprc.json
</code></pre></div></div>

<p>Replace the value of <code class="language-plaintext highlighter-rouge">scope</code> key with value in your <strong>~/.clasprc.json</strong>.</p>

<p>b.) <strong>scripts.json</strong></p>

<p>This script will contain the <strong>id</strong> and <strong>name</strong> of the Google Apps Script projects. You can add single or multiple projects here depending upon your backup strategy. Add the following JSON object to the file:</p>

<div class="language-json highlighter-rouge"><div class="highlight"><pre class="highlight"><code><span class="p">[</span><span class="w">
    </span><span class="p">{</span><span class="w">
        </span><span class="nl">"id"</span><span class="p">:</span><span class="w"> </span><span class="s2">"google-apps-script-project-id"</span><span class="p">,</span><span class="w">
        </span><span class="nl">"name"</span><span class="p">:</span><span class="w"> </span><span class="s2">"google-apps-script-project-name"</span><span class="w">
    </span><span class="p">},</span><span class="w">
    </span><span class="p">{</span><span class="w">
        </span><span class="nl">"id"</span><span class="p">:</span><span class="w"> </span><span class="s2">"google-apps-script-project-id"</span><span class="p">,</span><span class="w">
        </span><span class="nl">"name"</span><span class="p">:</span><span class="w"> </span><span class="s2">"google-apps-script-project-name"</span><span class="w">
    </span><span class="p">}</span><span class="w">
</span><span class="p">]</span><span class="w">
</span></code></pre></div></div>

<p>c.) <strong>clone.sh</strong></p>

<p>This script will use Clasp’s <code class="language-plaintext highlighter-rouge">clone</code> command to download all the scripts that you provided in the <code class="language-plaintext highlighter-rouge">scripts.json</code> file. This script will delete all the previous projects committed to the repository. This is an important step to reflect the deleted files in Github. Add the following bash code to this  file:</p>

<div class="language-bash highlighter-rouge"><div class="highlight"><pre class="highlight"><code><span class="c">#!/bin/sh</span>

<span class="c"># remove all the pre-existing projects</span>
<span class="nb">rm</span> <span class="nt">-r</span> <span class="nt">-f</span> <span class="k">*</span>/

<span class="nv">content</span><span class="o">=</span><span class="si">$(</span><span class="nb">cat </span>scripts.json<span class="si">)</span>
<span class="k">for </span>row <span class="k">in</span> <span class="si">$(</span><span class="nb">echo</span> <span class="s2">"</span><span class="k">${</span><span class="nv">content</span><span class="k">}</span><span class="s2">"</span> | jq <span class="nt">-r</span> <span class="s1">'.[] | @base64'</span><span class="si">)</span><span class="p">;</span> <span class="k">do
    </span>_jq<span class="o">()</span> <span class="o">{</span>
      <span class="nb">echo</span> <span class="k">${</span><span class="nv">row</span><span class="k">}</span> | <span class="nb">base64</span> <span class="nt">--decode</span> | jq <span class="nt">-r</span> <span class="k">${</span><span class="nv">1</span><span class="k">}</span>
    <span class="o">}</span>

    <span class="c"># get name and id for project</span>
    <span class="nv">name</span><span class="o">=</span><span class="si">$(</span>_jq <span class="s1">'.name'</span><span class="si">)</span>
    <span class="nb">id</span><span class="o">=</span><span class="si">$(</span>_jq <span class="s1">'.id'</span><span class="si">)</span>

    <span class="c"># create a project directory</span>
    <span class="nb">mkdir</span> <span class="nv">$name</span>
    <span class="nb">cd</span> <span class="nv">$name</span>

    <span class="c"># clone the project using the clasp</span>
    clasp clone <span class="nv">$id</span>

    <span class="c"># come out of the directory</span>
    <span class="nb">cd</span> ..
<span class="k">done</span>
</code></pre></div></div>

<h2 id="setting-up-github-actions">Setting up Github Actions</h2>

<p>Now comes the best part of the project. You can automate the whole backup process using Github Actions. You can schedule the script to run every midnight using <strong>Cron</strong> job syntax.</p>

<p>Create a directory path at <strong>.github/workflows</strong>. In this path, create a <strong>backup.yml</strong> file and add the following code to it:</p>

<div class="language-yaml highlighter-rouge"><div class="highlight"><pre class="highlight"><code><span class="na">name</span><span class="pi">:</span> <span class="s">Backup</span>

<span class="na">on</span><span class="pi">:</span>
  <span class="na">schedule</span><span class="pi">:</span>
    <span class="pi">-</span> <span class="na">cron</span><span class="pi">:</span> <span class="s1">'</span><span class="s">0</span><span class="nv"> </span><span class="s">0</span><span class="nv"> </span><span class="s">*</span><span class="nv"> </span><span class="s">*</span><span class="nv"> </span><span class="s">*'</span>

<span class="na">jobs</span><span class="pi">:</span>
  <span class="na">backup</span><span class="pi">:</span>
    <span class="na">runs-on</span><span class="pi">:</span> <span class="s">ubuntu-latest</span>

    <span class="na">env</span><span class="pi">:</span>
      <span class="na">ACCESS_TOKEN</span><span class="pi">:</span> <span class="s">${{ secrets.ACCESS_TOKEN }}</span>
      <span class="na">REFRESH_TOKEN</span><span class="pi">:</span> <span class="s">${{ secrets.REFRESH_TOKEN }}</span>
      <span class="na">CLIENT_ID</span><span class="pi">:</span> <span class="s">${{ secrets.CLIENT_ID }}</span>
      <span class="na">CLIENT_SECRET</span><span class="pi">:</span> <span class="s">${{ secrets.CLIENT_SECRET }}</span>
      <span class="na">ID_TOKEN</span><span class="pi">:</span> <span class="s">${{ secrets.ID_TOKEN }}</span>
      <span class="na">REMOTE_BRANCH</span><span class="pi">:</span> <span class="s">master</span>

    <span class="na">steps</span><span class="pi">:</span>
      <span class="pi">-</span> <span class="na">name</span><span class="pi">:</span> <span class="s">Setup repository</span>
        <span class="na">uses</span><span class="pi">:</span> <span class="s">actions/checkout@v2</span>

      <span class="pi">-</span> <span class="na">name</span><span class="pi">:</span> <span class="s">Setup Node</span>
        <span class="na">uses</span><span class="pi">:</span> <span class="s">actions/setup-node@v1</span>
        <span class="na">with</span><span class="pi">:</span>
          <span class="na">node-version</span><span class="pi">:</span> <span class="s1">'</span><span class="s">12'</span>

      <span class="pi">-</span> <span class="na">name</span><span class="pi">:</span> <span class="s">Install Clasp</span>
        <span class="na">run</span><span class="pi">:</span> <span class="s">npm install -g @google/clasp</span>

      <span class="pi">-</span> <span class="na">name</span><span class="pi">:</span> <span class="s">Install jq</span>
        <span class="na">run</span><span class="pi">:</span> <span class="pi">|-</span>
          <span class="s">sudo apt update -y</span>
          <span class="s">sudo apt install jq -y</span>

      <span class="pi">-</span> <span class="na">name</span><span class="pi">:</span> <span class="s">Setup Logins</span>
        <span class="na">run</span><span class="pi">:</span> <span class="s">bash setup.sh</span>

      <span class="pi">-</span> <span class="na">name</span><span class="pi">:</span> <span class="s">Clone Scripts</span>
        <span class="na">run</span><span class="pi">:</span> <span class="s">bash clone.sh</span>

      <span class="pi">-</span> <span class="na">name</span><span class="pi">:</span> <span class="s">Update Progress</span>
        <span class="na">run</span><span class="pi">:</span> <span class="pi">|</span>
          <span class="s">if [ $(git status --porcelain=v1 2&gt;/dev/null | wc -l) != "0" ] ; then</span>
            <span class="s">git config user.name "GitHub Actions"</span>
            <span class="s">git config user.email noreply@github.com</span>
            <span class="s">git add .</span>
            <span class="s">git commit -m "github-actions: took backup"</span>
            <span class="s">git push origin master --force</span>
          <span class="s">fi</span>
</code></pre></div></div>

<p>The workflow setups the repository, installs Node, installs Clasp, runs Clasp Setup, clones the Google Apps Scripts, checks whether there are any new changes, and if so commits them back to the repository as with a pre-defined commit message.</p>

<h2 id="adding-github-actions-secrets">Adding Github Actions Secrets</h2>

<p>You can get your Action Secrets values from the <code class="language-plaintext highlighter-rouge">~/.clasprc.json</code> and add them accordingly.</p>

<figure class="mb-0 w-100 rounded">
    <img src="https://www.ravsam.in/assets/images/resized/20/github-secrets.png" width="100%" class="img-fluid rounded blur-up lazyautosizes lazyload" sizes="auto" alt="Setting up Github Actions Secrets" style="" data-srcset="            https://www.ravsam.in/assets/images/resized/20/github-secrets.png 20w,            https://www.ravsam.in/assets/images/resized/64/github-secrets.png 64w,            https://www.ravsam.in/assets/images/resized/576/github-secrets.png 576w,            https://www.ravsam.in/assets/images/resized/960/github-secrets.png 960w,            https://www.ravsam.in/assets/images/resized/1400/github-secrets.png 1400w,            https://www.ravsam.in/assets/images/blog-assets/github-secrets.png 1408w" />
    
        <figcaption class="text-center text-muted mt-2 mb-4">Setting up Github Actions Secrets</figcaption>
    
</figure>

<h2 id="results">Results</h2>

<p>Hurray! You can see that the Github Action workflow completed with success at 00:00 UTC.</p>

<figure class="mb-0 w-100 rounded">
    <img src="https://www.ravsam.in/assets/images/resized/20/github-actions.png" width="100%" class="img-fluid rounded blur-up lazyautosizes lazyload" sizes="auto" alt="Scheduled Actions workflow completed successfully" style="" data-srcset="            https://www.ravsam.in/assets/images/resized/20/github-actions.png 20w,            https://www.ravsam.in/assets/images/resized/64/github-actions.png 64w,            https://www.ravsam.in/assets/images/resized/576/github-actions.png 576w,            https://www.ravsam.in/assets/images/resized/960/github-actions.png 960w,            https://www.ravsam.in/assets/images/resized/1400/github-actions.png 1400w,            https://www.ravsam.in/assets/images/blog-assets/github-actions.png 1408w" />
    
        <figcaption class="text-center text-muted mt-2 mb-4">Scheduled Actions workflow completed successfully</figcaption>
    
</figure>

<p>Let us check the repository to confirm that the backup was taken successfully.</p>

<figure class="mb-0 w-100 rounded">
    <img src="https://www.ravsam.in/assets/images/resized/20/google-apps-script-github-repo.png" width="100%" class="img-fluid rounded blur-up lazyautosizes lazyload" sizes="auto" alt="Backup taken successfully to Google Apps Script" style="" data-srcset="            https://www.ravsam.in/assets/images/resized/20/google-apps-script-github-repo.png 20w,            https://www.ravsam.in/assets/images/resized/64/google-apps-script-github-repo.png 64w,            https://www.ravsam.in/assets/images/resized/576/google-apps-script-github-repo.png 576w,            https://www.ravsam.in/assets/images/resized/960/google-apps-script-github-repo.png 960w,            https://www.ravsam.in/assets/images/resized/1400/google-apps-script-github-repo.png 1400w,            https://www.ravsam.in/assets/images/blog-assets/google-apps-script-github-repo.png 1408w" />
    
        <figcaption class="text-center text-muted mt-2 mb-4">Backup taken successfully to Google Apps Script</figcaption>
    
</figure>

<p>You can see that the Google Apps Scripts projects were committed back to the repository with a commit message <em>github-action: took backup</em>.</p>

<p>Using this workflow, you can stay connected with both Google Apps Script and Github.</p>]]></content><author><name>Ravgeet Dhillon</name></author><category term="automation" /><category term="github-actions" /><category term="google-apps-script" /><category term="automation" /><summary type="html"><![CDATA[Use Github Actions to set up an automated backup of Google Apps Scripts to Github.]]></summary><media:thumbnail xmlns:media="http://search.yahoo.com/mrss/" url="https://www.ravsam.in/assets/images/blogs/backup-google-apps-script-using-github-actions.png" /><media:content medium="image" url="https://www.ravsam.in/assets/images/blogs/backup-google-apps-script-using-github-actions.png" xmlns:media="http://search.yahoo.com/mrss/" /></entry><entry><title type="html">Collect form responses using Google Apps Script</title><link href="https://www.ravsam.in/blog/collect-form-responses-using-google-apps-script/" rel="alternate" type="text/html" title="Collect form responses using Google Apps Script" /><published>2020-08-02T06:30:00+00:00</published><updated>2025-08-18T07:51:05+00:00</updated><id>https://www.ravsam.in/blog/collect-form-responses-using-google-apps-script</id><content type="html" xml:base="https://www.ravsam.in/blog/collect-form-responses-using-google-apps-script/"><![CDATA[<p>Most of the time you are designing static websites. But almost all of them have some components like forms, comments, where you want to collect the user responses. Setting up a dedicated server for backend and database is a good option, but there is a cost overhead as well. Thankfully, you can set up this entire system using a serverless architecture.</p>

<p>In this blog, you will learn to use amazing Google Apps Scripts as backend and Google Spreadsheets for data persistence to collect the form responses from your static website. This approach can help you set up forms on Github Pages, Netlify, or any other hosting provider. As a bonus, you will also add a webhook to notify your <em>Leads</em> team on Slack whenever a new form is filled.</p>

<h6 id="contents">Contents</h6>

<ul>
  <li><a href="#creating-a-google-spreadsheet">Creating a Google Spreadsheet</a></li>
  <li><a href="#creating-a-slack-bot">Creating a Slack Bot</a></li>
  <li><a href="#creating-a-google-apps-script-project">Creating a Google Apps Script Project</a></li>
  <li><a href="#deploying-a-google-apps-script-project">Deploying a Google Apps Script Project</a></li>
  <li><a href="#setting-up-a-html-form">Setting up a HTML Form</a></li>
  <li><a href="#setting-up-javascript">Setting up Javascript</a></li>
  <li><a href="#results">Results</a></li>
</ul>

<h2 id="creating-a-google-spreadsheet">Creating a Google Spreadsheet</h2>

<ol>
  <li>Create a new Google Spreadsheet and name the sheet as <em>Sheet1</em>.</li>
  <li>Add the following fields in the top row of your spreadsheet. Make sure you name them correctly because you will be using these names in your HTML form.</li>
</ol>

<figure class="mb-0 w-100 rounded">
    <img src="https://www.ravsam.in/assets/images/resized/20/spreadsheet-format.png" width="100%" class="img-fluid rounded blur-up lazyautosizes lazyload" sizes="auto" alt="Format for Google Spreadsheet for collecting form responses" style="" data-srcset="            https://www.ravsam.in/assets/images/resized/20/spreadsheet-format.png 20w,            https://www.ravsam.in/assets/images/resized/64/spreadsheet-format.png 64w,            https://www.ravsam.in/assets/images/resized/576/spreadsheet-format.png 576w,            https://www.ravsam.in/assets/images/resized/960/spreadsheet-format.png 960w,            https://www.ravsam.in/assets/images/resized/1400/spreadsheet-format.png 1400w,            https://www.ravsam.in/assets/images/blog-assets/spreadsheet-format.png 1408w" />
    
        <figcaption class="text-center text-muted mt-2 mb-4">Google Spreadsheet to collect form responses</figcaption>
    
</figure>

<h2 id="creating-a-slack-bot">Creating a Slack Bot</h2>

<p>To notify your Leads team on the Slack, you need to create a Slack bot.</p>

<ol>
  <li>Go to <a href="https://api.slack.com/apps">https://api.slack.com/apps</a> and click <code class="language-plaintext highlighter-rouge">Create New App</code>.</li>
  <li>Give your app a name and choose your <strong>Development Workspace</strong> from the dropdown.</li>
  <li>Once you have created an app, you need to turn on the <strong>Incoming Webhook</strong> feature and create a new webhook URL.</li>
  <li>Create a new webhook by clicking <strong>Add New Webhook to Workspace</strong> and choose the channel you want the notifications to be posted in. Your webhook URL should look like this <code class="language-plaintext highlighter-rouge">https://hooks.slack.com/services/T0160Uxxxxx/B0187Nxxxxx/4AZixxswHVxxxxxxxxxxxxxx</code>. If you have access to a terminal, you can test the webhook as well by sending a POST request using <em>cURL</em>.</li>
</ol>

<div class="language-plaintext highlighter-rouge"><div class="highlight"><pre class="highlight"><code>curl -X POST -H 'Content-type: application/json' --data '{'text':'Hello, World!'}' https://hooks.slack.com/services/T0160Uxxxxx/B0187Nxxxxx/4AZixxswHVxxxxxxxxxxxxxx
</code></pre></div></div>

<figure class="mb-0 w-100 rounded">
    <img src="https://www.ravsam.in/assets/images/resized/20/new-slack-app.png" width="100%" class="img-fluid rounded blur-up lazyautosizes lazyload" sizes="auto" alt="Setup name of your Slack app and development workspace" style="" data-srcset="            https://www.ravsam.in/assets/images/resized/20/new-slack-app.png 20w,            https://www.ravsam.in/assets/images/resized/64/new-slack-app.png 64w,            https://www.ravsam.in/assets/images/resized/576/new-slack-app.png 576w,            https://www.ravsam.in/assets/images/resized/960/new-slack-app.png 960w,            https://www.ravsam.in/assets/images/resized/1400/new-slack-app.png 1400w,            https://www.ravsam.in/assets/images/blog-assets/new-slack-app.png 1408w" />
    
        <figcaption class="text-center text-muted mt-2 mb-4">Setup name of your Slack app and development workspace</figcaption>
    
</figure>

<h2 id="creating-a-google-apps-script-project">Creating a Google Apps Script Project</h2>

<p>Now comes the most important and interesting part of the project. Google Apps Script is written in Javascript. So even if you have basic Javascript knowledge, setting up Google Apps will be a breeze for you.</p>

<ol>
  <li>Create a new project at <a href="https://script.google.com/home">https://script.google.com/home</a>.</li>
  <li>Create a new script file from <em>File</em> &gt; <em>New</em> &gt; <em>Script</em>, name it as <em>Form.gs</em> add the following code to it:</li>
</ol>

<div class="language-javascript highlighter-rouge"><div class="highlight"><pre class="highlight"><code><span class="c1">// new property service</span>
<span class="kd">const</span> <span class="nx">SCRIPT_PROP</span> <span class="o">=</span> <span class="nx">PropertiesService</span><span class="p">.</span><span class="nf">getScriptProperties</span><span class="p">()</span>

<span class="kd">function</span> <span class="nf">doGet</span><span class="p">(</span><span class="nx">e</span><span class="p">)</span> <span class="p">{</span>
  <span class="k">return</span> <span class="nf">handleResponse</span><span class="p">(</span><span class="nx">e</span><span class="p">)</span>
<span class="p">}</span>

<span class="kd">function</span> <span class="nf">handleResponse</span><span class="p">(</span><span class="nx">e</span><span class="p">)</span> <span class="p">{</span>
  <span class="c1">// this prevents concurrent access overwritting data</span>
  <span class="c1">// you want a public lock, one that locks for all invocations</span>
  <span class="kd">const</span> <span class="nx">lock</span> <span class="o">=</span> <span class="nx">LockService</span><span class="p">.</span><span class="nf">getPublicLock</span><span class="p">()</span>
  <span class="nx">lock</span><span class="p">.</span><span class="nf">waitLock</span><span class="p">(</span><span class="mi">30000</span><span class="p">)</span>  <span class="c1">// wait 30 seconds before conceding defeat</span>
  
  <span class="k">try</span> <span class="p">{</span>
    <span class="c1">// next set where you write the data - you could write to multiple/alternate destinations</span>
    <span class="kd">const</span> <span class="nx">doc</span> <span class="o">=</span> <span class="nx">SpreadsheetApp</span><span class="p">.</span><span class="nf">openById</span><span class="p">(</span><span class="nx">SCRIPT_PROP</span><span class="p">.</span><span class="nf">getProperty</span><span class="p">(</span><span class="dl">'</span><span class="s1">key</span><span class="dl">'</span><span class="p">))</span>
    <span class="kd">const</span> <span class="nx">sheet</span> <span class="o">=</span> <span class="nx">doc</span><span class="p">.</span><span class="nf">getSheetByName</span><span class="p">(</span><span class="nx">SHEET_NAME</span><span class="p">)</span>
    
    <span class="kd">const</span> <span class="nx">headRow</span> <span class="o">=</span> <span class="mi">1</span>
    <span class="kd">const</span> <span class="nx">headers</span> <span class="o">=</span> <span class="nx">sheet</span><span class="p">.</span><span class="nf">getRange</span><span class="p">(</span><span class="mi">1</span><span class="p">,</span> <span class="mi">1</span><span class="p">,</span> <span class="mi">1</span><span class="p">,</span> <span class="nx">sheet</span><span class="p">.</span><span class="nf">getLastColumn</span><span class="p">()).</span><span class="nf">getValues</span><span class="p">()[</span><span class="mi">0</span><span class="p">]</span>
    <span class="kd">const</span> <span class="nx">nextRow</span> <span class="o">=</span> <span class="nx">sheet</span><span class="p">.</span><span class="nf">getLastRow</span><span class="p">()</span> <span class="o">+</span> <span class="mi">1</span> <span class="c1">// get next row</span>
    <span class="kd">const</span> <span class="nx">row</span> <span class="o">=</span> <span class="p">[]</span> 
    
    <span class="c1">// loop through the header columns</span>
    <span class="k">for </span><span class="p">(</span><span class="nx">i</span> <span class="k">in</span> <span class="nx">headers</span><span class="p">)</span> <span class="p">{</span>
      <span class="k">switch </span><span class="p">(</span><span class="nx">headers</span><span class="p">[</span><span class="nx">i</span><span class="p">])</span> <span class="p">{</span>
        <span class="k">case</span> <span class="dl">'</span><span class="s1">timestamp</span><span class="dl">'</span><span class="p">:</span>
          <span class="nx">row</span><span class="p">.</span><span class="nf">push</span><span class="p">(</span><span class="k">new</span> <span class="nc">Date</span><span class="p">())</span>
          <span class="k">break</span>
        <span class="na">default</span><span class="p">:</span>
          <span class="kd">const</span> <span class="nx">str</span> <span class="o">=</span> <span class="nx">e</span><span class="p">.</span><span class="nx">parameter</span><span class="p">[</span><span class="nx">headers</span><span class="p">[</span><span class="nx">i</span><span class="p">]]</span>
          <span class="nx">row</span><span class="p">.</span><span class="nf">push</span><span class="p">(</span><span class="nx">str</span><span class="p">.</span><span class="nf">trim</span><span class="p">().</span><span class="nf">substring</span><span class="p">(</span><span class="mi">0</span><span class="p">,</span> <span class="nx">CHARACTER_LIMIT</span><span class="p">))</span>
          <span class="k">break</span>
      <span class="p">}</span>
    <span class="p">}</span>
    
    <span class="c1">// add data to the spreadsheet</span>
    <span class="nx">sheet</span><span class="p">.</span><span class="nf">getRange</span><span class="p">(</span><span class="nx">nextRow</span><span class="p">,</span> <span class="mi">1</span><span class="p">,</span> <span class="mi">1</span><span class="p">,</span> <span class="nx">row</span><span class="p">.</span><span class="nx">length</span><span class="p">).</span><span class="nf">setValues</span><span class="p">([</span><span class="nx">row</span><span class="p">])</span>
    
    <span class="c1">// send thanks email to customer</span>
    <span class="kd">const</span> <span class="nx">emailStatus</span> <span class="o">=</span> <span class="nf">notifyCustomer</span><span class="p">(</span><span class="nx">row</span><span class="p">)</span>
    
    <span class="c1">// send notification to slack</span>
    <span class="nf">postToSlack</span><span class="p">(</span><span class="nx">row</span><span class="p">,</span> <span class="nx">emailStatus</span><span class="p">)</span>
    
    <span class="c1">// return json success results</span>
    <span class="k">return</span> <span class="nx">ContentService</span>
          <span class="p">.</span><span class="nf">createTextOutput</span><span class="p">(</span><span class="nx">JSON</span><span class="p">.</span><span class="nf">stringify</span><span class="p">({</span><span class="dl">'</span><span class="s1">result</span><span class="dl">'</span><span class="p">:</span> <span class="dl">'</span><span class="s1">success</span><span class="dl">'</span><span class="p">}))</span>
          <span class="p">.</span><span class="nf">setMimeType</span><span class="p">(</span><span class="nx">ContentService</span><span class="p">.</span><span class="nx">MimeType</span><span class="p">.</span><span class="nx">JSON</span><span class="p">)</span>
  <span class="p">}</span>
  <span class="k">catch </span><span class="p">(</span><span class="nx">e</span><span class="p">)</span> <span class="p">{</span>
    <span class="c1">// if error then log it and return response</span>
    <span class="nx">Logger</span><span class="p">.</span><span class="nf">log</span><span class="p">(</span><span class="nx">e</span><span class="p">)</span>
    <span class="k">return</span> <span class="nx">ContentService</span>
          <span class="p">.</span><span class="nf">createTextOutput</span><span class="p">(</span><span class="nx">JSON</span><span class="p">.</span><span class="nf">stringify</span><span class="p">({</span><span class="dl">'</span><span class="s1">result</span><span class="dl">'</span><span class="p">:</span> <span class="dl">'</span><span class="s1">error</span><span class="dl">'</span><span class="p">}))</span>
          <span class="p">.</span><span class="nf">setMimeType</span><span class="p">(</span><span class="nx">ContentService</span><span class="p">.</span><span class="nx">MimeType</span><span class="p">.</span><span class="nx">JSON</span><span class="p">)</span>
  <span class="p">}</span>
  <span class="k">finally</span> <span class="p">{</span>
    <span class="c1">// release lock</span>
    <span class="nx">lock</span><span class="p">.</span><span class="nf">releaseLock</span><span class="p">()</span>
  <span class="p">}</span>
<span class="p">}</span>

<span class="kd">function</span> <span class="nf">setup</span><span class="p">()</span> <span class="p">{</span>
    <span class="kd">const</span> <span class="nx">doc</span> <span class="o">=</span> <span class="nx">SpreadsheetApp</span><span class="p">.</span><span class="nf">getActiveSpreadsheet</span><span class="p">()</span>
    <span class="nx">SCRIPT_PROP</span><span class="p">.</span><span class="nf">setProperty</span><span class="p">(</span><span class="dl">'</span><span class="s1">key</span><span class="dl">'</span><span class="p">,</span> <span class="nx">doc</span><span class="p">.</span><span class="nf">getId</span><span class="p">())</span>
<span class="p">}</span>
</code></pre></div></div>

<blockquote class="alert alert-info">
  <p>Don’t forget to run the <strong>setup</strong> function. It is important to connect your project with the Google Spreadsheet and gain the right permissions.</p>
</blockquote>

<ol>
  <li>Create a new script file from <em>File</em> &gt; <em>New</em> &gt; <em>Script</em> and name it as <em>Email.gs</em>. In this file, you will write the code that sends an email back to the customer on your behalf.</li>
  <li>Add the following code to this script file:</li>
</ol>

<div class="language-javascript highlighter-rouge"><div class="highlight"><pre class="highlight"><code><span class="kd">function</span> <span class="nf">notifyCustomer</span><span class="p">(</span><span class="nx">data</span><span class="p">)</span> <span class="p">{</span>
  <span class="kd">const</span> <span class="nx">name</span> <span class="o">=</span> <span class="nx">data</span><span class="p">[</span><span class="mi">1</span><span class="p">]</span>
  <span class="kd">const</span> <span class="nx">message</span> <span class="o">=</span> <span class="dl">'</span><span class="s1">Hi</span><span class="dl">'</span> <span class="o">+</span> <span class="nx">name</span> <span class="o">+</span> <span class="dl">'</span><span class="s1">. Your response has been received. you will get in touch with you shortly.</span><span class="dl">'</span>
  
  <span class="c1">// check if you can send an email</span>
  <span class="k">if </span><span class="p">(</span><span class="nx">MailApp</span><span class="p">.</span><span class="nf">getRemainingDailyQuota</span><span class="p">()</span> <span class="o">&gt;</span> <span class="mi">0</span><span class="p">)</span> <span class="p">{</span>
    <span class="kd">const</span> <span class="nx">email</span> <span class="o">=</span> <span class="nx">data</span><span class="p">[</span><span class="mi">2</span><span class="p">]</span>
    
    <span class="c1">// send the email on your behalf</span>
    <span class="nx">MailApp</span><span class="p">.</span><span class="nf">sendEmail</span><span class="p">({</span>
      <span class="na">to</span><span class="p">:</span> <span class="nx">email</span><span class="p">,</span>
      <span class="na">subject</span><span class="p">:</span> <span class="dl">'</span><span class="s1">Thanks for contacting RavSam Web Solutions.</span><span class="dl">'</span><span class="p">,</span>
      <span class="na">body</span><span class="p">:</span> <span class="nx">message</span>
    <span class="p">})</span>

    <span class="k">return</span> <span class="kc">true</span>
  <span class="p">}</span> 
<span class="p">}</span>
</code></pre></div></div>

<ul>
  <li>you will again create a new script file from <em>File</em> &gt; <em>New</em> &gt; <em>Script</em> and name it as <em>Slack.gs</em></li>
  <li>In this file, you will write the code that notifies your Leads team on the form submission.</li>
  <li>Add the following code to this script file:</li>
</ul>

<div class="language-javascript highlighter-rouge"><div class="highlight"><pre class="highlight"><code><span class="kd">function</span> <span class="nf">postToSlack</span><span class="p">(</span><span class="nx">data</span><span class="p">,</span> <span class="nx">emailSent</span><span class="p">)</span> <span class="p">{</span>
  <span class="kd">const</span> <span class="nx">name</span> <span class="o">=</span> <span class="nx">data</span><span class="p">[</span><span class="mi">1</span><span class="p">]</span>
  <span class="kd">const</span> <span class="nx">email</span> <span class="o">=</span> <span class="nx">data</span><span class="p">[</span><span class="mi">2</span><span class="p">]</span>
  <span class="kd">const</span> <span class="nx">phone</span> <span class="o">=</span> <span class="nx">data</span><span class="p">[</span><span class="mi">3</span><span class="p">]</span>
  <span class="kd">const</span> <span class="nx">service</span> <span class="o">=</span> <span class="nx">data</span><span class="p">[</span><span class="mi">4</span><span class="p">]</span>
  <span class="kd">const</span> <span class="nx">notes</span> <span class="o">=</span> <span class="nx">data</span><span class="p">[</span><span class="mi">5</span><span class="p">]</span>
  
  <span class="c1">// check if email was sent</span>
  <span class="k">if </span><span class="p">(</span><span class="nx">emailSent</span><span class="p">)</span> <span class="kd">const</span> <span class="nx">emailStatus</span> <span class="o">=</span> <span class="dl">'</span><span class="s1">Email Sent</span><span class="dl">'</span>
  <span class="k">else</span> <span class="kd">const</span> <span class="nx">emailStatus</span> <span class="o">=</span> <span class="dl">'</span><span class="s1">Email Not Sent</span><span class="dl">'</span>
  
  <span class="c1">// create a message format</span>
  <span class="kd">const</span> <span class="nx">payload</span> <span class="o">=</span> <span class="p">{</span>
    <span class="dl">'</span><span class="s1">attachments</span><span class="dl">'</span><span class="p">:</span> <span class="p">[{</span>
        <span class="dl">'</span><span class="s1">text</span><span class="dl">'</span><span class="p">:</span> <span class="dl">'</span><span class="s1">Lead Details</span><span class="dl">'</span><span class="p">,</span>
        <span class="dl">'</span><span class="s1">fallback</span><span class="dl">'</span><span class="p">:</span> <span class="dl">'</span><span class="s1">New Customer Lead has been received</span><span class="dl">'</span><span class="p">,</span>
        <span class="dl">'</span><span class="s1">pretext</span><span class="dl">'</span><span class="p">:</span> <span class="dl">'</span><span class="s1">New Customer Lead has been received</span><span class="dl">'</span><span class="p">,</span>
        <span class="dl">'</span><span class="s1">fields</span><span class="dl">'</span><span class="p">:</span> <span class="p">[</span>
          <span class="p">{</span>
            <span class="dl">'</span><span class="s1">title</span><span class="dl">'</span><span class="p">:</span> <span class="dl">'</span><span class="s1">Full Name</span><span class="dl">'</span><span class="p">,</span>
            <span class="dl">'</span><span class="s1">value</span><span class="dl">'</span><span class="p">:</span> <span class="nx">name</span><span class="p">,</span>
            <span class="dl">'</span><span class="s1">short</span><span class="dl">'</span><span class="p">:</span> <span class="kc">true</span>
          <span class="p">},</span>
          <span class="p">{</span>
            <span class="dl">'</span><span class="s1">title</span><span class="dl">'</span><span class="p">:</span> <span class="dl">'</span><span class="s1">Phone</span><span class="dl">'</span><span class="p">,</span>
            <span class="dl">'</span><span class="s1">value</span><span class="dl">'</span><span class="p">:</span> <span class="dl">'</span><span class="s1">&lt;tel:</span><span class="dl">'</span> <span class="o">+</span> <span class="nx">phone</span> <span class="o">+</span> <span class="dl">'</span><span class="s1">|</span><span class="dl">'</span> <span class="o">+</span> <span class="nx">phone</span> <span class="o">+</span> <span class="dl">'</span><span class="s1">&gt;</span><span class="dl">'</span><span class="p">,</span>
            <span class="dl">'</span><span class="s1">short</span><span class="dl">'</span><span class="p">:</span> <span class="kc">true</span>
          <span class="p">},</span>
          <span class="p">{</span>
            <span class="dl">'</span><span class="s1">title</span><span class="dl">'</span><span class="p">:</span> <span class="dl">'</span><span class="s1">Service</span><span class="dl">'</span><span class="p">,</span>
            <span class="dl">'</span><span class="s1">value</span><span class="dl">'</span><span class="p">:</span> <span class="nx">service</span><span class="p">,</span>
            <span class="dl">'</span><span class="s1">short</span><span class="dl">'</span><span class="p">:</span> <span class="kc">true</span>
          <span class="p">}</span>
          <span class="p">{</span>
            <span class="dl">'</span><span class="s1">title</span><span class="dl">'</span><span class="p">:</span> <span class="dl">'</span><span class="s1">Email</span><span class="dl">'</span><span class="p">,</span>
            <span class="dl">'</span><span class="s1">value</span><span class="dl">'</span><span class="p">:</span> <span class="nx">emailStatus</span> <span class="o">+</span> <span class="dl">'</span><span class="s1"> to &lt;mailto:</span><span class="dl">'</span> <span class="o">+</span> <span class="nx">email</span> <span class="o">+</span> <span class="dl">'</span><span class="s1">|</span><span class="dl">'</span> <span class="o">+</span> <span class="nx">email</span> <span class="o">+</span> <span class="dl">'</span><span class="s1">&gt;</span><span class="dl">'</span><span class="p">,</span>
            <span class="dl">'</span><span class="s1">short</span><span class="dl">'</span><span class="p">:</span> <span class="kc">false</span>
          <span class="p">},</span>
          <span class="p">{</span>
            <span class="dl">'</span><span class="s1">title</span><span class="dl">'</span><span class="p">:</span> <span class="dl">'</span><span class="s1">Notes</span><span class="dl">'</span><span class="p">,</span>
            <span class="dl">'</span><span class="s1">value</span><span class="dl">'</span><span class="p">:</span> <span class="nx">notes</span><span class="p">,</span>
            <span class="dl">'</span><span class="s1">short</span><span class="dl">'</span><span class="p">:</span> <span class="kc">false</span>
          <span class="p">},</span>
        <span class="p">],</span>
        <span class="dl">'</span><span class="s1">mrkdwn_in</span><span class="dl">'</span><span class="p">:</span> <span class="p">[</span><span class="dl">'</span><span class="s1">text</span><span class="dl">'</span><span class="p">,</span> <span class="dl">'</span><span class="s1">fields</span><span class="dl">'</span><span class="p">],</span>
        <span class="dl">'</span><span class="s1">footer</span><span class="dl">'</span><span class="p">:</span> <span class="dl">'</span><span class="s1">Developed by &lt;https://www.ravsam.in|RavSam Web Solutions&gt;</span><span class="dl">'</span><span class="p">,</span>
    <span class="p">}]</span>
  <span class="p">}</span>
  
  <span class="c1">// prepare the data to be sent with POST request</span>
  <span class="kd">const</span> <span class="nx">options</span> <span class="o">=</span> <span class="p">{</span>
    <span class="dl">'</span><span class="s1">method</span><span class="dl">'</span> <span class="p">:</span> <span class="dl">'</span><span class="s1">post</span><span class="dl">'</span><span class="p">,</span>
    <span class="dl">'</span><span class="s1">contentType</span><span class="dl">'</span> <span class="p">:</span> <span class="dl">'</span><span class="s1">application/json</span><span class="dl">'</span><span class="p">,</span>
    <span class="dl">'</span><span class="s1">payload</span><span class="dl">'</span> <span class="p">:</span> <span class="nx">JSON</span><span class="p">.</span><span class="nf">stringify</span><span class="p">(</span><span class="nx">payload</span><span class="p">)</span>
  <span class="p">}</span>
  
  <span class="c1">// send a post request to your webhook URL</span>
  <span class="k">return</span> <span class="nx">UrlFetchApp</span><span class="p">.</span><span class="nf">fetch</span><span class="p">(</span><span class="nx">webhookUrl</span><span class="p">,</span> <span class="nx">options</span><span class="p">)</span>
<span class="p">}</span>
</code></pre></div></div>

<ol>
  <li>Finally, create a script file from <em>File</em> &gt; <em>New</em> &gt; <em>Script</em> and name it as <em>Variables.gs</em> to store your constant variables. In this file, you will store your constant variables that are referenced in the project.</li>
  <li>Add the following code to this script file:</li>
</ol>

<div class="language-javascript highlighter-rouge"><div class="highlight"><pre class="highlight"><code><span class="c1">//  enter sheet name where data is to be written below</span>
<span class="kd">const</span> <span class="nx">SHEET_NAME</span> <span class="o">=</span> <span class="dl">'</span><span class="s1">Sheet1</span><span class="dl">'</span>

<span class="c1">// set a max character limit for each form field</span>
<span class="kd">const</span> <span class="nx">CHARACTER_LIMIT</span> <span class="o">=</span> <span class="mi">1000</span>

<span class="c1">// slack bot weebhook URL</span>
<span class="kd">const</span> <span class="nx">webhookUrl</span> <span class="o">=</span> <span class="dl">'</span><span class="s1">https://hooks.slack.com/services/T0160Uxxxxx/B0187Nxxxxx/4AZixxswHVxxxxxxxxxxxxxx</span><span class="dl">'</span>
</code></pre></div></div>

<p>So your project is ready, but there is still one last thing to do. You need to deploy your project as a Web App so that you can access it over the Internet.</p>

<h2 id="deploying-a-google-apps-script-project">Deploying a Google Apps Script Project</h2>

<p>At this point, you are done with code and now is the time to deploy your project as a <strong>Web App</strong>.</p>

<ol>
  <li>Visit <em>Publish</em> &gt; <em>Deploy as Web App..</em>.</li>
  <li>Make sure you set the <strong>Who has access to the app:</strong> to <em>Anyone, even anonymous</em>. This is important so that you can make an unauthorized call to your Web App.</li>
  <li>Finally, deploy the web app and copy the web app’s URL. The URL should look like this <code class="language-plaintext highlighter-rouge">https://script.google.com/macros/s/AKfycbxSF9Y4V4qmZLxUbcaMB0Xhmjwqxxxxxxxxxxxxxxxxxxxxxxx/exec</code></li>
</ol>

<figure class="mb-0 w-100 rounded">
    <img src="https://www.ravsam.in/assets/images/resized/20/deploy-as-web-app.png" width="100%" class="img-fluid rounded blur-up lazyautosizes lazyload" sizes="auto" alt="Deploy the Google Apps Script project as a web app" style="" data-srcset="            https://www.ravsam.in/assets/images/resized/20/deploy-as-web-app.png 20w,            https://www.ravsam.in/assets/images/resized/64/deploy-as-web-app.png 64w,            https://www.ravsam.in/assets/images/resized/576/deploy-as-web-app.png 576w,            https://www.ravsam.in/assets/images/resized/960/deploy-as-web-app.png 960w,            https://www.ravsam.in/assets/images/resized/1400/deploy-as-web-app.png 1400w,            https://www.ravsam.in/assets/images/blog-assets/deploy-as-web-app.png 1408w" />
    
        <figcaption class="text-center text-muted mt-2 mb-4">Deploy the Google Apps Script project as a web app</figcaption>
    
</figure>

<h2 id="setting-up-a-html-form">Setting up a HTML Form</h2>

<p>On your static website, add the following Bootstrap form:</p>

<div class="language-html highlighter-rouge"><div class="highlight"><pre class="highlight"><code><span class="nt">&lt;form</span> <span class="na">id=</span><span class="s">"contact-form"</span> <span class="na">class=</span><span class="s">"needs-validation"</span> <span class="na">role=</span><span class="s">"form"</span> <span class="na">novalidate</span><span class="nt">&gt;</span>
    <span class="nt">&lt;div</span> <span class="na">class=</span><span class="s">"row"</span><span class="nt">&gt;</span>
        <span class="nt">&lt;div</span> <span class="na">class=</span><span class="s">"col-md-6"</span><span class="nt">&gt;</span>
            <span class="nt">&lt;div</span> <span class="na">class=</span><span class="s">"form-group"</span><span class="nt">&gt;</span>
                <span class="nt">&lt;input</span> <span class="na">type=</span><span class="s">"text"</span> <span class="na">name=</span><span class="s">"name"</span> <span class="na">class=</span><span class="s">"form-control"</span> <span class="na">placeholder=</span><span class="s">"Full Name"</span> <span class="na">required</span><span class="nt">&gt;</span>
            <span class="nt">&lt;/div&gt;</span>
        <span class="nt">&lt;/div&gt;</span>
        <span class="nt">&lt;div</span> <span class="na">class=</span><span class="s">"col-md-6"</span><span class="nt">&gt;</span>
            <span class="nt">&lt;div</span> <span class="na">class=</span><span class="s">"form-group"</span><span class="nt">&gt;</span>
                <span class="nt">&lt;input</span> <span class="na">type=</span><span class="s">"email"</span> <span class="na">name=</span><span class="s">"email"</span> <span class="na">class=</span><span class="s">"form-control"</span> <span class="na">placeholder=</span><span class="s">"Email"</span> <span class="na">required</span><span class="nt">&gt;</span>
            <span class="nt">&lt;/div&gt;</span>
        <span class="nt">&lt;/div&gt;</span>
        <span class="nt">&lt;div</span> <span class="na">class=</span><span class="s">"col-md-6"</span><span class="nt">&gt;</span>
            <span class="nt">&lt;div</span> <span class="na">class=</span><span class="s">"form-group"</span><span class="nt">&gt;</span>
                <span class="nt">&lt;input</span> <span class="na">type=</span><span class="s">"tel"</span> <span class="na">name=</span><span class="s">"phone"</span> <span class="na">class=</span><span class="s">"form-control"</span> <span class="na">placeholder=</span><span class="s">"Mobile No."</span> <span class="na">required</span><span class="nt">&gt;</span>
            <span class="nt">&lt;/div&gt;</span>
        <span class="nt">&lt;/div&gt;</span>
        <span class="nt">&lt;div</span> <span class="na">class=</span><span class="s">"col-md-6"</span><span class="nt">&gt;</span>
            <span class="nt">&lt;div</span> <span class="na">class=</span><span class="s">"form-group"</span><span class="nt">&gt;</span>
                <span class="nt">&lt;input</span> <span class="na">type=</span><span class="s">"text"</span> <span class="na">name=</span><span class="s">"service"</span> <span class="na">class=</span><span class="s">"form-control"</span> <span class="na">placeholder=</span><span class="s">"Service"</span> <span class="na">required</span><span class="nt">&gt;</span>
            <span class="nt">&lt;/div&gt;</span>
        <span class="nt">&lt;/div&gt;</span>
        <span class="nt">&lt;div</span> <span class="na">class=</span><span class="s">"col-12"</span><span class="nt">&gt;</span>
            <span class="nt">&lt;div</span> <span class="na">class=</span><span class="s">"form-group"</span><span class="nt">&gt;</span>
                <span class="nt">&lt;textarea</span> <span class="na">class=</span><span class="s">"form-control rounded"</span> <span class="na">rows=</span><span class="s">"8"</span> <span class="na">name=</span><span class="s">"notes"</span> <span class="na">placeholder=</span><span class="s">"Any Notes"</span> <span class="na">required</span><span class="nt">&gt;&lt;/textarea&gt;</span>
            <span class="nt">&lt;/div&gt;</span>
        <span class="nt">&lt;/div&gt;</span>
        <span class="nt">&lt;div</span> <span class="na">class=</span><span class="s">"col-12 mt-3"</span><span class="nt">&gt;</span>
            <span class="nt">&lt;button</span> <span class="na">class=</span><span class="s">"btn btn-primary"</span> <span class="na">type=</span><span class="s">"submit"</span> <span class="na">name=</span><span class="s">"submit"</span><span class="nt">&gt;</span>Submit request -<span class="ni">&amp;gt;</span><span class="nt">&lt;/button&gt;</span>
        <span class="nt">&lt;/div&gt;</span>
    <span class="nt">&lt;/div&gt;</span>
<span class="nt">&lt;/form&gt;</span>
</code></pre></div></div>

<blockquote class="alert alert-info">
  <p>You need to make sure that the form fields’ names are same as headers in the Google Spreadsheet.</p>
</blockquote>

<h2 id="setting-up-javascript">Setting up Javascript</h2>

<p>Finally, you need to add some Javascript to make AJAX call to the Google Apps Script:</p>

<div class="language-html highlighter-rouge"><div class="highlight"><pre class="highlight"><code><span class="nt">&lt;script </span><span class="na">src=</span><span class="s">"/assets/jquery/dist/jquery.min.js"</span><span class="nt">&gt;&lt;/script&gt;</span>
<span class="nt">&lt;script </span><span class="na">src=</span><span class="s">"/assets/popper.js/dist/umd/popper.min.js"</span><span class="nt">&gt;&lt;/script&gt;</span>
<span class="nt">&lt;script </span><span class="na">src=</span><span class="s">"/assets/bootstrap/dist/js/bootstrap.min.js"</span><span class="nt">&gt;&lt;/script&gt;</span>
<span class="nt">&lt;script&gt;</span>
    <span class="c1">// for validating the forms</span>
    <span class="p">(</span><span class="nf">function </span><span class="p">()</span> <span class="p">{</span>
        <span class="dl">'</span><span class="s1">use strict</span><span class="dl">'</span><span class="p">;</span>
        <span class="nb">window</span><span class="p">.</span><span class="nf">addEventListener</span><span class="p">(</span>
            <span class="dl">'</span><span class="s1">load</span><span class="dl">'</span><span class="p">,</span> <span class="nf">function </span><span class="p">()</span> <span class="p">{</span>
                <span class="kd">const</span> <span class="nx">formObject</span> <span class="o">=</span> <span class="nf">$</span><span class="p">(</span><span class="dl">'</span><span class="s1">#contact-form</span><span class="dl">'</span><span class="p">);</span>
                <span class="kd">const</span> <span class="nx">form</span> <span class="o">=</span> <span class="nx">formObject</span><span class="p">[</span><span class="mi">0</span><span class="p">];</span>
                <span class="k">if </span><span class="p">(</span><span class="nx">form</span> <span class="o">!=</span> <span class="kc">undefined</span><span class="p">)</span> <span class="p">{</span>
                    <span class="nx">form</span><span class="p">.</span><span class="nf">addEventListener</span><span class="p">(</span>
                        <span class="dl">'</span><span class="s1">submit</span><span class="dl">'</span><span class="p">,</span>
                        <span class="nf">function </span><span class="p">(</span><span class="nx">event</span><span class="p">)</span> <span class="p">{</span>
                            <span class="kd">const</span> <span class="nx">submitBtn</span> <span class="o">=</span> <span class="nf">$</span><span class="p">(</span><span class="dl">'</span><span class="s1">button[name="submit"]</span><span class="dl">'</span><span class="p">)[</span><span class="mi">0</span><span class="p">];</span>
                            <span class="nx">submitBtn</span><span class="p">.</span><span class="nx">disabled</span> <span class="o">=</span> <span class="kc">true</span><span class="p">;</span>
                            <span class="nx">submitBtn</span><span class="p">.</span><span class="nx">innerHTML</span> <span class="o">=</span> <span class="dl">'</span><span class="s1">Submitting request...</span><span class="dl">'</span><span class="p">;</span>

                            <span class="k">if </span><span class="p">(</span><span class="nx">form</span><span class="p">.</span><span class="nf">checkValidity</span><span class="p">()</span> <span class="o">===</span> <span class="kc">false</span><span class="p">)</span> <span class="p">{</span>
                                <span class="nx">submitBtn</span><span class="p">.</span><span class="nx">disabled</span> <span class="o">=</span> <span class="kc">false</span><span class="p">;</span>
                                <span class="nx">submitBtn</span><span class="p">.</span><span class="nx">innerHTML</span> <span class="o">=</span> <span class="dl">'</span><span class="s1">Submit request -&amp;gt;</span><span class="dl">'</span><span class="p">;</span>
                                <span class="nx">event</span><span class="p">.</span><span class="nf">preventDefault</span><span class="p">();</span>
                                <span class="nx">event</span><span class="p">.</span><span class="nf">stopPropagation</span><span class="p">();</span>
                            <span class="p">}</span>
                            <span class="k">else</span> <span class="p">{</span>
                                <span class="kd">const</span> <span class="nx">url</span> <span class="o">=</span> <span class="dl">'</span><span class="s1">https://script.google.com/macros/s/AKfycbxSF9Y4V4qmZLxUbcaMB0Xhmjwqxxxxxxxxxxxxxxxxxxxxxxx/exec</span><span class="dl">'</span><span class="p">;</span>
                                <span class="kd">const</span> <span class="nx">redirectSuccessUrl</span> <span class="o">=</span> <span class="dl">'</span><span class="s1">/thanks/</span><span class="dl">'</span><span class="p">;</span>
                                <span class="kd">const</span> <span class="nx">redirectFailedUrl</span> <span class="o">=</span> <span class="dl">'</span><span class="s1">/failed/</span><span class="dl">'</span><span class="p">;</span>
                                <span class="kd">const</span> <span class="nx">xhr</span> <span class="o">=</span> <span class="nx">$</span><span class="p">.</span><span class="nf">ajax</span><span class="p">({</span>
                                    <span class="na">url</span><span class="p">:</span> <span class="nx">url</span><span class="p">,</span>
                                    <span class="na">method</span><span class="p">:</span> <span class="dl">'</span><span class="s1">GET</span><span class="dl">'</span><span class="p">,</span>
                                    <span class="na">dataType</span><span class="p">:</span> <span class="dl">'</span><span class="s1">json</span><span class="dl">'</span><span class="p">,</span>
                                    <span class="na">data</span><span class="p">:</span> <span class="nx">formObject</span><span class="p">.</span><span class="nf">serialize</span><span class="p">(),</span>
                                    <span class="na">success</span><span class="p">:</span> <span class="nf">function </span><span class="p">(</span><span class="nx">data</span><span class="p">)</span> <span class="p">{</span>
                                        <span class="nx">submitBtn</span><span class="p">.</span><span class="nx">disabled</span> <span class="o">=</span> <span class="kc">false</span><span class="p">;</span>
                                        <span class="nx">submitBtn</span><span class="p">.</span><span class="nx">innerHTML</span> <span class="o">=</span> <span class="dl">'</span><span class="s1">Submit request -&amp;gt;</span><span class="dl">'</span><span class="p">;</span>
                                        <span class="nf">$</span><span class="p">(</span><span class="nx">location</span><span class="p">).</span><span class="nf">attr</span><span class="p">(</span><span class="dl">'</span><span class="s1">href</span><span class="dl">'</span><span class="p">,</span> <span class="nx">redirectSuccessUrl</span><span class="p">);</span>
                                    <span class="p">},</span>
                                    <span class="na">error</span><span class="p">:</span> <span class="nf">function </span><span class="p">(</span><span class="nx">data</span><span class="p">)</span> <span class="p">{</span>
                                        <span class="nx">submitBtn</span><span class="p">.</span><span class="nx">disabled</span> <span class="o">=</span> <span class="kc">false</span><span class="p">;</span>
                                        <span class="nx">submitBtn</span><span class="p">.</span><span class="nx">innerHTML</span> <span class="o">=</span> <span class="dl">'</span><span class="s1">Submit request -&amp;gt;</span><span class="dl">'</span><span class="p">;</span>
                                        <span class="nf">$</span><span class="p">(</span><span class="nx">location</span><span class="p">).</span><span class="nf">attr</span><span class="p">(</span><span class="dl">'</span><span class="s1">href</span><span class="dl">'</span><span class="p">,</span> <span class="nx">redirectFailedUrl</span><span class="p">);</span>
                                    <span class="p">},</span>
                                <span class="p">});</span>
                                <span class="nx">event</span><span class="p">.</span><span class="nf">preventDefault</span><span class="p">();</span>
                                <span class="nx">event</span><span class="p">.</span><span class="nf">stopPropagation</span><span class="p">();</span>
                            <span class="p">}</span>
                            <span class="nx">form</span><span class="p">.</span><span class="nx">classList</span><span class="p">.</span><span class="nf">add</span><span class="p">(</span><span class="dl">'</span><span class="s1">was-validated</span><span class="dl">'</span><span class="p">);</span>
                        <span class="p">},</span>
                        <span class="kc">false</span>
                    <span class="p">);</span>
                <span class="p">}</span>
            <span class="p">},</span>
            <span class="kc">false</span>
        <span class="p">);</span>
    <span class="p">})();</span>
<span class="nt">&lt;/script&gt;</span>
</code></pre></div></div>

<p>If the form submission is successful, your customer will be redirected to the <strong>Thanks</strong> page. However, if anything goes wrong, your customer will be redirected to the <strong>Failed</strong> page.</p>

<h2 id="results">Results</h2>

<p>Reload your website to reflect the changes you made. Fill the form by adding all the required details and submit the form.</p>

<figure class="mb-0 w-100 rounded">
    <img src="https://www.ravsam.in/assets/images/resized/20/ravsam-contact-form.png" width="100%" class="img-fluid rounded blur-up lazyautosizes lazyload" sizes="auto" alt="Fill out the sample website form" style="" data-srcset="            https://www.ravsam.in/assets/images/resized/20/ravsam-contact-form.png 20w,            https://www.ravsam.in/assets/images/resized/64/ravsam-contact-form.png 64w,            https://www.ravsam.in/assets/images/resized/576/ravsam-contact-form.png 576w,            https://www.ravsam.in/assets/images/resized/960/ravsam-contact-form.png 960w,            https://www.ravsam.in/assets/images/resized/1400/ravsam-contact-form.png 1400w,            https://www.ravsam.in/assets/images/blog-assets/ravsam-contact-form.png 1408w" />
    
        <figcaption class="text-center text-muted mt-2 mb-4">Fill out the website form</figcaption>
    
</figure>

<p>Hurray! You have received a notification sent by your <strong>Customer Leads</strong> bot.</p>

<figure class="mb-0 w-100 rounded">
    <img src="https://www.ravsam.in/assets/images/resized/20/slack-response.png" width="100%" class="img-fluid rounded blur-up lazyautosizes lazyload" sizes="auto" alt="Notification received in the Slack channel" style="" data-srcset="            https://www.ravsam.in/assets/images/resized/20/slack-response.png 20w,            https://www.ravsam.in/assets/images/resized/64/slack-response.png 64w,            https://www.ravsam.in/assets/images/resized/576/slack-response.png 576w,            https://www.ravsam.in/assets/images/resized/960/slack-response.png 960w,            https://www.ravsam.in/assets/images/resized/1400/slack-response.png 1400w,            https://www.ravsam.in/assets/images/blog-assets/slack-response.png 1408w" />
    
        <figcaption class="text-center text-muted mt-2 mb-4">Notification received in the Slack channel</figcaption>
    
</figure>

<p>Next, check your Google Spreadsheet as well and see whether the form response was recorded or not. You can see in the screenshot below that the form response has been successfully stored in the spreadsheet.</p>

<figure class="mb-0 w-100 rounded">
    <img src="https://www.ravsam.in/assets/images/resized/20/spreadsheet-response.png" width="100%" class="img-fluid rounded blur-up lazyautosizes lazyload" sizes="auto" alt="Form response recorded in Google Spreadsheet" style="" data-srcset="            https://www.ravsam.in/assets/images/resized/20/spreadsheet-response.png 20w,            https://www.ravsam.in/assets/images/resized/64/spreadsheet-response.png 64w,            https://www.ravsam.in/assets/images/resized/576/spreadsheet-response.png 576w,            https://www.ravsam.in/assets/images/resized/960/spreadsheet-response.png 960w,            https://www.ravsam.in/assets/images/resized/1400/spreadsheet-response.png 1400w,            https://www.ravsam.in/assets/images/blog-assets/spreadsheet-response.png 1408w" />
    
        <figcaption class="text-center text-muted mt-2 mb-4">Form response recorded in Google Spreadsheet</figcaption>
    
</figure>

<p>Using this workflow, you can get in touch with your customers as soon as possible and convert the leads into happy clients. Moreover, there is no need to set up servers and databases for collecting form responses on your website. You can use the same approach to collect comments on your blog posts as well.</p>]]></content><author><name>Ravgeet Dhillon</name></author><category term="development" /><category term="google-apps-script" /><category term="automation" /><category term="slack" /><category term="web-development" /><summary type="html"><![CDATA[Use Google Apps Script to collect form responses on a static website and get notified on Slack, all without setting up a server.]]></summary><media:thumbnail xmlns:media="http://search.yahoo.com/mrss/" url="https://www.ravsam.in/assets/images/blogs/collect-form-responses-using-google-apps-script.png" /><media:content medium="image" url="https://www.ravsam.in/assets/images/blogs/collect-form-responses-using-google-apps-script.png" xmlns:media="http://search.yahoo.com/mrss/" /></entry><entry><title type="html">How to achieve a redesign of your website?</title><link href="https://www.ravsam.in/blog/redesigning-your-website/" rel="alternate" type="text/html" title="How to achieve a redesign of your website?" /><published>2020-07-22T08:30:00+00:00</published><updated>2025-08-18T07:51:05+00:00</updated><id>https://www.ravsam.in/blog/redesigning-your-website</id><content type="html" xml:base="https://www.ravsam.in/blog/redesigning-your-website/"><![CDATA[<p>Over the past few months, we have been thinking about <strong>redesigning our website</strong>. Since the start of 2018, we have been using new tools, frameworks, and updated design guidelines for our customers’ websites. But our very own website was outdated, and no one from our team liked it anymore. So we decided to put some of our time in giving a fresh look and a performance boost that it deserved.</p>

<p>In this blog, we will discuss about technical tools and practices we used while working on this project.</p>

<h6 id="contents">Contents</h6>

<ul>
  <li><a href="#choosing-a-static-site-generator">Choosing a Static Site Generator</a></li>
  <li><a href="#setting-up-a-design-framework">Setting up a Design Framework</a></li>
  <li><a href="#git-version-control">Git Version Control</a></li>
  <li><a href="#handling-deployment">Handling Deployment</a></li>
</ul>

<h2 id="choosing-a-static-site-generator">Choosing a Static Site Generator</h2>

<p>Previously, we have been using WordPress for our website. At the start of 2018, we learned about the <a href="https://www.netguru.com/blog/what-are-static-site-generators">Static Site Generators</a>. They are secure, fast, and easy to configure. The best advantage of a Static Site Generator is its speed. It pleases your SEO team and search engine as well. It gives us the option to write pretty URLs that are easy to index and understandable for both the reader and the search engine crawler. For a non-technical customer, it can be integrated easily with the <a href="https://www.zesty.io/mindshare/marketing-technology/what-is-a-content-management-system-cms-the-complete-guide/">Content Management Systems</a> made especially for the Static Site Generators.</p>

<figure class="mb-0 w-100 rounded">
    <img src="https://www.ravsam.in/assets/images/resized/20/jekyll.jpeg" width="100%" class="img-fluid rounded blur-up lazyautosizes lazyload" sizes="auto" alt="A banner containing Jekyll logo" style="" data-srcset="            https://www.ravsam.in/assets/images/resized/20/jekyll.jpeg 20w,            https://www.ravsam.in/assets/images/resized/64/jekyll.jpeg 64w,            https://www.ravsam.in/assets/images/resized/576/jekyll.jpeg 576w,            https://www.ravsam.in/assets/images/resized/960/jekyll.jpeg 960w,            https://www.ravsam.in/assets/images/resized/1400/jekyll.jpeg 1400w,            https://www.ravsam.in/assets/images/blog-assets/jekyll.jpeg 1617w" />
    
        <figcaption class="text-center text-muted mt-2 mb-4">Jekyll is the most popular SSG for desiging blogs</figcaption>
    
</figure>

<p>For our website, we used <a href="https://jekyllrb.com/">Jekyll</a>, which is a Static Site Generator written in Ruby. It is the default Static Site Generator for the <a href="https://pages.github.com/">Github Pages</a> as well and has immense community support.</p>

<h2 id="setting-up-a-design-framework">Setting up a Design Framework</h2>

<p>Setting up a design framework is always a crucial task in the website redesign. For our <a href="/services/website-design/">website design projects</a>, we love to use a stable community-managed design framework. The reason for this is that it has been developed after years of iterations and from the contributions of the designers around the world. So we settled with the <a href="https://getbootstrap.com/">Bootstrap</a>. It is easy to use, customize, and helps in designing websites that not just look great but also perform well on different devices and browsers.</p>

<figure class="mb-0 w-100 rounded">
    <img src="https://www.ravsam.in/assets/images/resized/20/bootstrap.png" width="100%" class="img-fluid rounded blur-up lazyautosizes lazyload" sizes="auto" alt="A banner containing Bootstrap logo" style="" data-srcset="            https://www.ravsam.in/assets/images/resized/20/bootstrap.png 20w,            https://www.ravsam.in/assets/images/resized/64/bootstrap.png 64w,            https://www.ravsam.in/assets/images/resized/576/bootstrap.png 576w,            https://www.ravsam.in/assets/images/resized/960/bootstrap.png 960w,            https://www.ravsam.in/assets/images/blog-assets/bootstrap.png 1366w" />
    
        <figcaption class="text-center text-muted mt-2 mb-4">We created a beautiful and maintainable website with Bootstrap v4</figcaption>
    
</figure>

<h2 id="git-version-control">Git Version Control</h2>

<p>Git Version Control is one of the best innovations of the century. It helps the teams around the world to develop and maintain software collaboratively and iteratively. We use Github to host the code for our website. It allows our team to create issues, pull requests, and different versions of our website. In 2019, Github introduced a new feature called Github Actions. It allows us to <strong>create automated workflows</strong> that get triggered when a particular event happens on the git repository.</p>

<figure class="mb-0 w-100 rounded">
    <img src="https://www.ravsam.in/assets/images/resized/20/github.png" width="100%" class="img-fluid rounded blur-up lazyautosizes lazyload" sizes="auto" alt="A banner containing Github logo" style="" data-srcset="            https://www.ravsam.in/assets/images/resized/20/github.png 20w,            https://www.ravsam.in/assets/images/resized/64/github.png 64w,            https://www.ravsam.in/assets/images/resized/576/github.png 576w,            https://www.ravsam.in/assets/images/resized/960/github.png 960w,            https://www.ravsam.in/assets/images/blog-assets/github.png 1200w" />
    
        <figcaption class="text-center text-muted mt-2 mb-4">We use Github and Github Actions for automated deployments</figcaption>
    
</figure>

<p>We use Github Actions to test the quality of our website. The workflows run periodically to make sure that our website is free of any issues. We set up the workflows that use Lighthouse CI and send the test results back to our Slack channel. On every push to the master branch, a notification is sent to the Netlify to build a new version of the website.</p>

<h2 id="handling-deployment">Handling Deployment</h2>

<p>When we started our <strong>website redesign</strong>, there was a new tech stack in the market, <a href="https://jamstack.org/">JAMstack</a>. It is a new way of <strong>designing static websites</strong>. It offers faster performance, higher security, and better customer experience. The pages are built at the deploy time since they are static. This helps to minimize the time to the first byte. The pre-built files are delivered from the nearest CDN to the customer rather than a single server. <a href="https://www.netlify.com/">Netlify</a> is one such service that offers hosting for websites that use JAMstack. It eliminates the need to set up servers, DevOps, or costly infrastructure. It provides us with the opportunity to collect form responses from our website without setting any backend service.</p>

<figure class="mb-0 w-100 rounded">
    <img src="https://www.ravsam.in/assets/images/resized/20/netlify.png" width="100%" class="img-fluid rounded blur-up lazyautosizes lazyload" sizes="auto" alt="A banner containing Netlify logo" style="" data-srcset="            https://www.ravsam.in/assets/images/resized/20/netlify.png 20w,            https://www.ravsam.in/assets/images/resized/64/netlify.png 64w,            https://www.ravsam.in/assets/images/resized/576/netlify.png 576w,            https://www.ravsam.in/assets/images/resized/960/netlify.png 960w,            https://www.ravsam.in/assets/images/resized/1400/netlify.png 1400w,            https://www.ravsam.in/assets/images/blog-assets/netlify.png 1500w" />
    
        <figcaption class="text-center text-muted mt-2 mb-4">Host your websites on Netlify for free</figcaption>
    
</figure>

<p>Our website is hosted on Netlify too. Whenever a push is done to the master branch on our git repository, it triggers a build script on Netlify. The purpose of the build script is to convert our Jekyll source code into a static website. Once the website is available, it minifies the assets such as CSS, JS, images, and other optimizations to give a boost to the website speed. Once the build script finishes, the generated website is deployed by Netlify to its CDN around the world. After the <strong>website deployment</strong>, a Slack notification is sent by the Netlify bot to indicate that the process is complete.</p>]]></content><author><name>Ravgeet Dhillon</name></author><category term="design" /><category term="github-actions" /><category term="netlify" /><category term="jamstack" /><category term="bootstrap" /><category term="web-design" /><summary type="html"><![CDATA[Learn about the practices to use use while redesigning your website from scratch.]]></summary><media:thumbnail xmlns:media="http://search.yahoo.com/mrss/" url="https://www.ravsam.in/assets/images/blogs/how-to-achieve-a-redesign-of-your-website.png" /><media:content medium="image" url="https://www.ravsam.in/assets/images/blogs/how-to-achieve-a-redesign-of-your-website.png" xmlns:media="http://search.yahoo.com/mrss/" /></entry></feed>